Home » basics

Tag: basics

German Cream Cheese Buttercream aka Best-Ever Cream Cheese Frosting

Best-Ever Cream Cheese Frosting

German Cream Cheese Buttercream aka Best-Ever Cream Cheese Frosting
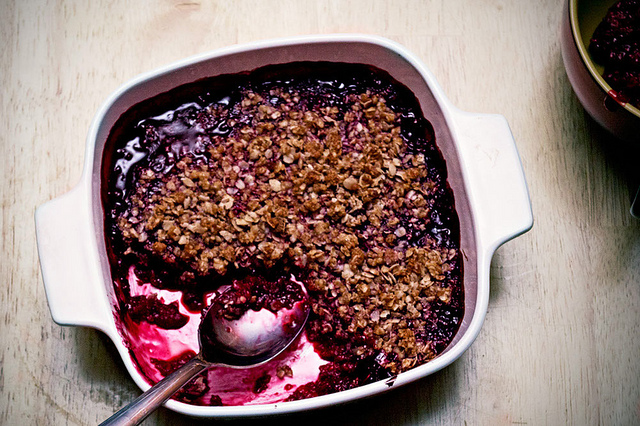
Things have been a little heavy here lately.

And we need to have a serious talk about frosting. Because it pains me when people say they don’t like frosting.

We can't be friends if you don't like frosting
via someecards

True story: I feel this way.

You have been fed a lot of bad frosting in your life. Heck, some of you even like it. (If you didn’t Betty Crocker wouldn’t have half an aisle in the grocery store filled with cans of the stuff). But that, and dreadful american buttercream (powdered sugar + butter + vanilla + milk) give frosting a bad rap.

But to just totally eliminate an entire category of pastry toppings because you don’t like the super-sweet, slightly gritty, dries out when left out kind? That would be like saying you don’t like any cake because you don’t like yellow cake.

You have heard of SMB (Swiss Merengue Buttercream) and a pastry chef friend of mine prefers the Italian Merengue Buttercream. Most bakers are familiar with American Buttercream (see above). But there is French Buttercream. And German Buttercream.

What does all that mean?

  • American Buttercream – The powdered sugar frosting we have all had a gazillion times. It is common because it is incredibly easy and fast. It stands up well to the elements (it doesn’t melt, it stiffens a little so it isn’t as delicate)
  • Swiss Merengue Buttercream (SMB) – Made from a cooked egg white & sugar mixture, this frosting is made by whipping the cooked whites and sugar, whipping them into a merengue and then adding butter and flavorings. It is the frosting technique that I use the most and makes a light & fluffy frosting.
  • Italian Merengue Buttercream – Similar to SMB, this is a merengue frosting, but instead of cooking the whites, you beat a hot sugar syrup into the egg whites.
  • French Buttercream – Instead of egg whites, a hot sugar syrup is beat into egg yolks and then combined with butter. This stuff is rich and incredibly decadent.
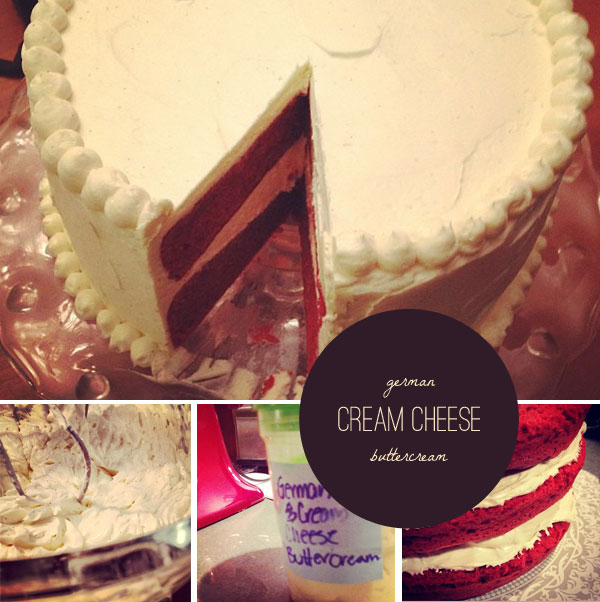
  • German Buttercream – You start with pastry cream, beat it and add butter. You can thank me later for introducing you to this.

This is German Cream Cheese Buttercream. And it is a dream.

It isn’t the best for piping pretty designs, but it really will rock your socks. (I might have overheard someone in the office compare it to ice cream that wouldn’t melt). That’s the thing with frosting.

Feed the frosting naysayers this. You will rock their socks hard core.

Best-Ever Cream Cheese Frosting

Author: Mary Fran Wiley
Prep time: 15 mins
Cook time: 5 mins
Total time: 20 mins
This recipe was adapted from [url href=”http://bravetart.com/recipes/GermanButtercream”]Brave Tart[/url] & [url href=”http://www.gilttaste.com/stories/2292-the-original-red-wine-velvet-cake-recipe”]Gilt Taste[/url]. It makes enough to frost & fill a 3 layer cake and pipe a decorative border or to decorate 48 cupcakes. This frosting will pipe simple designs like the one in the photo, but intricate piping techniques won’t hold up.
Ingredients
  • 16 ounces whole milk
  • 1 tablespoon vanilla bean paste
  • 10 ounces sugar (1¼ cups, by volume)
  • 1½ ounces cornstarch (6 tablespoons by volume)
  • 2 eggs
  • 2 egg yolks
  • 16 ounces cream cheese, room temperature
  • 16 ounces unsalted butter, room temperature
  • ¼ teaspoon salt, or more to taste
Instructions
  1. In a medium sauce pan, bring the milk to a simmer. Meanwhile, whisk together the sugar, cornstarch, eggs, and yolks in a medium bowl.
  2. Temper the egg mixture by whisking about a half cup of the hot milk into the egg mixture—it will be quite thick but while you whisk, it will loosen as the milk incorporates. Whisk in a little more hot milk until the egg mixture is fluid and warm. Pour the egg mixture back into the pot of hot milk with the heat set to medium and keep whisking.
  3. Once the mixture starts to thicken and bubble sluggishly, continue whisking and cooking for a minute more, then remove from heat and pour into a bowl.
  4. Put the custard in the bowl of a stand mixer fit with the whisk attachment and beat the custard for a few minutes, until it has cooled to room temperature and is creamy.
  5. Whip in the cream cheese, one tablespoon at a time, until it has fully incorporated. Then repeat with the butter. Add the salt and beat for about a minute more.
  6. Chill for about 15 minutes before using, if you want to be able to pipe with it.
Notes

You can make this a regular german buttercream by swapping the cream cheese for an equal amount of butter

3.1.09


gluten free chocolate chip cookies

Gluten-free chocolate chip cookies, a classic treat

gluten free chocolate chip cookiesLittle black dresses. Peep-toe pumps. Red lipstick. Cucumber sandwiches. Sunday Roasts. French vanilla anything. Chocolate chip cookies.

I am a fan of classic things.

I have a go-to red lipstick. A perfect pair of pumps. Almost all of my dresses are little black dresses. I know how to swing dance and salsa. I can waltz and cha cha. (I cannot for the life of me do the Cha Cha slide.) I still wear Chanel No. 5 whenever I put on a suit.

When I need cheering up? Breakfast at Tiffany’s. Some Celine Dion. (Ok, fine, and maybe some 90’s pop)

Classics endure.

Like brownies, Sunday roasts and chocolate chip cookies. All things that are always a good choice.

Yes, there happen to be 2 other recipes for gluten-free chocolate chip cookies on frannycakes (one a birthday cake cookie with chocolate chips, the other a toffee chocolate-chip cookie), but neither of them is just a classic chocolate chip cookie.

Gluten-free chocolate chip cookies, a classic treat
#ratingval# from #reviews# reviews
Print
Recipe Type: Cookie
Author: Mary Fran Wiley
Prep time: 20 mins
Cook time: 15 mins
Total time: 35 mins
Serves: 36
Ingredients
  • 350 (2 1/2 cups) grams gluten-free all purpose flour*
  • 1 teaspoon xantham gum**
  • 1 teaspoon baking soda
  • 1/4 teaspoon salt
  • 215 grams (1 cup, firmly packed) dark brown sugar
  • 50 grams (1/4 cup) granulated sugar
  • 225 grams (2 sticks or 1 cup) cold butter, cut into cubes
  • 2 large eggs
  • 1 tablespoon vanilla extract
  • 350 grams (2 cups) semi-sweet chocolate chips
Instructions
  1. Prepare cookie sheets with parchment paper, but do not grease them.
  2. In a medium bowl whisk together the gluten-free flour, xantham gum if using, baking soda, and salt.
  3. In the bowl of a stand mixer, blend the sugars at medium speed.
  4. Add the cold butter and mix to form a grainy paste, scraping down the sides of the bowl. You are not looking for light and fluffy, you just want to mix until they are evenly combined.
  5. Add eggs and vanilla extract and mix at medium speed just until blended. Scrape down the sides of the bowl and do not over mix.
  6. Add the flour mix in 2 parts with the mixer at a low speed just until mixed. Then stir in the chocolate chips until just combined
  7. Drop by rounded tablespoons onto prepared cookie sheet, two inches apart.
  8. Place the cookie sheet in the freezer while the oven preheats.
  9. Preheat oven to 375° F. (Or 300° F. for a flatter, more spread out cookie).
  10. Bake 12-15 (20-22 for the cooler temperature) minutes until golden. Transfer cookies immediately to a wire rack to cool.
Notes

*This recipe works best with Cup4Cup flour from Williams-Sonoma. It will work with other blends that are not bean-based and do not have leaveners already added. Better Batter or Jules Nearly Normal Flour will work well here. You could also use your favorite home made blend.
**Xantham gum is only necessary if your blend does not include a binding agent such as xantham gum, guar gum or expandex.

2.2.8


Wednesday Wisdom: Getting Started on a Gluten-Free Diet

When people ask me how to go about starting a gluten-free diet, I always tell them to keep it simple. My favorite foods are naturally gluten free—fruits and vegetables, rice, beans, nuts, seeds, seafood and poultry—foods that don’t require a label. Packaged products are fine occasionally, but you need to be a diligent label reader. Even the most minimally processed foods can contain gluten.


Ideally, home cooking should be part of every gluten-free lifestyle. When you cook, you know exactly what’s on your plate and what’s going in your body. Try one new recipe a week to build up your repertoire. There are plenty of gluten-free bloggers and cookbook authors out there ready to help!

Laura is the “Gluten Freedom” columnist for the Oregonian and author of The Gluten-Free Asian Kitchen. Find her blog, “Notes from a Gluten-Free Kitchen”, at http://www.laurabrussell.com/

gluten free broccoli quinoa superfood salad with radish and goat feta

Food Matters | Broccoli Quinoa Salad

This post is part of the Food Matters Project, a cooking collaboration from a wide range of food bloggers. Each week, I will cook a recipe from Mark Bittman’s Food Matters Cookbook, which places an emphasis on mindful and sustainable eating. Follow along with us! My posts for this project can be found here.

Today is a Food Matters day.

One problem, I quite dislike the main component for the recipe for this week’s post.

Read more

Pastry Basics: Pâte à Bombe

This fantastic creamy delight is one you need to have up your sleeve. Why? Because you can use up the egg yolks that are left over when you make something like merengue frosting or macarons. (Waste not, want not 🙂 ). Or maybe just because it is one of the most decadent things you might ever try. And that is before you use it as the base of something even more spectacular.

It might have a fancy French name, but this is not a complicated technique (unlike making a croissant or macarons). It is easy to make, takes just a few minutes to whip up and it will open doors to mousses, parfaits and French buttercream.

This is the opposite of Swiss Merengue. Instead of cooking the egg whites with the sugar, you cook the sugar with the water and whip it into the yolks. You are left with an incredibly smooth and silky sauce that is rich and perfect just the way it is. But then you add something, like melted chocolate and whipped cream, and you have dessert nirvana.

Pastry Basics: Pâte à Bombe
#ratingval# from #reviews# reviews
Print
Recipe Type: Sauce
Author: Mary Fran Wiley
Prep time: 5 mins
Cook time: 15 mins
Total time: 20 mins
Adapted from Joe Pastry, The Cake Bible and Sugarbaby.
Ingredients
  • 6 egg yolks
  • 170 grams (6 ounces or 3/4 cup + 2 tablespoons) sugar
  • 1 1/2 ounces (1 tablespoon + 1 1/2 teaspoons) water
  • 1/8 teaspoon salt
Instructions
  1. Place the egg yolks in the bowl of a stand mixer with the whisk attachment and beat til light and frothy.
  2. On the stovetop, over low heat, combine the sugar and water and stir til dissolved.
  3. Once the sugar is dissolved stop stirring and increase the temperature to medium-high and cook until sugar reaches 140 degrees on a candy thermometer.
  4. Carefully transfer the sugar to a glass measuring cup.
  5. Add about a third to the eggs and mix on medium high for about 30 seconds, repeat 2 more times, stopping to add the sugar syrup each time.
  6. Then beat for about 5 more minutes on high until the eggs are light and creamy and you have a marshmallowy texture.
Google Recipe View Microformatting by Easy Recipe
2.2.1


Mixing Methods – Egg Foam

The second installment in my series on mixing methods. (did you miss the first one on creaming?) This time we are talking about the egg foam method.

It sounds super exciting, right?

This is the method that is used for creating those super fancy French gateaux and genoise and jelly rolls. Oh, and angel food cake. This is the method that makes people thing that baking cakes from scratch is difficult.

Ok, this is a bit more involved than dumping a cake mix from a box into water and eggs, but the results are worth it. Really. 15 extra minutes for a delicate and light cake. I promise. Better gluten free cakes await.

In this method, we get all of our lift from the air we add to the eggs. None of it is coming from a chemical source and we are not cutting air pockets into our butter. When you make cakes this way, you use melted butter or oil to moisten and tenderize. Gluten free goods tend to be dense and chewy. We should use this method more.

This method is used in many european style cakes. Why? Typical European flours have less gluten than American varieties. So the cakes rely on the eggs to create the structure, not the gluten proteins from the flour.

This method of mixing uses the protiens of the eggs to create structure, the sugar to tenderize and oil to moisten. In traditional baking, you use this method when you want the least possible gluten formation, so why don’t we have more recipes that use this method? Because they aren’t traditional American butter or chiffon cakes. But they are darn tasty.

The nitty gritty:

You must whip your eggs. Whip ’em real good. You want them to double or triple in volume (depending if you are using yolks, whites or whole eggs). You usually add in a small amount of sugar when they are at a soft peak. If you are whipping whites and yolks separately, you whip the yolks first and then the whites. You then fold in your flour and mix about a quarter of your foam mixture with your liquid fat. This small amount will deflate, but will help the fat mix without separating or deflating your entire mixture. You then fold in that mxture and bake promptly.

Time is not on your side with this technique. The longer the eggs sit, the flatter they become. And the more dense your cake will be.

How easy is that? I used this technique when making my gluten-free swiss roll cake.

Go forth and bake light and fluffy cakes!


Mixing Methods – Creaming

While answering questions on Facebook last week, I realized that many people who are baking gluten-free don’t actually know that much about baking.

A person was upset over all of her baked goods being quite dense and crumbly. I know that my first batch of brownies after going gluten-free was actually quite atrocious. There are a million things that could be wrong, from the recipe itself, to the flours chosen to the technique used.

Gluten-free baking requires patience, practice and technique. But this isn’t much different from regular baking.

Except that you probably have more practice with how batters should look when they are made with regular flour rather than gluten free flour.

This series is going to cover everything from mixing methods, to baking tools and other skills for your arsenal.

Today, the most common mixing method. Creaming.

Most baking recipes (well, those not for fancy pastries), start out by telling you to cream the butter and sugar.

First, the science.

(oi, all my high school science teachers are having heart attacks at the thought of me talking about science).

What you are doing when you beat the butter and sugar together is creating little pockets of air where the sugar cuts through the fat. The lighter this mixture is when you are done, the lighter and more delicate your crumb will be. Because you added lots of air.

You then create an emulsion with the sugar mixture and the eggs. You need to add them one at a time. For the same reason you stream your oil into your vinaigrette while whisking, you need to combine 2 things (oil and water) that do not like to play nice.

You also need to alternate adding liquid and dry ingredients. Why? If you add all the liquid ingredients at once, your flour will lump and clump when you add it and it will cause you to over mix your batter trying to get it smooth. And an over mixed batter is dense and not so good.

How to make it work.

You need your ingredients at a cool room temperature – meaning you should take the eggs & butter out a few hours before baking. Your butter should be the texture of soft ice cream. It should not be so soft that when you touch it, it squashes completely.

A stand mixer works best for this method. (I use Old Faithful, a 30+ year old Kitchenaid stand mixer).

You first whisk together all of your flours, chemical leaveners (baking powder or baking soda) and salt. You want the leavener to be evenly distributed for an even rise.

In the bowl of your stand mixer, place your sugar and your butter. Start slowly so you don’t send sugar flying, and bump up the speed to medium. (High will create too much friction and melt your butter)

Beat until the sugar mixture turns light and fluffy. It will expand slightly in vloume. Next, you beat in the eggs one at a time. I have read that putting them in a bowl of warm water first helps them beat up better, but if you have left them out for an hour or two, you should be good.

Once the eggs are combined (and the bowl has been scraped down), you alternate adding the flour and any liquid ingredients.

See, it just takes a little bit of time (about 15 minutes max).

Next time your recipe calls for creaming, take your time and remember that a little patience goes a long way.


savory buckwheat crepe with poached egg, chevre and home made ketchup

Buckweat Crepes

buckwheat crepe with blueberry syrupMy friend, Sabina and I met under awkward circumstances. She was hired to do the job I was doing as temp to hire. When the other french speaker in the office and I first met her, we thought she had been brought in to speak spanish. I really wanted to hate her. But she was sweet, and funny. And, she spoke french.

We spent lunches speaking in french so no one could understand us complaining about our boss. French words would slip into our English conversations and vice versa. She is also the one who gave Blondie his nickname. It was at lunch one day and the name just kind of stuck.

One sunday afternoon, when we were no longer working together, we decided to meet up for crepes at this little creperie in the suburbs. It is a fantastic little place, and if you ever have reason to be in that part of the Chicago suburbs, you should go.

But they have a gluten-free menu. And they make crepes from buckwheat. I found out while talking to the chef that the buckwheat isn’t a strange ingredient in Brittany, it is actually a traditional way to make a savory crepe.

savory buckwheat crepe with poached egg, chevre and home made ketchup

Sabina ordered her crepe complete, and I had mine with ratatouille. Then we had a dessert version with Nutella. The earthy, nutty flavor of the buckwheat stood up to the complex flavors of the savory fillings and was complemented by the nutty chocolate of the Nutella.

I had to make them for myself because even when I go to visit Blondie, the creperie is a bit of a drive.


I made some galletes de sarrasin for breakfast this morning and filled them with a poached egg, chevre and some home-made ketchup. Then I had a second with blueberry ginger syrup. It was a good Sunday.

Galettes de Sarrasin – Buckwheat Crepes
#ratingval# from #reviews# reviews
Print
Recipe Type: Breakfast
Author: Mary Fran Wiley
Prep time: 5 mins
Cook time: 30 mins
Total time: 35 mins
Serves: 6
These crepes have an earthy and nutty flavor.
Ingredients
  • 120 grams (1 cup) buckwheat flour
  • 3 eggs, lightly beaten
  • 1 ½ cups water
  • teaspoon salt
Instructions
  1. Combine the eggs and water and then add the flour and salt. Make sure everything is well mixed.
  2. Cover and let rest for at least 1 hour. (I put mine in the fridge over night).
  3. Heat a small skillet over high heat. You want the pan very hot.
  4. Once the pan is hot, add a small amount of butter (a thin slice) to the pan. Once it is melted, take a paper towel and swirl the butter around. (You can use tongs to hold the paper)
  5. Lower the heat to medium-high. Pour about 1/6 cup of batter and tilt the pan to coat the bottom with the batter. You need to move quickly to do this.
  6. Cook the crepe for 1-2 minutes. Once the shine is gone from the batter being wet, it is ready to flip.
  7. Cook for an additional minute or so on the second side.
  8. Stack the crepes on a plate in a warm oven until you are ready to serve.
Notes

Add a teaspoon of sugar if you want to make sweet crepes. If you don’t like that strong of a buckwheat flavor, you can swap out some of the buckwheat for sorghum or brown rice flour.
If you have extra, you can freeze them on a cookie sheet for about half an hour and then stack them in freezer bags. You will then be able to eat them one at a time.

Google Recipe View Microformatting by Easy Recipe
1.2.4


gluten free raspberry crisp

Raspberry Crisp

gluten free raspberry crisp

Fruit crisps are one of the easiest desserts to whip up.

You know, when you find raspberries at the farmer’s market (or you find a bag of frozen raspberries in your freezer that you didn’t know you had). Or someone drops by for sangria on the porch and you want to serve something yummy.

This is a dessert that I learned from my mother, and is more of a guideline than a recipe. It can be thrown together in a couple of minutes, popped into the oven and left alone. It uses ingredients that we always have on hand, and can be adapted and changed to use what ever is in your kitchen. Just don’t melt the butter, or you will end up with a mushy crust.

Boys, if you need to do something sweet for a girl, this dessert, topped with a wee bit of vanilla ice cream is a winner. (You hear that Blondie? Even you could make this).

Raspberry Crisp
#ratingval# from #reviews# reviews
Print
Recipe Type: Dessert
Author: Mary Fran Wiley
Prep time: 10 mins
Cook time: 35 mins
Total time: 45 mins
Serves: 4
Really, this could be breakfast.
Ingredients
  • 2 cups fresh or frozen raspberries*
  • 1/8 cup sugar (if a sweeter dessert is desired)
  • 1 cup gluten free oats*
  • 1/4 cup butter, softened
  • 1/4 cup brown sugar
  • 1 teaspoon vanilla
  • 1 teaspoon cinnamon
  • salt to taste
Instructions
  1. Preheat oven to 425 degrees.
  2. Grease a small baking dish (8in square-ish).
  3. Pour in berries and sprinkle with sugar. (I didn’t use it, but if your berries are extra tart, you can add it in).
  4. In a mixing bowl add softened butter, oats, brown sugar, cinnamon and vanilla.
  5. Mix with your hands until combined.
  6. If the mixture is too crumbly, add a little butter. Too loose? Add some oats. Not sweet enough? Add a little more brown sugar.
Notes

If you can’t eat oats, quinoa flakes will work here. Also, make sure they are gluten free.
You can swap out the berries for any fresh or frozen fruit.

Google Recipe View Microformatting by Easy Recipe
1.2.4

Oats, sugar, butter, vanilla, fruit and complimentary spices. Mix the crust with your hands. Not enough? Mix some more.

Chai Cream Puffs

Ratio Rally: Pâte à Choux

cream puuffsgluten free ratio rally logoI am a joiner. And this time it was for something really great – the blogging event started by Shauna at GlutenFreeGirl – the Gluten Free Ratio Rally. It is all about the relationship between the ingredients. It gives you freedom to just cook. And bake. We start with a ratio for a well known (& loved) product and go from there.

This month’s rally was Pâte à Choux. A perfect opportunity to indulge in French pastry. I adore french pastries. (Okay, I adore all pastries). This particular technique for pastry dough has many applications – from sweet to savory, I had to stop myself from cooking myself into a sugar coma. After reading up on the dough, I found out that there are so many different things that you can make with this dough. There were the usual: eclairs, gougeres and profiteroles (cream puffs), the extravagant: croquembouche (a large number or profiteroles) and St. Honoré Cake, the surprising: churros and the one I had never heard of and absolutely had to make and make my own: Marillenknödel.

Chai Cream Puffs

I needed to start with the basic Pâte à Choux. The ratio here is 2:1:1:2. 8 ounces liquid, 4 ounces fat, 4 ounces flour, 4 eggs (8 ounces). Simple math and stunning results.  Getting this dough right, once you understand what is happening, is simple (although easy to mess up). This recipe works in traditional baking, not because of gluten, but because of the starches and the eggs. Like all baking (especially pastries) it is important that you pay close attention to what you are doing. There are a very specific chain of chemical reactions taking place.

This mix works because there is a good mix of starches & whole grains. If you need to know what flours to swap for (the brown rice & sorghum are whole grains, the sweet white rice and tapioca are starches), you can reference this chart. Only replace starches with starch and grains with grains for predictable results.

If you want to read about my foray into German apricot dumplings, read part 2 of this post.

A special thanks to Erin at the Sensitive Epicure for hosting this month’s event!

And here is a list of this month’s participants:

[box type=”info”]If you have never baked by weight, I encourage you to try it. Scales can be obtained relatively inexpensively and help you to achieve consistent results in your baking. [/box]

Gluten Free Pate a Choux with Chai Pastry Cream
#ratingval# from #reviews# reviews
Print
Recipe Type: Dessert
Author: Mary Fran Wiley
Prep time: 60 mins
Cook time: 40 mins
Total time: 1 hour 40 mins
Serves: 24
Cream Puffs with a spicy twist
Ingredients
  • 8 oz (by weight) whole milk (a scant cup)
  • 4 oz (1 stick) butter
  • 1.2 oz sorghum flour
  • 1.2 oz brown rice flour
  • 8 oz tapioca flour
  • 8 oz sweet rice flour
  • 4 eggs
  • 1/4 teaspoon xantham gum
  • 1/2 teaspoon salt
  • 1/4 cup cornstarch
  • 1/4 cup + 1/2 cup sugar
  • 21/4 cups milk
  • 2 T loose chai tea
  • 4 large egg yolks, lightly beaten
  • 1 pinch salt
  • 2 tsp vanilla extract
  • 2 T unsalted butter
Instructions
  1. Make the choux: Whisk flours, cardamom & xantham gum together. Boil milk, butter & salt. Reduce heat to medium and add the flour all at once. Stir until ingredients start to pull away from the sides of the pot. Remove from heat & put in the bowl of a stand mixer. Add eggs one at a time, incorporating each one before adding the next one. Chill the dough covered for at least half an hour.
  2. Make the chai milk: Simmer the milk and chai over medium-low heat for 20 mins, stirring occasionally. Strain milk into measuring cup, discarding any extra.
  3. Make your puffs: Preheat oven to 425 degrees.Spoon small mounds of dough onto a parchment lined baking sheet about 2 inches apart. Bake for 20 mins and then reduce temperature and bake for another 20 mins. Remove from oven and let sit for 5 mins. Poke a hole in the bottom (with a skewer and transfer to a cooling rack.
  4. Prepare the pastry cream. While the puffs are cooling. whisk together cornstarch and 1/4 cup sugar in a mixing bowl. Stir in 1/2 cup of the milk. Blend yolks into the mixture, stirring until smooth. Prepare an ice bath (a very large bowl filled with ice & water – it should be a bowl that the sauce pan you are using does not quite fit in). Combine remaining milk (1 1/2 cups), salt and sugar (1/2 cup) in a medium sized sauce pan (non-reactive is ideal). Bring to a boil over medium heat while stirring constantly. Temper the egg mixture with about 1/3 of the hot milk (you have to whisk constantly – you do not want to cook the eggs unevenly) Add egg mixture to remaining milk mixture and return the pan to the heat. Continue to cook over medium heat, vigorously stirring with a whisk until the mixture boils and a trail forms after the whisk, about 5-7 minutes. Transfer pan to the ice bath and stir occasionally until the pastry cream is cool.
  5. Assemble the puffs. Once everything is cool, slice the top third off of your puffs and pipe in the pastry cream. Melt white chocolate in the microwave on medium power, stirring every 30 seconds until melted. Replace tops and drizzle with white chocolate. Share.
Notes

To cook by volume: use 1 cup of sifted flour. No tapping of the measuring cup. You want 4 ounces of flour, which is the average weight of a cup of cake flour. You want 7/8 cups of whole milk.

Google Recipe View Microformatting by Easy Recipe
1.2.4