Home » pastry cream

Tag: pastry cream

a recipe for mini gluten-free boston cream pies by frannycakes

Mini Gluten-Free Boston Cream Pies

I really think that my coworkers are trying to stump me when it comes to making them birthday treats. Pulling whatever kind of flavor they can out of their heads to see if I really can do it. I mean, we had gluten-free peanut butter & jelly cupcakes and gluten-free double chocolate peanut butter cupcakes this summer.

learn to make gluten free boston cream pie on frannycakes.com

This time the request was for Boston Cream Pie Cupcakes – something that was actually a bit more traditional and a little less out there.

I decided that I was bored with the core & fill kind of cupcake, so I went a different route with these – I used a mini whoopie pie pan to make the cake pieces and then piped in some filling and poured on a thick glaze. And ended up with two-bite treats that were all gone before lunch.

chopped chocolate for chocolate glaze

The only caveat is that these do not transport well. If you try to take them on your 2-train 2-hour commute, they might just get a little banged up before you get them in to the office. (It won’t effect the flavor, but it might bruise your ego a wee bit). If these need to make a trip, I would bring all the components and assemble on-site. It takes about 10 minutes to combine all the parts into lovely little gluten-free boston cream (whoopie) pies.

a recipe for mini gluten-free boston cream pies by frannycakes

Mini Gluten-Free Boston Cream Pies
Recipe Type: Dessert
Cuisine: American
Author: Mary Fran Wiley
Prep time: 45 mins
Cook time: 25 mins
Total time: 1 hour 10 mins
Serves: 24
These are fun, but don’t travel well, so assemble shortly before serving.
Ingredients
  • For the Cakes
  • 175g (1¼ cups) gluten-free cake flour (143g high-quality all-purpose gluten-free flour + 4 tablespoons (32g) cornstarch)*
  • ½ teaspoon xanthan gum (omit if your blend already contains it)
  • ½ teaspoon baking powder
  • ¼ teaspoon baking soda
  • ¼ teaspoon kosher salt
  • 109 grams (½ cup) packed light brown sugar
  • 28 grams (2 tablespoons) unsalted butter, melted and cooled
  • 24 grams (2 tablespoons) vegetable shortening, melted and cooled
  • 1 extra-large egg at room temperature, beaten
  • 1 teaspoon vanilla bean paste (or replace with equal volume pure vanilla extract)
  • ½ cup + 2 tablespoons buttermilk
  • For the pastry cream
  • 30 grams (1/4 cup) cornstarch
  • 150 grams (3/4 cup) sugar, divided
  • 2 cups milk (I don’t drink milk, so I almost always use almond milk) , divided
  • 4 egg yolks
  • 1 teaspoon vanilla bean paste
  • 2 tablespoons butter
  • pinch of salt
  • Chocolate Glaze
  • 130 grams (4.5 ounces) bittersweet chocolate, roughly chopped
  • 60 grams (4 tablespoons) butter
  • 1 tablespoon corn syrup
Instructions
  1. Preheat your oven to 325 degrees F and grease a mini whoopie pie pan.
  2. In a large bowl, place the flour, xanthan gum, baking powder, baking soda and salt and whisk to combine well.
  3. Whisk in the brown sugar, making sure you remove any lumps.
  4. Next, mix in the butter, shortening, egg and vanilla and make sure everything is well combined.
  5. Now, add the milk and vinegar, and mix again to combine well. You will have a batter that is somewhere between cake batter and cookie dough in consistency.
  6. Using a small scoop or you can pipe about as much as a large marble to each well of your whoopie pie pan.
  7. Bake on a center rack for 8-10 minutes, or until the cakes bounce back when pressed gently in the center. Remove from the oven and allow to cool in the pan for 10 minutes before transferring to a wire rack to cool completely. Repeat with the remaining batter.
Make the pastry cream
  1. Prepare an ice bath.
  2. In a small mixing bowl, combine ¼ cup sugar, egg yolks and the creamer (or ½ cup milk).
  3. In a medium sauce pan over medium heat, bring the remaining 1½ cups milk to a boil, stirring constantly.
  4. Remove from heat and add the hot milk to the egg mixture about a third at a time to temper the eggs. If you do this too fast you will end up with scrambled egg yolks and not a smooth cream.
  5. Return the pot to the stove and add the egg mixture. Over medium heat, keep whisking until the cream thickens and when you scrape the bottom of a pot, the cream does not close the gap immediately. Stir in the vanilla, salt and butter.
  6. Put the pot over your ice bath and stir every 5-10 mintues for about half an hour, or until the cream has cooled.
Make the glaze
  1. When you are ready to assemble the mini boston cream pies, melt together the chocolate, butter and corn syrup over low heat. If the mixture is not pourable, add an extra tablespoon of butter.
Assemble the cakes
  1. Pipe the pastry cream onto half of the cake pieces. Take one of the other cake pieces and top each one. Pour or spread chocolate glaze on each mini Boston cream pie.
Notes
*I use Cup4Cup Gluten-Free All-Purpose flour, and if you don’t have cornstarch, you can use it for the full amount called for here, the cakes will just be a little denser. This recipe will work with almost any GF AP Blend but it will not work with bean-flour based blends or baking mixes that contain baking powder or baking soda.
3.2.2124


GF Ratio Rally: Raspberries & Cream doughnuts

raspberries and cream gluten free doughnut montage

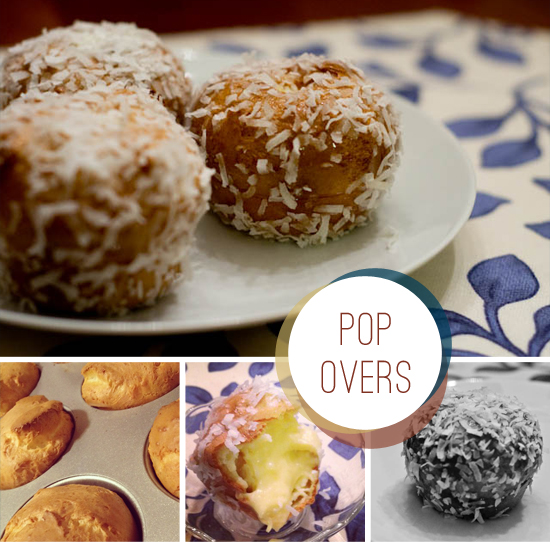
I might have a thing for doughnuts. I made 3 kinds of baked doughnuts earlier this summer with grown up flavors like honey lavender and ginger brown butter. (I might have also shown you that I have a ridiculous sweet tooth with those powdered sugar doughnuts).

When we were kids, doughnuts were a special tradition. On the morning of my first day of first grade, the ceiling collapsed in the kitchen. The fan was still spinning while it was sitting on the kitchen table. My dad, the breakfast superhero, couldn’t cook. So, he did what any dad would do. He went out to get doughnuts and started a tradition that lasted until I went away to college.

My favorites? Chocolate snowballs (powdered sugar-covered, chocolate whipped cream filled), Boston Creme and strawberry. Oh and pumpkin or apple spice doughnuts.

gluten free ratio rally logo

For this month’s Gluten Free Ratio Rally (in which we all create a recipe based on a ratio – you can learn more at Shauna’s introductory post), Meg thought we should all make doughnuts or fritters. The timing was perfect. School has just started; the air was cool this morning. And I had a whole bottle of canola oil.

My first two attempts at doughnuts were miserable failures. I tried one where you create a yeast sponge that you let sit overnight (hockey pucks) and another with the ratio that everyone else seemed to find workable (sand).

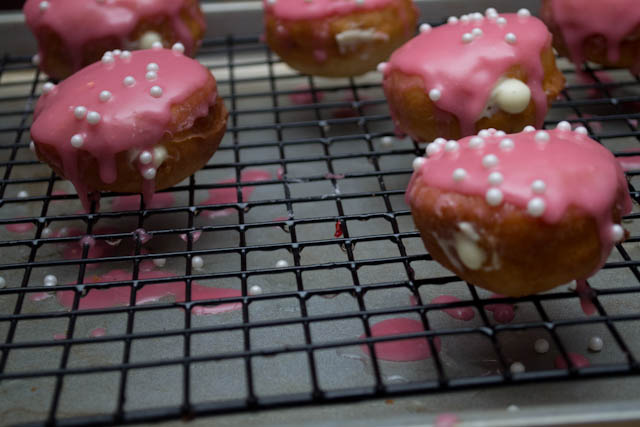
I sat down and did some math from recipes of chefs I admire (Jamie Oliver, Baked, Alton Brown, etc.). My ratio is radically different from the other ones that you will see. I used no eggs. I used a lower flour to liquid ratio. But I ended up with doughnuts that are like eating clouds. They were good plain (I had to taste to make sure), they were excellent with just the glaze (again, I had to taste them to verify) and they were pretty close to perfection once I filled them with cream and dipped them in the glaze again.

My ratio was 3:2:1:1. Flour:Liquid:Sugar:Fat. Pretty simple. You can scale this recipe down if it is just for 2 or scale it up to feed a small army.

If you are going to buy a flour blend, I made some of these with the Cup4Cup flour from Williams-Sonoma (that bag cost $20! You better believe I will be baking with it). You will have equally fantastic results with Jules’ Nearly Normal Flour. Want to blend your own? There is a break down in the recipe notes on how to do this.

Yeast doughnuts are not for the time-pressed, and I made these a little more complicated than just your basic doughnut. There is time involved (lots of waiting). You don’t have to fill yours, or cook raspberries to make a juice. (I also used the pulp to flavor my yogurt and cooked the leftover juice into a syrup for adding to bubbly water).

Think of the doughnut as a blank canvas with infinite possibilities. And then think of just how worth it a warm straight-from-the-fryer doughnut is. (KrispyKreme did not end up all over the country for nothing! Warm doughnuts are a superb treat).

Before the recipe magic, here are links to all the other participants in this month’s event, hosted by Meg at Gluten-Free Boulangerie 

Charissa  from Zest Bakery made Picarones (Sweet potato/pumpkin fritters)
Jenn from Jenn Cuisine made Mini raspberry doughnut cakes
Lisa from Gluten Free Canteen made Apple Butter Maple Syrup Donuts, GF 
gretchen from kumquat made peach cider doughnuts
Brooke from  B & the boy! made Apricot Fritters 
Meg from Gluten-Free Boulangerie made Old-fashioned raised doughnuts & cake doughnuts
Rachel from The Crispy Cook made Chocolate Doughnuts with Chocolate Glaze
Caneel from Mama Me Gluten Free Thai Fried Bananas
Jean Layton made Cinnamon Apple FrittersOK
Silvana from Silvana’s Kitchen Vanilla-Glazed Chocolate Chip Doughnuts 
Claire from Gluten Freedom made Chocolate Coconut or Cinnamon-Glazed Vanilla Cake Donuts 
Jeanette from Jeanette’s Healthy Living made Pumpkin Spice Donuts
Shauna from Gluten-Free Girl & the Chef made Gluten-free yeast doughnuts 
Caliegh from Gluten Free(k) made Beetroot Fritters
TR from Nobody Likes Crumbly Cookies made Sweet Pepper Fritters 
Pete from No Gluten, No Problem made doughnut holes
Britt from GF in the City made fritters
Tara from A Baking Life made Gluten Free Brioche Doughnuts 
Irvin from Eat the Love made Vanilla Doughnuts

Gluten Free Raspberries & Cream doughnuts
#ratingval# from #reviews# reviews
Print
Recipe Type: Breakfast
Author: Mary Fran Wiley
Prep time: 2 hours 30 mins
Cook time: 10 mins
Total time: 2 hours 40 mins
Serves: 6
I really love doughnuts and this recipe has you making every last bit from scratch. But don’t worry. I won’t tell anyone that you decided to fill them with store bought jam and didn’t make a glaze but topped them with powdered sugar instead. No matter what, as long as the dough is right, you can’t go wrong.
Ingredients
  • 160 ml milk (I used SoDelicious), warmed
  • 35 grams sugar
  • 250 grams (2 cups +1 tablespoon) all-purpose gluten free flour*
  • 7 grams (1 t) active dry yeast
  • 40 grams (2.5 T) butter or EarthBalance
  • 1 teaspoon vanilla bean paste (or vanilla extract if you don’t have the paste)
  • Pinch salt
  • 3 tablespoons butter
  • 1/2 cup raspberry juice**
  • 1 cup powdered sugar
  • 1 cup [url href=”http://frannycakes.com/recipes/master-recipes-pastry-cream/”]pastry cream[/url]
  • 1 cup heavy cream or coconut milk cream
Instructions
  1. Measure out your ingredients and prepare a mise en place.
  2. In a small bowl combine warm milk, a teaspoon of your sugar, a tablespoon of your flour and your yeast. Let sit for about 15 minutes – the mixture should have produced a decent amount of foam.
  3. In the bowl of a stand mixer combine the remaining flour, sugar, butter, vanilla and salt.
  4. Add in the yeast mixer and mix to combine. Once combined, turn the mixer speed to low-medium (mine was on 3) and let the dough “knead” for about 10 minutes.
  5. Watch the dough, if it is impossibly sticky add a little more flour a teaspoon at a time. (It was a bit humid in my apartment and I ended up adding 2 teaspoons of flour).
  6. After 10 minutes, place the dough in a greased bowl in a warm spot (my microwave is the warmest spot in my kitchen). Cover with plastic wrap or a damp towel. If you have a spare bowl for your mixer, pop it and the whisk attachment (or any bowl and the beaters for your hand mixer) into the freezer. You need it good and cold to whip the cream.
  7. Let the dough raise for 45 mins-1 hour. It should have just about doubled in size.
  8. Roll out the dough to ½” thickness and cut it into small circles (I used a small cup and they were about 2.5” in diameter.) Place them onto a greased baking sheet. Keep re-rolling the dough until you use it all up. (I got 15 mini-doughnuts from this recipe).
  9. Let them rise for another 45 minutes.
  10. While the doughnuts are raising, melt the 1 ½ tablespoons butter and combine it with ½ cup raspberry juice and ½ cup powdered sugar. Whisk until smooth. If it is too runny, add more powdered sugar, too stiff add more liquid
  11. With about 10 minutes of rising time left, heat 1 quart of oil in a big, deep pot (I used my 5 quart dutch oven). You want it to be about 370 degrees.
  12. Fry the doughnuts for about a minute on each side. You want them to turn a nice golden color.
  13. Set on a cooling rack.
  14. Once all the doughnuts are fried and are cool enough to touch, dip them into the glaze. This first dip doesn’t have to be perfect – it just helps the flavor seep into the doughnut.
  15. Take your bowl and whisk out of the freezer. Beat the heavy cream or non-dairy cream until you have stiff peaks. Add the pastry cream and beat about a minute more, until you have a uniform cream.
  16. Fit a pastry bag with a narrow plain tip and fill it with the filling (the fancy name for this is diplomat cream).
  17. Poke holes in the sides of all of your doughnuts with a skewer and then insert the pastry tip in the hole. Squeeze about 1 ½ tablespoons of filling in each doughnut.
  18. Dip them one more time in the glaze and top with sprinkles (optional).
Notes

*If you are not using a pre-blended flour, you can either use [url href=”http://glutenfreegirl.com/gluten-free-holiday-baking-2010/”]Shauna’s All-Purpose Blend[/url] and add 2 teaspoons xantham gum. Whisk well before using.
Or you can make your own with 90 grams (3/4 cup) tapioca starch, 100 grams (1/2 cup) sweet white rice flour, 60 grams (1/2 cup) sorghum flour. Add 2 teaspoons xantham gum and whisk together well to ensure that the gum is spread throughout the flour.
**I made mine by cooking a half pint of raspberries in 2 cups of water with a half cup of sugar for about 30 minutes – you can use store bought or just use milk and vanilla extract

Google Recipe View Microformatting by Easy Recipe
2.1.7


Mulberry tart

Mulberries

mulberry tree! This recipe tastes like childhood. It brings back the days of coming home when the sun went down and playing across every back yard on the block. It tastes like sitting on my dad’s shoulders and grabbing berries from trees as we walked to and from the ice cream shop or a movie. There were a couple of mulberry trees that every summer would be heavy from juicy, sweet berries. It was my favorite part of the walk. My hands would be stained purple from berries when they burst. My shoes would have gooey purple messes on the bottoms. It was summer. At it tasted good.

Imagine how excited I was to discover that there is a mulberry tree in my backyard. Right there, shading my tomato plants. A tree heavy with the flavor of childhood summers.

mulberries

I couldn’t pass it up. Plus, I recieved a tart pan (along with a dutch oven & a gym membership) from Blondie for my birthday. It was fate.

Now, mulberries have a tart & sour flavor if they are not yet ripe, and even at their juicy best, they are not as sweet as a black berry. But they are darn tasty. If you don’t have access to a mulberry tree in your back yard, front yard or down the street, you can always use raspberries, blackberries or strawberries.

Mulberry tart

The tart recipe has been de-glutened from a recipe and technique shared by David Lebovitz. Visit his site for more in-depth directions and photos of the process. There are no gums, just some flax, and you can use my substitution chart if you are working by weight and want to swap out some flours.

Vanilla Bean Tart with Mulberries
#ratingval# from #reviews# reviews
Print
Recipe Type: Dessert
Author: Mary Fran Wiley
Prep time: 15 mins
Cook time: 45 mins
Total time: 1 hour
Serves: 8-10
Thanks to an incredible method shared by David Lebovitz, the tart has an incredibly tender, melt-in-your-mouth crust
Ingredients

For the crust

  • 6 tablespoons (3oz/90 grams) unsalted butter, cubed
  • 1 tablespoon vegetable oil
  • 2 tablespoons water
  • 1 tablespoon vanilla bean paste
  • 1 tablespoon sugar
  • 1/8 teaspoon salt
  • 10 g ground flax seeds
  • 50 g sorghum flour
  • 30 grams brown rice flour
  • 30 grams white rice flour
  • 30 grams tapioca starch

For the pastry cream

  • 1/4 cup cornstarch
  • 1/4 cup + 1/2 cup sugar
  • 1/2 cup plus 1 1/2 cups milk
  • 4 large egg yolks, lightly beaten
  • 1 pinch salt
  • 2 tsp vanilla extract or vanilla bean paste
  • 2 T unsalted butter
  • 1 pint fresh berries, picked over with stems removed
Instructions
  1. For the crust: Preheat the oven to 410º. In a medium-sized ovenproof bowl, add the butter, oil, water, sugar, vanilla and salt. Place the bowl in your hot oven for 15 minutes. The butter should be bubbling and the mixture should be slightly brown around the edges. While it is baking, whisk together your flours. Carefully remove the bowl from the oven. (Don’t be like me and forget a pot holder, it will be HOT!) and dump in the flour and stir it in quickly, until it comes together and forms a ball which pulls away from the sides of the bowl. Put the dough in a 9in tart pan, and when it is cool enough to touch, press it into the tart pan with your hands, pinching dough up the edges. Prick the bottom with a fork and then bake for about 15 mins. The crust should be a light golden brown.
  2. For the pastry cream: While the crust is cooling whisk together cornstarch and 1/4 cup sugar in a mixing bowl. Stir in 1/2 cup of the milk. Blend yolks into the mixture, stirring until smooth. Prepare an ice bath (a very large bowl filled with ice & water – it should be a bowl that the sauce pan you are using does not quite fit in). Combine remaining milk (1 1/2 cups), salt and sugar (1/2 cup) in a medium sized sauce pan (non-reactive is ideal). Bring to a boil over medium heat while stirring constantly. Temper the egg mixture with about 1/3 of the hot milk (you have to whisk constantly – you do not want to cook the eggs unevenly) Add egg mixture to remaining milk mixture and return the pan to the heat. Continue to cook over medium heat, vigorously stirring with a whisk until the mixture boils and a trail forms after the whisk, about 5-7 minutes. Transfer pan to the ice bath and stir occasionally until the pastry cream is cool.
  3. Assemble the tart: Pour pastry cream (or vanilla pudding) into the crust and top with your fresh berries and enjoy the taste of summer.
Notes

If making pastry cream is too fussy, you could try a vanilla pudding.

If you wish to see the original crust recipe, visit David Lebovitz’s site.

Want to make the crust by volume? Use 1 slightly rounded cup of gluten free all purpose flour (I like Jules’ Nearly Normal Flour), if you use a flour without xantham gum or flax, add 1/2 teaspoon xantham gum.

Google Recipe View Microformatting by Easy Recipe
1.2.4