Home » slider » Page 2

Tag: slider

gluten free dairy free bittersweet chocolate doughnuts on cooling rack

Bittersweet

gluten free dairy free bittersweet chocolate doughnuts on cooling rack

This post is about doughnuts.Rich, chocolate doughnuts.

And maybe some bittersweet thoughts.

Nope, currently I don’t have any of those. Currently the only thoughts I am having are about how to keep the kitten from trying to sit on my chest while I sit and type this. And how to train him that feet are not toys. And that Cecilia is the boss.

Back to the doughnuts. These doughnuts might even make you feel sophisticated. Really, they just might. They are dairy & gluten free. And chocolate. Deliciously chocolate.

These are the last doughnuts that I am going to invent for a little while. Although, these have all been so delicious, I need an excuse to bake them all again. Quick, someone have a brunch party!

Gluten Free Chocolate Doughnuts with bittersweet glaze
#ratingval# from #reviews# reviews
Print
Recipe Type: Dessert
Author: Mary Fran Wiley
Prep time: 10 mins
Cook time: 60 mins
Total time: 1 hour 10 mins
Serves: 12
Ingredients
  • 100 grams sorghum flour
  • 35 grams tapioca starch
  • 25 grams sweet white rice flour
  • 15 grams flax
  • 25 grams (1/4 cup) cocoa
  • 1 1/2 teaspoons baking powder
  • 1/4 teaspoon salt
  • 175 grams (3/4 cup) coconut oil, melted
  • 200 grams (1 cup) sugar
  • 30 grams (1 ounce) bittersweet chocolate, melted
  • 3 eggs, or egg replacer for 3 eggs
  • 1 tablespoon vanilla bean paste
  • 170 grams (6 ounces) bittersweet chocolate
  • 1/4 cup coconut oil
  • 1/4 cup powdered sugar
Instructions
  1. Preheat oven to 350 degrees and grease a loaf pan.
  2. Whisk together your flours, cocoa, baking powder and salt.
  3. Beat together sugar and coconut oil for about 2 mintues.
  4. Mix in the melted chocolate.
  5. Add the eggs and beat for another minute or so.
  6. Stir in the vanilla.
  7. Pour the batter into your prepared pan and bake for 6-8 minutes.
  8. Let cool in the pan for 5 minutes, then remove and finish cooling on a cooling rack.
  9. Once all doughnuts are baked, melt together the 6 ounces of chocolate, coconut oil and powdered sugar, whisking so your glaze is smooth.
  10. Drizzle over the doughnuts and relish your awesomeness.
Google Recipe View Microformatting by Easy Recipe
1.2.4


Powdered Sugar Doughnuts

gluten free dairy free powdered sugar doughnuts on a wire rackI might have made a third type of doughnuts. How could I not? The mini doughnut pan that I got for my birthday is just so adorable. Blondie picked it out hoping he was going to get some doughnuts…too bad these will probably all be gone by noon.

I am going to have the basic recipe memorized by the time I finish that Next Food Network Star application (shouldn’t be too hard to make it…these doughnuts could take on Bobby Flay in a throwdown any day.)

These are not as inventive as the honey lavender doughnuts or the ginger brown butter ones, but they are darn tasty. And they melt in your mouth. Just like a doughnut should.

You know those little doughnuts that come all stacked up in a plastic bag at a gas station? These are better than that. But just as addictive. And they are gluten and dairy free.

Powdered Sugar Doughnuts
#ratingval# from #reviews# reviews
Print
Recipe Type: Breakfast
Author: Mary Fran Wiley
Serves: 12
Using coconut oil and coconut milk yogurt, you get a lightly sweet doughnut that melts in your mouth. There are instructions in the note to make these vegan with a flax egg.
Ingredients
  • 50 grams (6 tablespoons) sorghum flour
  • 35 grams (3 tablespoons)sweet white rice flour
  • 20 grams (1/6 cup) tapioca starch
  • 15 grams (3 tablespoons) flax
  • 100 grams (1/2 cup) sugar
  • 1 ½ teaspoons baking powder
  • 1 ½ teaspoons vanilla bean paste (or vanilla extract)
  • 1 egg, lightly beaten or egg replacer for 1 egg (info in notes)
  • 1/4 cup dairy free plain yogurt
  • 1 teaspoon vanilla bean paste (or vanilla extract)
  • 1/4 cup melted coconut oil
  • 1/4 teaspoon salt
  • 2 cups powdered sugar
  • Coconut oil for brushing the doughnuts
Instructions
  1. Preheat the oven to 375 degrees. Grease the doughnut pan or mini muffin tin.
  2. For the batter: Whisk together flours, sugar, baking powder and salt. In the bowl of a stand mixer, combine wet ingredients and beat together lightly (mixer on medium for about 30 seconds). Add in dry ingredients and mix to combine, scraping down the sides of the bowl a couple of times.
  3. If using a mini doughnut pan, scoop the batter into a pastry bag or a gallon size ziplock bag and snip off the tip/corner. This will save you from a giant mess.
  4. Fill the wells slightly less than half full, or your doughnuts won’t have holes. Bake for 8-12 minutes for minis or 12-15 for full size doughnuts. They are done when a toothpick comes out almost clean. Let sit in the pan for 5 minutes before removing the doughnuts.
  5. Once you remove the doughnuts, wipe out the wells with a paper towel, and re-grease them. This recipe makes 36 mini doughnuts or 10 full size.
  6. Brush the doughnuts with the extra coconut oil while they are still warm and then drop into a bowl of powdered sugar and toss to coat.
  7. For a thicker coating of sugar, brush a second time with oil and drop into the sugar one more time.
Notes

If you want to make these vegan, skip the egg and use a flax egg: 1 tablespoon ground flax and 3 tablespoons warm water stirred together until it is thick and gelatinous.

I used So Delicious Plain Yogurt, but you could use regular plain yogurt (not greek), if that is what you have.

You can swap the flours for 1 cup all puropse blend and 1/2 teaspoon xantham gum (or 1 cup Jules’ Nearly Normal Flour)

Google Recipe View Microformatting by Easy Recipe
1.2.4
gluten free honey lavender doughnuts with pink frosting

Honey Lavender Doughnuts

gluten free honey lavender doughnuts with pink frostingI want to live on doughnuts. I feel like they might be the secret key to getting through the next month.

When Blondie and I were blueberry picking, the farm had herbs that you could pick too, and we grabbed some lavender because that is not in my garden. I love the scent of lavender, but had never baked with it before these doughnuts. Eat the lavender! It doesn’t taste like soap smells (in case you were worried about that). It tastes spicy and peppery, a great pairing for the flavor of honey.

My boss’s boss told me today that these were amazing, and that I could make any doughnut’s I wanted as long as they were not mushroom flavored. Next time, it will be savory doughnuts…

Looking at these, I keep feeling like they are strawberry flavored – I just colored them so I could tell them from the ginger brown butter doughnuts I made earlier on Sunday.

Honey lavender Doughnuts
#ratingval# from #reviews# reviews
Print
Recipe Type: Breakfast
Author: Mary Fran Wiley
Prep time: 15 mins
Cook time: 45 mins
Total time: 1 hour
Serves: 12
Lavender has a bright, almost peppery flavor that complements the honey. If you don’t have a dougnut pan, don’t fret. These can easily be made in mini muffin tins as doughnut holes.
Ingredients
  • 50 grams (6 tablespoons) sorghum flour
  • 35 grams (3 tablespoons)sweet white rice flour
  • 20 grams (1/6 cup) tapioca starch
  • 15 grams (3 tablespoons) flax
  • 1 ½ teaspoons baking powder
  • 125 grams (3/8 cup) honey
  • 1 egg, lightly beaten
  • 3/8 cup plain yogurt (not greek)
  • 4 tablespoons butter, melted
  • 1/4 teaspoon salt
  • 2 tablespoons fresh lavender

For the glaze:

  • 1/8 cup water
  • 115 grams (1 cup) powdered sugar
  • 85 grams (¼ cup) honey
Instructions
  1. Preheat the oven to 375 degrees. Grease the doughnut pan or mini muffin tin.
  2. For the batter: Whisk together dry ingredients. In the bowl of a stand mixer, combine wet ingredients and beat together lightly (mixer on medium for about 30 seconds). Add in dry ingredients and mix to combine, scraping down the sides of the bowl a couple of times.
  3. If using a mini doughnut pan, scoop the batter into a pastry bag or a gallon size ziplock bag and snip off the tip/corner. This will save you from a giant mess.
  4. Fill the wells slightly less than half full, or your doughnuts won’t have holes. Bake for 8-12 minutes for minis or 12-15 for full size doughnuts. They are done when a toothpick comes out almost clean. Let sit in the pan for 5 minutes before removing the doughnuts.
  5. Once you remove the doughnuts, wipe out the wells with a paper towel, and re-grease them. This recipe makes 36 mini doughnuts or 10 full size.
  6. To make the glaze: combine water and powdered sugar in the bowl of your mixer and beat until smooth. Add the honey. You can also color the glaze if you want. Transfer to a smaller, heat proof bowl.
  7. Dip the doughnuts into the glaze one at a time. If the glaze starts to set, pop it in the microwave for 10-15 seconds, any longer and it might burn.
Notes

You can use dried lavender. Crush it first and only use 1 tablespoon.

Google Recipe View Microformatting by Easy Recipe
1.2.4


gluten free brown butter ginger doughnuts

Ginger Brown Butter Doughnuts

mini gluten free brown butter ginger doughnuts

No, this is not a macro shot of Cheerios. They are mini ginger brown butter doughnuts.

Things around here have been incredibly stressful. I keep telling people that I can feel the grey hairs coming in. And that I can see the wrinkles forming. The dentist kept thinking he was hurting me because my eyebrows are always pulled in tight. It actually is starting to feel unnatural to have a relaxed face.

Why? Because I am working on a couple of major secret projects at work. Ok, they are not so secret any more, but they are a little overwhelming at the moment. Blondie didn’t visit me this weekend, so I had plenty of time to do things like laundry and mopping (ick!). Well, when the washers in the building were in use nearly all day Saturday & Sunday, I had to do something. Since it was oppressively hot, I dared not go outside. And I couldn’t look at work or the vacuum for one more minute.

So, I made up a recipe for doughnuts. (Really! It is less stressful than my job some days!). The basic recipe is based on recipes for over 100 cake doughnuts and doughnut muffins.

I had fresh ginger for making some chai tea concentrate, and decided on a ginger doughnut. You won’t be disappointed by these!

Gluten Free Ginger Brown Butter Doughnuts
#ratingval# from #reviews# reviews
Print
Recipe Type: Breakfast
Author: Mary Fran Wiley
Serves: 12
Baked doughnuts that you can’t stop eating? Here ya go. Make sure you have somewhere to take these or a crowd to eat them because they are quite addictive. The ginger is not over powering and is backed by the nutty brown butter for a delicately flavored treat. The recipe makes 36 mini doughnuts – although it is better to under-fill than over-fill your pan, so you might even end up with 40…
Ingredients
  • 50 grams (6 tablespoons) sorghum flour
  • 35 grams (3 tablespoons)sweet white rice flour
  • 20 grams (1/6 cup) tapioca starch
  • 15 grams (3 tablespoons) flax
  • 100 grams (1/2 cup) sugar
  • 1 ½ teaspoons baking powder
  • 1 ½ teaspoons vanilla bean paste (or vanilla extract)
  • 1 egg, lightly beaten
  • 1/4 cup plain yogurt (not greek)
  • 1 ½ tablespoons grated fresh ginger
  • 4 tablespoons butter
  • 1/4 teaspoon salt
  • 1/4 cup cream
  • 115 grams (1 cup) powdered sugar
  • 1 tablespoon grated fresh ginger
Instructions
  1. Preheat the oven to 375 degrees. Grease the doughnut pan or mini muffin tin.
  2. Brown the butter in a small skillet. This takes about 5 minutes. The butter will start to smell nutty, that’s when you know it is ready. Remove from heat and let it sit for about 5 minutes before moving on. Hot butter will cook the eggs, and that is not what we want to happen
  3. For the batter: Whisk together dry ingredients. In the bowl of a stand mixer, combine wet ingredients and beat together lightly (mixer on medium for about 30 seconds). Add in dry ingredients and mix to combine, scraping down the sides of the bowl a couple times.
  4. If using a mini doughnut pan, scoop the batter into a pastry bag or a gallon size ziplock bag and snip off the tip/corner. This will save you from a giant mess.
  5. Fill the wells slightly less than half full, or your doughnuts won’t have holes. Bake for 8-12 minutes for minis or 12-15 for full size doughnuts. They are done when a toothpick comes out almost clean. Let sit in the pan for 5 minutes before removing the doughnuts.
  6. Once you remove the doughnuts, wipe out the wells with a paper towel, and re-grease them. This recipe makes 36 mini doughnuts or 10 full size.
  7. To make the glaze:Simmer cream and ginger over medium-low heat to infuse the cream with the ginger flavor. Pour the infused cream through a strainer and measure out 1/4 cup. Add this to the bowl of your stand mixer and add the powdered sugar. Make sure your cooling rack is sitting on top of a cookie sheet. Pour this over the doughnuts on the cooling rack. Enjoy!
Notes

To use an AP blend, use 100 grams (1 scant cup) of flour plus the flax, or 1 cup of a flour like Jules Nearly Normal and skip the flax.
If you don’t have a mini muffin pan, you can make donut holes in a mini muffin tin. If all you have is a regular muffin tin, you will have to increase the baking time and add an extra 1/2 teaspoon of baking soda.

Google Recipe View Microformatting by Easy Recipe
1.2.4


Gluten Free French Lemon Cake

GF French Lemon Cake

Gluten Free French Lemon Cake with lemon rum syrupWe had a cooking unit in my high school french class and everyone was given a more or less traditional French food to cook. I had to make this lemon cake.

A year later, in college, I had my dad find the recipe, type it up and email it to me so that I could impress the other girls in the dorm. In European fashion, it was by weight and I definitely made it by eyeballing it.

Lemon cake for Bastille day Two years ago, I went back to the yahoo email address I used back then to find it, but I didn’t make it – this whole gluten-free baking thing was a bit too scary for me.

I dug it out yesterday because today is Bastille day and a French treat was in order.

It is a bright, lemony cake with a delicate crumb. There is absolutely no need for any gums or even flax in this cake – you want it to disintegrate into lemony goodness  in your mouth.


GF French Lemon Cake with Lemon Rum Glaze
#ratingval# from #reviews# reviews
Print
Recipe Type: Dessert
Author: Mary Fran Wiley
Prep time: 10 mins
Cook time: 20 mins
Total time: 30 mins
Serves: 8
The original recipe was given to me as a handout in my high school French class by Mme. Czarnecki. I have made it gluten-free and changed a few things to make it even better than the original.
Ingredients
  • 150 grams (3/4 cup) sugar, divided (75 grams for the cake, 75 for the syrup)
  • 2 eggs
  • 4 tablespoons (60 grams/ 1/2 stick) VERY soft butter
  • 5 grams (1 teaspoon) baking powder
  • 30 grams (1/4 cup) sweet white sorghum flour
  • 30 grams (1/3 cup) brown rice flour
  • 30 grams (1/3 cup) sweet white rice flour
  • 30 grams (1/4 cup) tapioca starch
  • 5 grams (1 Tablespoon) ground flax
  • 1/4 teaspoon salt
  • 5 lemons (3 zests for cake, 2 zests and juice from 3 lemons in syrup)
  • 3/8 cup (6 Tablespoons) dark rum
Instructions
  1. Preheat oven to 350 degrees.
  2. Place eggs & half the sugar (75 grams or 3/8 cup) sugar in the bowl of a mixer and beat for about 30 seconds.
  3. Add the butter, flours, baking powder, salt and zest from 3 of the lemons.
  4. Mix well. The batter should be thick and look creamy.
  5. Pour into a greased 8 or 9 inch round pan. Bake for 15-20 minutes.
  6. While cake is baking, combine remaining sugar (75 grams or 3/8 cup), the juice of 3 lemons and the rum in a sauce pan. Bring to a simmer and stir regularly while the cake is baking.
  7. Remove cake from oven and let cool for 5 minutes.
  8. Invert over a cake plate and pour syrup over cake while still warm.
  9. If you can wait, the lemon flavor will intensify over night, but the cake can be enjoyed immediately.
Notes

You can replace all flours with 1 cup GF all-purpose flour, such as Jules’ Nearly Normal Flour.

You cannot make this cake without the rum. In high school we used rum extract because of laws and such, but with real rum it is 1,000 times better.

Google Recipe View Microformatting by Easy Recipe
1.2.4


gluten free buckwheat popcorn rolls

buckwheat popcorn rolls

gluten free buckwheat popcorn rollsThe first time my dad made popcorn bread, I thought it was the most ridiculous thing. You pop corn and then grind it up and bake it in bread. That is crazy talk. Plain old, crazy talk.

But it is good. Well, for gluten-free bread. My dad has made several hundred loaves of this bread. He uses plain air-popped popcorn and his trusty all purpose gluten free flour. And his bread maker. Well, I can’t make air-popped pop corn, so, I brought home a free refill on my popcorn from the theater. I also discovered (after measuring everything out), that the bread maker I was given was too small for this loaf. So, I improvised.

And dad, I made it even better than you do.

Next time you go to the theater, get the large popcorn and get it refilled as you leave the theater (if your theater gives you free popcorn), you will then have the most exotic ingredient in this recipe.

Buckwheat Popcorn Rolls
#ratingval# from #reviews# reviews
Print
Recipe Type: bread
Author: Mary Fran Wiley
Prep time: 15 mins
Cook time: 25 mins
Total time: 40 mins
Serves: 6
This might have originally come from Jules’ Nearly Normal kitchen where my dad gets his flour. However, this recipe varies a bit from the original. The buckwheat and sorghum give it a nutty, whole grain flavor. This should make 10-12 small rolls.
Ingredients
  • 1 cup Hot Water
  • 12 grams (2 Tablespoons) Flaxseed Meal
  • 2 Eggs Slightly Beaten
  • 1 Cup Plain/Vanilla Yogurt
  • 1 Teaspoon Apple Cider Vinegar
  • 3 Tablespoons Olive Oil
  • 3 Tablespoons Honey
  • 1Teaspoon Baking Soda
  • 2 Teaspoon Baking Powder
  • 1 Teaspoon Sea Salt
  • 1.5 Tablespoons Active Dry Yeast
  • 57 grams (⅔Cup Dry Milk)
  • 1 Cup Popcorn Flour*
  • 100 grams (½ Cup) Brown Rice Flour
  • 40 grams (1/3 cup) buckwheat flour
  • 50 grams (3/8 cup) sweet white sorghum flour
  • 40 grams (3 tablespoons + 1/2 teaspoon) sweet white rice flour
  • 30 grams (1/4 cup) tapioca starch
  • 30 grams (1/4 cup) corn starch
  • 20 grams (3 tablespoons + 2 teaspoons) flax meal
Instructions
  1. Preheat oven to 350 degrees. Grease & flour (use some white rice flour for this) a muffin tin.
  2. Mix hot water, 12 grams flax and yeast. Let sit for 10-15 minutes.
  3. Mix remaining wet ingredients in a large mixing bowl.
  4. In a separate bowl, whisk together dry ingredients.
  5. Combine wet ingredients, dry ingredients and yeast mixture.
  6. Divide evenly among the wells of a muffin tin.
  7. Bake for 20-30 mins. The rolls are cooked when a toothpick comes out clean.
Notes

Popcorn flour is made simply by putting popcorn into a blend and grinding it into a coarse meal. The fluffy-ness of the popcorn should not be completely destroyed.

Google Recipe View Microformatting by Easy Recipe
2.1.7


GF Ratio Rally: Pasta with Pink Vodka Sauce

fresh gluten free pasta

This is the kind of discovery that I can’t believe that I am still having. Fresh. Pasta. Oh em gee. For realz. Ok, I’ll stop.

gluten free ratio rally logo

For this month’s Ratio Rally, we all made pasta. I don’t want this one to end. I also want to keep this secret formula for myself. It is that good. Each time and with each ratio it was good. So very, very good. I am going to make lasagna with fresh noodles before this post goes live just so that I can bask in the glory of fresh pasta. I am Irish. And British. And German. And Norwegian. I am definitely not Italian.  We had a pasta maker in the house growing up, and we made fresh pasta a couple of times, but it wasn’t really our thing.  I make a mean potato anything. And some delicious gluten free spaetzle. And desserts, I make the best desserts.

But fresh pasta? Who does that? Apparently, I do. Pasta is so easy to make. Some flour, some eggs and some getting your hands dirty.

The ratio that I used is 3:2, flour:eggs (from Ruhlman), but it wasn’t so simple this month. I tried his ratio. The pasta was a little dry. Water made it pliable, and it was delicious, but it was too finicky to share with you. I tried a different ratio. This one was 8:5 with a splash of olive oil. I also tried a flour combination used by my favorite dry pasta. With brown rice and soy pasta, I was so close that I could taste victory, but I could also taste beans and olive oil. The third time was the charm. Thank you Gluten Free Girl & The Chef cookbook. More yolks, less whites. I replaced an egg with 2 yolks and found the texture I was looking for. If you are interested in how she tackled pasta, check out her cookbook – her’s has olive oil and a different array of flours.

pasta and pot
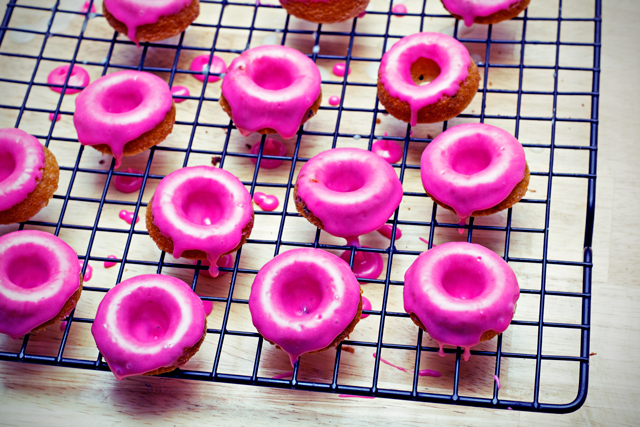
I apologize now for what I am sure will be an excessive amount of pasta recipes. Today, I paired my fresh gluten free pasta with a pink vodka sauce, which despite the cream is actually a fairly light tasting sauce. (Actually, I just needed to use the vodka that I bought for my pie crusts for something else to justify the purchase).

The pasta freezes exceptionally well, so once it has partially dried, put it in individual baggies in the freezer. When you want a quick dinner, boil a pot of water and add the still frozen noodles. They need about 5 minutes to cook, and with some olive oil, oregano and parmesan cheese, you have an almost instant dinner. Now, go make some pasta, you’ll be glad you did.

My recipe is after the list of this month’s participants. The Ratio Rally was hosted this month by Jenn of Jenn Cuisine.

Brooke | B & the boy!  – Ravioli w/strawberry filling and chocolate berry sauce
Caneel | Mama Me Gluten Free – Multi-grain Fettuccine
Pete and Kelli | No Gluten, No Problem – Tortellini
tbdgretchen | kumquat – vegetable lasagna
Jenn | Jenn Cuisine – Tagliatelle with Smoked Salmon, Peas and Parmesan
Lisa from Gluten Free Canteen – lokshen kugel
Meaghan | The Wicked Good Vegan – vegan gluten-free homemade pasta, in Creamy Artichoke Tagliatelle
Meg | Gluten-Free Boulangerie – Fettuccine with sun-dried tomatoes
Silvana Nardone | Dishtowl Diaries –  Lemon-Poppy Pasta with Tomato, Corn and Basil
Tara | A Baking Life – Rag Pasta with Wild Mushrooms and Spring Onions

Fresh Pasta with Pink Vodka Sauce
#ratingval# from #reviews# reviews
Print
Recipe Type: Entree
Author: Mary Fran Wiley
Prep time: 30 mins
Cook time: 30 mins
Total time: 1 hour
Serves: 2
Nothing beats fresh pasta. Nothing.
Ingredients
  • 15 grams ground flax
  • 60 grams brown rice flour
  • 65 grams sweet white sorghum flour
  • 40 grams sweet white rice flour
  • 30 grams tapioca starch
  • 1/2 teaspoon salt
  • 2 eggs
  • 2 yolks
  • 1 14oz can of diced fire roasted tomatoes (buy the good ones!)
  • 1/2 small onion diced
  • 1 clove garlic, minced
  • 1 dried chili pepper, seeds discarded, minced (or 1 teaspoon crushed red pepper)
  • 1 teaspoon fresh thyme, stems removed
  • 1 teaspoon fresh oregano, chopped
  • 1 tablespoon fresh basil, chopped
  • 1/4 cup cream
  • 1/4 cup vodka
  • salt, to taste
Instructions
  1. Whisk together flours and salt in a large mixing bowl.
  2. Make a well in the middle, and add in eggs and yolks. This really is if you are brave enough to mix it on your counter with out a bowl. I am not that brave, nor do I want to have to clean up the mess it would leave, so I made my pasta dough in a bowl.
  3. Mix with a wooden spoon until it starts to come together. Knead the flour into the eggs until every thing is combined and the texture is like playdough.
  4. Cover with plastic wrap and let rest while you make the sauce.
  5. Melt butter in a medium sauce pan over medium heat.
  6. Add chili pepper and let it fry in the butter until it starts to become fragrant, about 1 minute. Add the onions and cook until translucent, about 5 minutes. Add the garlic and stir. Once you start to smell the garlic, add in the can of tomatoes. Reduce heat to medium-low, stir and return to pasta making.
  7. This is the fun part: divide your dough into thirds and press into a disc about 1/2 inch thick. If you are rolling it out by hand, flour your table and roll the dough to about 1/16 inch. If you are rolling by pasta maker, roll it through the maker several times on the widest setting, folding it into thirds after each pass. This helps with the texture of the pasta.
  8. Roll the dough through the maker at each thickness until the dough is thin enough to be cut by the linguine rollers. (Or by hand into lasagna noodles).
  9. Let pasta dry for 15-20 mins before cooking or putting in the freezer.
  10. Set a pot of salted water on medium-high heat and bring to a boil (do this after pasta has been drying for 10 mins)
  11. Once your sauce has been simmering for 30 mins (or you are done rolling & cutting your pasta, whichever is longer), use an immersion blender or pour your sauce into a blender. This will help the texture.
  12. Return your sauce to low heat and add the fresh herbs, vodka and cream. Cook over low for about 5 minutes more.
  13. While the sauce is in its last 5 minutes, boil your fresh noodles. They will most likely be done in about 4 minutes.
  14. Drain and top with sauce.
  15. Feel super awesome about the fact that you are eating fresh pasta with a delicious sauce.
Notes
Acording to my nifty scale that converts weight to volume, you could substitute 1 1/2 cups of a Gluten Free AP blend (Jules Nearly Normal Flour is a good one to keep in your kitchen). This recipe makes enough for me to eat 3 meals. If Blondie were here, it would be enough for the 2 of us. Don’t despair, this recipe can easily be doubled or tripled.
Gluten Free Blueberry Almond Pie

Hidden secret pie

Hidden Surprise Pie
I was going to wait to post this pie. I made it this pie this weekend so that I could have a successful crust recipe to use for the Pie Party today. But I couldn’t keep this to myself.

Blondie & I went blueberry picking this weekend. I had wanted to make jam but we didn’t pick enough for jam. So, I did what any girl who needed to perfect a pie crust recipe and had extra blueberries would do, I planned to make a pie. I did more research. I needed a stick of butter per crust (top & bottom). I read that vodka helps make a tender crust. And that you need to bake your pie on a baking sheet so that the bottom cooks faster and doesn’t get mushy.

I also had to make this an exceptional pie. Plain blueberry pie is delicious. I’m sure blueberry and ginger go well together. But, I already used ginger and peach, I needed something different. In the cabinet I found almonds & almond paste! I was set.

I present to you Hidden Secret Pie!

Gluten Free Blueberry Almond Pie

Blueberry Almond Pie
#ratingval# from #reviews# reviews
Print
Recipe Type: Dessert
Author: Mary Fran Wiley
Prep time: 30 mins
Cook time: 40 mins
Total time: 1 hour 10 mins
Serves: 8
The sweetness of the paste contrasts with the tangy berries in this not too sweet filling and the almonds give some necessary crunch.
Ingredients
  • 30 grams ground flax seeds
  • 90 grams brown rice flour
  • 90 grams sweet white sorghum flour
  • 60 grams sweet rice flour
  • 40 grams tapioca starch
  • 40 grams corn starch
  • 2 sticks butter, frozen
  • 2 tablespoons vodka, ice cold
  • 1/2 cup ice water
  • 4 cups blueberries
  • 1/2 cup sliced almonds, toasted
  • 1/2 cup sugar
  • 1/2 teaspoon salt
  • 3 tablespoons tapioca starch
  • 8 oz almond paste
Instructions
  1. Make the crust: Whisk together your flours for the crust in a large mixing bowl. Grate the frozen butter into the flours using a cheese grater or microplane. Using a pastry blender, make sure your flours and butter are well mixed. It should look like mildly clumpy sand. Add the vodka. Pour in the water a little at a time, mixing with a spatula. As soon as the dough starts to come together, stop mixing. Pat into 2 disks about 4″ in diameter, wrap in plastic and refrigerate for about 30 mins. Once chilled, roll out one of your disks of dough to about 1/4″ thick. Place in pie pan and smooth to corners. Trim over hang and crimp edges. Pop in the freezer while you do the next steps.
  2. Make the filling: Place a baking sheet on the middle rack in your oven & preheat to 400 degrees Fahrenheit. Mix together blueberries, sliced almonds, sugar, salt and tapioca starch in a large bowl.
  3. Make the lattice: Roll out your second bit of pie crust and cut into thin strips or cookie cutter designs. Save extra crust to make pies in jars or pocket pies.
  4. Assemble the pie: Remove the pie shell from the freezer and pour in half the filling. Pinch out the almond paste into an 1/8″ disk that covers the filling. (You can piece it together from smaller pieces if it is easier – no one sees it). Pour in the rest of the filling on top. Place the top crust (lattice or design) on top of the pie. Crimp edges. You can add additional decorations with any leftover almond paste.
  5. Bake: Place on the baking sheet in the oven and bake for 35-45 minutes. The filling will bubble and the crust will be golden brown when the pie is ready. You can use an egg wash and sprinkle the crust with sugar when there is about 10 minutes of cooking time left, if you want. I didn’t do this. But you can.
Notes

You can substitute all the flours in the crust for 2 1/2 cups of an all purpose blend like Cup4Cup or Jules’ Nearly Normal Flour.

WordPress Recipe Plugin and Microformatting by EasyRecipe
2.2.6
ginger bourbon peach pie

Pie party!

ginger bourbon peach pieThere is an internet pie party today. There are nearly 1500 people participating. So, here’s my first ever attempt at pie.

There were peaches at the farmer’s market. I had to wait 20 minutes in line for peaches, now that there is variety (and fruit) there are three times the number of people shopping at the market, and they were the first peaches of the season.

I give you Sweet Champaign Pie. (Have you seen the movie Waitress? It came out 4 years ago. The main character makes pie and names them after what is going on in her life.) It is made with bourbon soaked peaches and ginger chips. I found the magic in making pies this weekend. The meditation that comes with making the crust by hand and the satisfaction that comes from eating it while it is still warm enough to be a gooey mess.

Now, of crust is scary, go get a pre-made crust (whole foods sells a decent pre-made one), and make this pie.

Ginger Bourbon Peach Pie
#ratingval# from #reviews# reviews
Print
Recipe Type: Dessert
Author: Mary Fran Wiley
Prep time: 30 mins
Cook time: 45 mins
Total time: 1 hour 15 mins
Serves: 8
Peaches, bourbon, ginger. This is pie for the soul.
Ingredients
  • 15 grams ground flax seeds
  • 45 grams brown rice flour
  • 45 grams sweet white sorghum flour
  • 30 grams sweet rice flour
  • 20 grams tapioca starch
  • 20 grams corn starch
  • 1 stick butter, frozen
  • 1 tablespoon vodka, ice cold
  • 1/4 cup ice water
  • 4 cups sliced peaches
  • 1/2 cup crystallized ginger chips
  • 1/4 cup granulated sugar
  • 1/4 cup brown sugar
  • 1/4 cup bourbon
  • 3 tablespoons tapioca starch
Instructions
  1. Make the crust: Whisk together your flours for the crust in a large mixing bowl. Grate the frozen butter into the flours using a cheese grater or microplane. Using a pastry blender, make sure your flours and butter are well mixed. It should look like mildly clumpy sand. Add the vodka. Pour in the water a little at a time, mixing with a spatula. As soon as the dough starts to come together, stop mixing. Pat into a disk about 4″ in diameter, wrap in plastic and refrigerate for about 30 mins.Once chilled, roll out your dough to about 1/4″ thick.Place in pie pan and smooth to corners. Trim over hang and crimp edges. Pop in the freezer while you do the next steps.
  2. Make the filling: While your crust is chilling, pace a cookie sheet on the middle rack of your oven and to 425 degrees Fahrenheit. This will help keep your bottom crust from getting soggy. Mix together peaches, ginger chips, sugars, bourbon and tapioca starch. Let stand for 15 minutes while your oven heats.
  3. Assemble the pie: When your oven is hot, remove the crust from the freezer and scoop filling into the shell. If your peaches have let off a lot of juice, it is ok to leave it in the bowl, you don’t want a soupy mess.
  4. Bake: Place pie on the hot cookie pan in the oven. Bake for 40-50 mins. You know it is done when the filling is boiling. Let stand for 2 hours.
  5. Scoop the filling into your cold pie shell
Notes

These directions are for making the dough by hand, if you have a food processor the dough comes together quite a bit quicker.

Don’t have a scale? Use 1 1/4 cups of a commercial all purpose blend.

Can’t do bourbon? Substitute 1 Tablespoon of vanilla extract for the bourbon.

Google Recipe View Microformatting by Easy Recipe
1.2.4