Home » summer » Page 2

Tag: summer

gluten free margherita lasagna

Margherita Lasagna

gluten free margherita lasagnaI have been making pasta almost obsessively over the past 2 weeks. But really, I was getting bored with noodles and sauce. Also, it is summer and most lasagna recipes are too hearty and heavy for the warm months.

But I had fresh pasta dough. And I had 6 servings ready to freeze individually for those nights when cooking feels like a mountain I don’t want to climb. What was I going to do with the rest? Lasagna noodles! I hadn’t made lasagna since I made this butternut squash lasagna (just a picture – I wasn’t writing my recipes out last fall). Lasagna is easy & filling.

This one is great with Marcella Hazan’s tomato sauce. It is tomato, onion and butter. If the sauce has too much seasoning, you won’t taste the flavors of the tomato, basil & mozzarella, so a simple sauce is best. You need to make sure that you are either using fresh pasta or boiled boxed noodles, even if they say they are no-boil, for this recipe they need to be cooked.

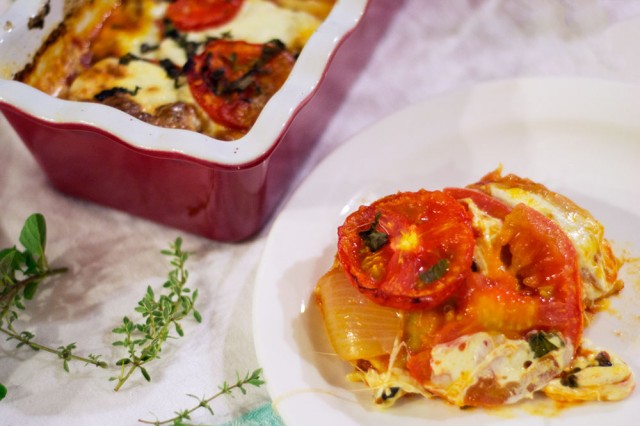
I made lasagna in a loaf pan, I know, not a traditional route. But it helps control the proportions and bakes up quite nicely. I will also share my fresh pasta recipe with you on Wednesday. And yes, it is worth the wait.

Margherita Lasagna
#ratingval# from #reviews# reviews
Print
Recipe Type: Entree
Author: Mary Fran Wiley
Prep time: 15 mins
Cook time: 40 mins
Total time: 55 mins
Serves: 4
With minimal sauce and juicy, fresh tomatoes, this lasagna is a perfect way to use tomatoes & basil plucked fresh from your garden.
Ingredients
  • 1 1/2 cups tomato sauce
  • 6-8 lasagna noodles (either fresh or halfway cooked)
  • 1 T olive oil
  • 3 small tomatoes, sliced in 1/4″ rounds
  • 1/4 cup fresh basil, chopped
  • 1 package fresh mozzarella
Instructions
  1. Grease a loaf pan with the olive oil.
  2. Put a spoonful of sauce on the bottom of the pan and spread it.
  3. Place a noodle, another spoonful or two of sauce, then add a thin layer of cheese, a sprinkling fresh basil and then a row of tomato slices.
  4. Repeat until the pan is full.
Notes

The goal is to avoid an overly saucy lasagna. The tomatoes will have plenty of moisture, the sauce is just to enhance the tomato flavor. I make large batches of Marcella Hazan’s tomato sauce and keep it around.

Google Recipe View Microformatting by Easy Recipe
1.2.4

I am also on this kick to not buy anything that comes with a label, rather, nothing that comes prepared and ready to eat. I know there will be nights where

gluten free raspberry crisp

Raspberry Crisp

gluten free raspberry crisp

Fruit crisps are one of the easiest desserts to whip up.

You know, when you find raspberries at the farmer’s market (or you find a bag of frozen raspberries in your freezer that you didn’t know you had). Or someone drops by for sangria on the porch and you want to serve something yummy.

This is a dessert that I learned from my mother, and is more of a guideline than a recipe. It can be thrown together in a couple of minutes, popped into the oven and left alone. It uses ingredients that we always have on hand, and can be adapted and changed to use what ever is in your kitchen. Just don’t melt the butter, or you will end up with a mushy crust.

Boys, if you need to do something sweet for a girl, this dessert, topped with a wee bit of vanilla ice cream is a winner. (You hear that Blondie? Even you could make this).

Raspberry Crisp
#ratingval# from #reviews# reviews
Print
Recipe Type: Dessert
Author: Mary Fran Wiley
Prep time: 10 mins
Cook time: 35 mins
Total time: 45 mins
Serves: 4
Really, this could be breakfast.
Ingredients
  • 2 cups fresh or frozen raspberries*
  • 1/8 cup sugar (if a sweeter dessert is desired)
  • 1 cup gluten free oats*
  • 1/4 cup butter, softened
  • 1/4 cup brown sugar
  • 1 teaspoon vanilla
  • 1 teaspoon cinnamon
  • salt to taste
Instructions
  1. Preheat oven to 425 degrees.
  2. Grease a small baking dish (8in square-ish).
  3. Pour in berries and sprinkle with sugar. (I didn’t use it, but if your berries are extra tart, you can add it in).
  4. In a mixing bowl add softened butter, oats, brown sugar, cinnamon and vanilla.
  5. Mix with your hands until combined.
  6. If the mixture is too crumbly, add a little butter. Too loose? Add some oats. Not sweet enough? Add a little more brown sugar.
Notes

If you can’t eat oats, quinoa flakes will work here. Also, make sure they are gluten free.
You can swap out the berries for any fresh or frozen fruit.

Google Recipe View Microformatting by Easy Recipe
1.2.4

Oats, sugar, butter, vanilla, fruit and complimentary spices. Mix the crust with your hands. Not enough? Mix some more.

Mulberry tart

Mulberries

mulberry tree! This recipe tastes like childhood. It brings back the days of coming home when the sun went down and playing across every back yard on the block. It tastes like sitting on my dad’s shoulders and grabbing berries from trees as we walked to and from the ice cream shop or a movie. There were a couple of mulberry trees that every summer would be heavy from juicy, sweet berries. It was my favorite part of the walk. My hands would be stained purple from berries when they burst. My shoes would have gooey purple messes on the bottoms. It was summer. At it tasted good.

Imagine how excited I was to discover that there is a mulberry tree in my backyard. Right there, shading my tomato plants. A tree heavy with the flavor of childhood summers.

mulberries

I couldn’t pass it up. Plus, I recieved a tart pan (along with a dutch oven & a gym membership) from Blondie for my birthday. It was fate.

Now, mulberries have a tart & sour flavor if they are not yet ripe, and even at their juicy best, they are not as sweet as a black berry. But they are darn tasty. If you don’t have access to a mulberry tree in your back yard, front yard or down the street, you can always use raspberries, blackberries or strawberries.

Mulberry tart

The tart recipe has been de-glutened from a recipe and technique shared by David Lebovitz. Visit his site for more in-depth directions and photos of the process. There are no gums, just some flax, and you can use my substitution chart if you are working by weight and want to swap out some flours.

Vanilla Bean Tart with Mulberries
#ratingval# from #reviews# reviews
Print
Recipe Type: Dessert
Author: Mary Fran Wiley
Prep time: 15 mins
Cook time: 45 mins
Total time: 1 hour
Serves: 8-10
Thanks to an incredible method shared by David Lebovitz, the tart has an incredibly tender, melt-in-your-mouth crust
Ingredients

For the crust

  • 6 tablespoons (3oz/90 grams) unsalted butter, cubed
  • 1 tablespoon vegetable oil
  • 2 tablespoons water
  • 1 tablespoon vanilla bean paste
  • 1 tablespoon sugar
  • 1/8 teaspoon salt
  • 10 g ground flax seeds
  • 50 g sorghum flour
  • 30 grams brown rice flour
  • 30 grams white rice flour
  • 30 grams tapioca starch

For the pastry cream

  • 1/4 cup cornstarch
  • 1/4 cup + 1/2 cup sugar
  • 1/2 cup plus 1 1/2 cups milk
  • 4 large egg yolks, lightly beaten
  • 1 pinch salt
  • 2 tsp vanilla extract or vanilla bean paste
  • 2 T unsalted butter
  • 1 pint fresh berries, picked over with stems removed
Instructions
  1. For the crust: Preheat the oven to 410º. In a medium-sized ovenproof bowl, add the butter, oil, water, sugar, vanilla and salt. Place the bowl in your hot oven for 15 minutes. The butter should be bubbling and the mixture should be slightly brown around the edges. While it is baking, whisk together your flours. Carefully remove the bowl from the oven. (Don’t be like me and forget a pot holder, it will be HOT!) and dump in the flour and stir it in quickly, until it comes together and forms a ball which pulls away from the sides of the bowl. Put the dough in a 9in tart pan, and when it is cool enough to touch, press it into the tart pan with your hands, pinching dough up the edges. Prick the bottom with a fork and then bake for about 15 mins. The crust should be a light golden brown.
  2. For the pastry cream: While the crust is cooling whisk together cornstarch and 1/4 cup sugar in a mixing bowl. Stir in 1/2 cup of the milk. Blend yolks into the mixture, stirring until smooth. Prepare an ice bath (a very large bowl filled with ice & water – it should be a bowl that the sauce pan you are using does not quite fit in). Combine remaining milk (1 1/2 cups), salt and sugar (1/2 cup) in a medium sized sauce pan (non-reactive is ideal). Bring to a boil over medium heat while stirring constantly. Temper the egg mixture with about 1/3 of the hot milk (you have to whisk constantly – you do not want to cook the eggs unevenly) Add egg mixture to remaining milk mixture and return the pan to the heat. Continue to cook over medium heat, vigorously stirring with a whisk until the mixture boils and a trail forms after the whisk, about 5-7 minutes. Transfer pan to the ice bath and stir occasionally until the pastry cream is cool.
  3. Assemble the tart: Pour pastry cream (or vanilla pudding) into the crust and top with your fresh berries and enjoy the taste of summer.
Notes

If making pastry cream is too fussy, you could try a vanilla pudding.

If you wish to see the original crust recipe, visit David Lebovitz’s site.

Want to make the crust by volume? Use 1 slightly rounded cup of gluten free all purpose flour (I like Jules’ Nearly Normal Flour), if you use a flour without xantham gum or flax, add 1/2 teaspoon xantham gum.

Google Recipe View Microformatting by Easy Recipe
1.2.4

Ratio Rally: Pâte à Choux pt. 2

gluten free ratio rally logoIf you missed part 1 of my recipes for this month’s ratio rally, you can find it here.

A Marillenknödle is a southern German and Austrian treat made with apricots (Marille) and wrapped in either choux pastry or a potato dough. I wanted to be adventurous, so I added some crystalized ginger chips to the inside and made a cardamom sugar breadcrumb to dust the outside. The sweetness of these depends on the sweetness of your apricots. But they taste like summer should.

I made the regular choux for some chai cream puffs, and they turned out fantastically. My apricot dumplings on the other hand, were a bit more frustrating. I used the same basic choux dough, but all I had was a sticky mess. I did some googling, and although wikipedia and tons of other sites said that choux is used in making Marillenknödle, almost all of the recipes that I could find were ones that used cheese and were not actual choux. Braving it and thinking that maybe wikipedia was right (and all the sites that said that choux was used to make these), I kept looking. Then, I found a blog in French & German where the poster had the same problem: the dough stuck more to her hands than the apricots. Solution: dip your hands in cold water before making each dumpling. It worked like a charm – as long as I didn’t have too much dough.marillenknodel

I made a second batch after figuring out that researching a French pastry term with a German delicacy was going to fail me, I started looking in German, found the correct name for the dough Brandteig. Some German YouTube videos and 20 recipes later, I had it figured out.

Gluten Free Marillenknodel
#ratingval# from #reviews# reviews
Print
Recipe Type: Dessert
Author: Mary Fran Wiley
Prep time: 45 mins
Cook time: 10 mins
Total time: 55 mins
Serves: 8
Ingredients
  • 8 oz (by weight) whole milk
  • 4 oz (1 stick) butter
  • 1.2 oz sorghum flour
  • 1.2 oz brown rice flour
  • 8 oz tapioca flour
  • 8 oz sweet rice flour
  • 4 eggs
  • 4 oz ricotta, strained to remove extra whey
  • 1/4 teaspoon xantham gum
  • 1/2 teaspoon salt
  • 8 sugar cubes
  • chopped crystalized ginger
  • 8 apricots
  • 1 1/2 cups gluten free bread crumbs
  • 1/4 cup sugar
  • 4 T butter
  • 1 teaspoon cardamom
Instructions
  1. Melt the 4 T of butter in a skillet and add the bread crumbs. Toast until golden and fragrant (about 5 mintues). Mix with 1/4 cup sugar and the cardamom. Set aside.
  2. Slice each apricot along the slit (halfway around) and remove the pit.
  3. Fill the holes with a sugar cube & a few bits of crystalized ginger.
  4. Whisk flours, cardamom & xantham gum together.
  5. Boil milk, butter & salt.
  6. Reduce heat to medium and add the flour all at once.
  7. Stir until ingredients start to pull away from the sides of the pot. Remove from heat & put in the bowl of a stand mixer.
  8. Add eggs one at a time, incorporating each one before adding the next one.
  9. Add in the ricotta & mix well.
  10. Chill the dough for at least an hour.
  11. Bring a large pot of water to a boil.
  12. Get a bowl of cold water out.
  13. Dip your hands in cold water and wrap the choux around your apricots. Dipping your hands between each dumpling. This prevents sticking.
  14. Drop the dumplings in boiling water and cook for 5-10 minutes.
  15. Drain the dumplings on a slotted spoon.
  16. Roll them in sugar & toasted bread crumbs once the majority of the water has dripped off.
  17. Serve warm.
Google Recipe View Microformatting by Easy Recipe
1.2.4