Home » gluten free

Tag: gluten free

ingredients for home made gluten-free instant oatmeal from frannycakes

Homemade Gluten-Free Instant Oatmeal

After the crushing revelation that Shamrock Shakes are not green smoothies, and that lattes and gluten-free doughnuts (sorry, Do-Rite) are not actually parts of a complete breakfast, I was left at a loss for what to start with as fuel for my days.

I eat breakfast in the office most days, due to a 2+ hour commute and a stomach that is even less of a morning person than the rest of me. So, I need something that transports easily and can be prepared with just a microwave and a spoon. Oh, and it has to be something my coworkers couldn’t mock me for, like they do for my love of Fruity Pebbles.

home made gluten-free instant oatmeal from frannycakes

The perfect solution? Instant oatmeal. The problem? It adds up pretty quickly and none of the grocery stores around me stock packets of the gluten-free variety. Oh, and the buckets of extra sugar they add to make it taste good…

What’s a girl to do? Make it at home!

It costs a whole heck of a lot less, can pack a nutritional punch, can be made in batches of any size and comes in an infinite number of flavors. So far I’ve made Dirty Chai, Chocolate Chocolate Chip, Honey Ginger (my favorite), Maple Raisin, and Mocha.

how to make home made gluten-free instant oatmeal from frannycakes

I found a lot of recipes that included powdered milk, presumably to up the creaminess factor, but it is an ingredient most people don’t keep on hand. (And by most people I mean me). When I was creating my base recipe, it was important to keep things as simple as possible. I didn’t want to add dairy to something that should be vegan and dairy free (even Quaker Instant Oatmeal is dairy free) and I most definitely didn’t want to tell people to get an ingredient they otherwise wouldn’t keep in their pantry.

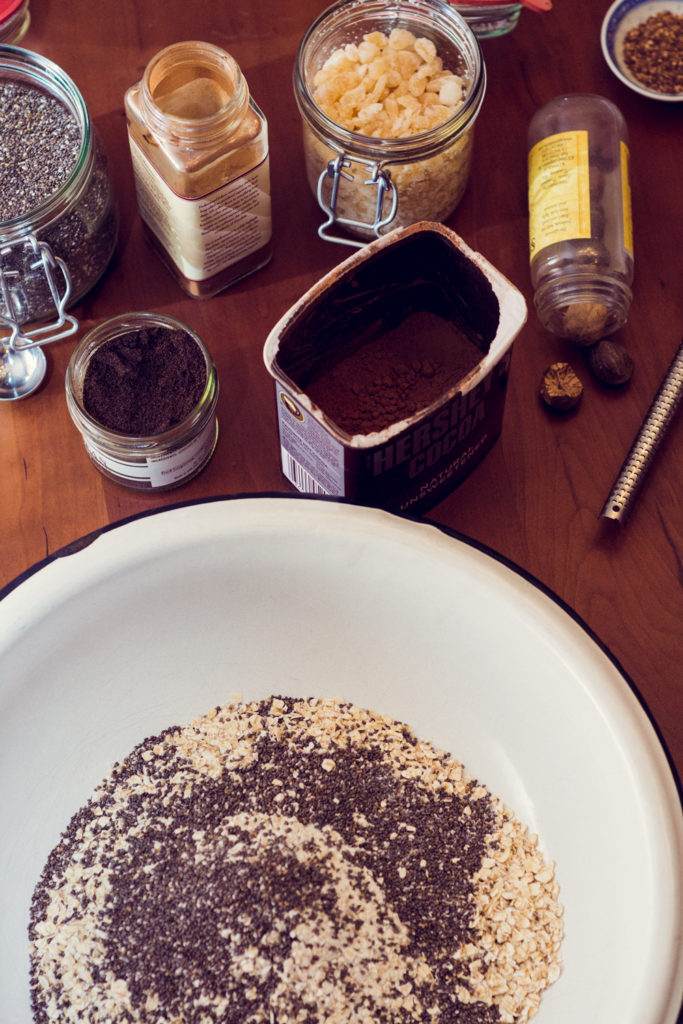
As I experimented, I found that simply grinding some of the oats made the oatmeal as creamy as its store-bought cousins. I couldn’t believe it was that simple. I also added chia seeds, which you could forgo if you don’t keep them on hand, for some protein and added vitamins.

ingredients for home made gluten-free instant oatmeal from frannycakes

Homemade Gluten-Free Instant Oatmeal
Author: Mary Fran Wiley
Prep time: 10 mins
Cook time: 2 mins
Total time: 12 mins
Serves: 6
You can scale this recipe up or down to suit your breakfast needs
Ingredients
  • 175 grams (2 cups) + 35 grams (6 tbsp) gluten-free instant oats, divided
  • 76 grams (6 tbsp) sugar*
  • 3/4 tsp salt
  • 30 grams (3 tbsp) chia seeds
  • Mix-ins (optional, see suggestions below)
Instructions
  1. Grind the smaller amount of oats in a food processor or spice mill.
  2. Combine all ingredients in a large bowl, a stir to make sure the ingredients are evenly dispersed.
  3. If you want to make all your baggies the same flavor, add your mix-ins now.
  4. Divide your ingredients evenly amongst 6 snack-sized plastic zip bags. If you want to add different flavors, you can add them to each baggie.
  5. To prepare, empty the baggie with your oat mixture into a bowl or mug. If you want to make it in a microwave, add a scant half cup of water and heat for 1:30- 2mins. Stir well and allow to cool slightly. If you hate the microwave, you can add a scant half cup of boiling water and let it sit until the oats are tender, about 3 minutes.
Notes
[i]These are suggestions per serving, so to make the whole recipe the same, you would have to multiply these amounts by 6.[/i][br][br][b]Dirty Chai[/b][br]1 tsp espresso powder[br]1/2 tsp cinnamon[br]1/8 tsp nutmeg[br]1/8 tsp cardamom [br]1/4 tsp dried lemon peel[br]1 tsp granulated honey (optional)[br][br][b]Ginger Honey[/b][br]2 tsp granulated honey [br]1 tbsp crystalized ginger[br][br][b]Mocha[/b][br]1 tsp espresso powder[br]2 tsp cocoa powder[br]1 tbsp brown sugar
3.2.2265


gluten-free kisir with sorghum from frannycakes

Gluten-Free Kisir with Sorghum

There are a couple of very awesome things about this blog post. First, it is pomegranate season and I can get my hands on the fruit at nearly every grocery store and they aren’t going to break the bank. Heck, even Walgreens has fresh pomegranate arils next to the Naked juices and RedBull.

Second, I finally found an excuse to make whole-grain sorghum. Don’t get me wrong, I love me some quinoa on the regular, and rice is a staple in these parts, but sometimes you really need to try something new.

gluten-free kisir with sorghum from frannycakes

When I went gluten-free 8 years ago, it was a nerve-wracking, difficult process. There were so many foods with crazy names – back then quinoa wasn’t a culinary buzzword and no one had any idea how to pronounce it. And if you didn’t have a Whole Foods or an ethnic grocery store nearby, you were not going to find it.

But those foods are now routine and ordinary in my diet. I eat buckwheat soba noodles and black bean spaghetti. I get annoyed when Whole Foods tells me they can’t find a local grower of kohlrabi.

Gah. Something happened to me. I became adventurous when it came to safe foods just so that things stay interesting. Which brings me to sorghum. I have used “sweet” sorghum in my gluten-free baking for a few years now. In flour form it isn’t gritty like rice flour or strongly flavored like teff, amaranth or quinoa flours. So, when I stumbled across this bag of whole grain sorghum when I was grocery shopping, I just had to buy it.

I am told the chewy texture is similar to wheat berries or faro, so it is great for salads. It has a mild nutty flavor but none of the bitterness of quinoa. It works well as a substitute for bulgur/cracked wheat in this recipe, and I suspect it would be equally as delicious in other similar dishes.

gluten-free kisir with sorghum from frannycakes

Combine the nutty sorghum with fresh herbs and pomegranates and you have a delightful salad that is delicious both warm and cold. A perfect dish for in-season pomegranates (yay!) and the wild roller coaster that is a Chicago fall…

Gluten-Free Kisir
Author: Mary Fran Wiley
Prep time: 5 mins
Cook time: 1 hour 15 mins
Total time: 1 hour 20 mins
Serves: 6
Kisir is a Turkish dish typically made from bulgur or cracked wheat, parsley and pomegranate molasses. I made this salad gluten-free by using pearled whole-grain sorghum in place of the bulgur. Sorghum has a texture similar to wheat berries which makes it an excellent choice for this salad. The mild, slightly earthy flavor is the closest of the gluten-free grains in flavor to wheat. The salad can be eaten warm or cold and makes for an excellent alternative to a sandwich for lunch. The time on this recipe looks like a lot, but if you put the grain on to cook and leave the prepping of the rest of ingredients until just before the sorghum is done cooking, you really only have about 15 minutes of active time total. This recipe is adapted from the October 2013 issue of Jamie magazine.
Ingredients
  • 500 grams (3 cups) dry, pearled sorghum*
  • 9 cups water
  • 2 tablespoons pomegranate molasses
  • 1 small, sweet pepper or 1/2 of a large sweet pepper, pureed or finely minced**
  • 1/2 red jalapeño pureed or finely minced**
  • 1 tablespoon tahini
  • 1 heaped teaspoon cumin
  • 1 heaped teaspoon black pepper
  • 1 garlic clove, minced
  • 1 pomegranate, seeds removed
  • 2 tomatoes roughly chopped (about 1/2 inch pieces)
  • 1 cucumber chopped in 1/2 inch dice
  • 1 bunch green onions finely sliced
  • 1 bunch mint, leaves picked and chopped
  • 1 small handful flat-leaf parsley, leaves picked and chopped
Instructions
  1. In a large saucepan over medium-high heat combine the water and the sorghum. Generously salt the water (2 large pinches of sea salt is perfect) and bring the pot to a boil. Once boiling, reduce the heat to maintain a simmer and cover the pot leaving the lid slightly askew. Cook the grains for 55-60 minutes.
  2. About 15 minutes before your sorghum is cooked, chop your vegetables and herbs.
  3. When your sorghum is cooked and the water is mostly absorbed- it will be chewier than quinoa or rice – drain any excess water (if there is more than a couple of tablespoons).
  4. Add the pomegranate molasses, sweet pepper, jalapeño, tahini, cumin, black pepper and garlic to the cooked sorghum. Stir for about 10 minutes, making sure that everything is combined well and that the grain is absorbing the flavors.
  5. Now, add about 3/4 of each of the following: pomegranate seeds, tomatoes, cucumber, green onions, mint and parsley. Stir until you have an even distribution.
  6. Use the remaining herbs and vegetables as a garnish when you transfer the salad to a serving dish.
Notes
* Bob’s Red Mill has recently started selling [url href=”http://www.bobsredmill.com/Gluten-Free-Sorghum-Grain.html”]whole grain sorghum[/url] as part of their Grains of Discovery line. I found it at my local whole foods, but you can also get it from a number of online stores such as Amazon and Vitacost.[br][br]** I just finely minced the peppers. It was easier than pureeing them and the dish works just fine that way.
3.2.2124


a recipe for mini gluten-free boston cream pies by frannycakes

Mini Gluten-Free Boston Cream Pies

I really think that my coworkers are trying to stump me when it comes to making them birthday treats. Pulling whatever kind of flavor they can out of their heads to see if I really can do it. I mean, we had gluten-free peanut butter & jelly cupcakes and gluten-free double chocolate peanut butter cupcakes this summer.

learn to make gluten free boston cream pie on frannycakes.com

This time the request was for Boston Cream Pie Cupcakes – something that was actually a bit more traditional and a little less out there.

I decided that I was bored with the core & fill kind of cupcake, so I went a different route with these – I used a mini whoopie pie pan to make the cake pieces and then piped in some filling and poured on a thick glaze. And ended up with two-bite treats that were all gone before lunch.

chopped chocolate for chocolate glaze

The only caveat is that these do not transport well. If you try to take them on your 2-train 2-hour commute, they might just get a little banged up before you get them in to the office. (It won’t effect the flavor, but it might bruise your ego a wee bit). If these need to make a trip, I would bring all the components and assemble on-site. It takes about 10 minutes to combine all the parts into lovely little gluten-free boston cream (whoopie) pies.

a recipe for mini gluten-free boston cream pies by frannycakes

Mini Gluten-Free Boston Cream Pies
Recipe Type: Dessert
Cuisine: American
Author: Mary Fran Wiley
Prep time: 45 mins
Cook time: 25 mins
Total time: 1 hour 10 mins
Serves: 24
These are fun, but don’t travel well, so assemble shortly before serving.
Ingredients
  • For the Cakes
  • 175g (1¼ cups) gluten-free cake flour (143g high-quality all-purpose gluten-free flour + 4 tablespoons (32g) cornstarch)*
  • ½ teaspoon xanthan gum (omit if your blend already contains it)
  • ½ teaspoon baking powder
  • ¼ teaspoon baking soda
  • ¼ teaspoon kosher salt
  • 109 grams (½ cup) packed light brown sugar
  • 28 grams (2 tablespoons) unsalted butter, melted and cooled
  • 24 grams (2 tablespoons) vegetable shortening, melted and cooled
  • 1 extra-large egg at room temperature, beaten
  • 1 teaspoon vanilla bean paste (or replace with equal volume pure vanilla extract)
  • ½ cup + 2 tablespoons buttermilk
  • For the pastry cream
  • 30 grams (1/4 cup) cornstarch
  • 150 grams (3/4 cup) sugar, divided
  • 2 cups milk (I don’t drink milk, so I almost always use almond milk) , divided
  • 4 egg yolks
  • 1 teaspoon vanilla bean paste
  • 2 tablespoons butter
  • pinch of salt
  • Chocolate Glaze
  • 130 grams (4.5 ounces) bittersweet chocolate, roughly chopped
  • 60 grams (4 tablespoons) butter
  • 1 tablespoon corn syrup
Instructions
  1. Preheat your oven to 325 degrees F and grease a mini whoopie pie pan.
  2. In a large bowl, place the flour, xanthan gum, baking powder, baking soda and salt and whisk to combine well.
  3. Whisk in the brown sugar, making sure you remove any lumps.
  4. Next, mix in the butter, shortening, egg and vanilla and make sure everything is well combined.
  5. Now, add the milk and vinegar, and mix again to combine well. You will have a batter that is somewhere between cake batter and cookie dough in consistency.
  6. Using a small scoop or you can pipe about as much as a large marble to each well of your whoopie pie pan.
  7. Bake on a center rack for 8-10 minutes, or until the cakes bounce back when pressed gently in the center. Remove from the oven and allow to cool in the pan for 10 minutes before transferring to a wire rack to cool completely. Repeat with the remaining batter.
Make the pastry cream
  1. Prepare an ice bath.
  2. In a small mixing bowl, combine ¼ cup sugar, egg yolks and the creamer (or ½ cup milk).
  3. In a medium sauce pan over medium heat, bring the remaining 1½ cups milk to a boil, stirring constantly.
  4. Remove from heat and add the hot milk to the egg mixture about a third at a time to temper the eggs. If you do this too fast you will end up with scrambled egg yolks and not a smooth cream.
  5. Return the pot to the stove and add the egg mixture. Over medium heat, keep whisking until the cream thickens and when you scrape the bottom of a pot, the cream does not close the gap immediately. Stir in the vanilla, salt and butter.
  6. Put the pot over your ice bath and stir every 5-10 mintues for about half an hour, or until the cream has cooled.
Make the glaze
  1. When you are ready to assemble the mini boston cream pies, melt together the chocolate, butter and corn syrup over low heat. If the mixture is not pourable, add an extra tablespoon of butter.
Assemble the cakes
  1. Pipe the pastry cream onto half of the cake pieces. Take one of the other cake pieces and top each one. Pour or spread chocolate glaze on each mini Boston cream pie.
Notes
*I use Cup4Cup Gluten-Free All-Purpose flour, and if you don’t have cornstarch, you can use it for the full amount called for here, the cakes will just be a little denser. This recipe will work with almost any GF AP Blend but it will not work with bean-flour based blends or baking mixes that contain baking powder or baking soda.
3.2.2124


gluten-free cannolizelli from kyra bussanich

Sweet Cravings | Kyra’s Gluten-Free Cannolizelli

sweet cravings by kyra bussanich review

I remember the first time I met Kyra, it was at the 2012 Gluten & Allergen Free Expo in Chicago. I was there promoting my first ebook and she was there with samples of her famous truffle brownies. It was friendship at first bite. Over the past couple of years I have had the opportunity to see her take on countless bakers on her 4 appearances on Cupcake Wars and knock out nearly all the competition (She has 2 wins and 2 runner-up finishes under her belt and was the first gluten-free winner on the show).

gf friends
Her cupcakes aren’t just good for gluten-free, they are damn good.   Needless to say, I was crazy excited when I found out she was writing a cookbook. And maybe even a little giddy when she showed off the cover art when I got to see her in February. The book, Sweet Cravings, did not disappoint. Kyra is a trained pastry chef, so she approaches recipes a little differently than us mere mortals. She worked out protein and starch content ratios to make sure that each recipe mimics (or bests) its gluten-filled counterpart.

As you page through the book you will feel urged to drop everything and get to your kitchen and bake. Lush photos (let’s call it what it is, food porn) make you feel like Kyra can help you do just about anything. The book has a very in depth introduction that talks you through the different ingredients she uses and what properties make each ingredient unique. Measurements are included in both volume and metric units, so no matter how you prefer to bake, you will be able to make everything in the book. Unleash your dreams of being a food tv rockstar and start baking some gluten-free cupcakes!

The Rating

Author: Kyra Bussanich
Title: Sweet Cravings
Format: hard cover, full color center photo section
Stars: 5/5*
Buy it or Forget it: Buy it and live out your dreams of Cupcake Wars Domination
Must try recipes: Cannolizelli, Persian Love Cakes with Cardamom Buttercream, Pumpkin Spice Bread

*Read more about my cookbook review criteria.Kyra and I are good friends, and if her cookbook were not super awesome, I wouldn’t review it. I received a copy of the book in PDF form from Kyra and Ten Speed Press provided a physical review copy as well as a copy to give away. 

The Giveaway

There are multiple ways to enter, the only one you have to do is leave a comment here, the rest are optional but they will increase your odds of winning. The giveaway will end on September 25 at 11:59pm CST.

a Rafflecopter giveaway

gluten-free cannolizelli from kyra bussanich

Gluten-Free Cannolizelli
Recipe Type: Dessert
Author: Kyra Bussanich
Serves: 20
Recipe reprinted with permission from Ten Speed Press/Kyra Bussanich. “When I was a child, our Christmas Day tradition was making cannoli. My dad grew up in the Bronx and was enamored with Ferraro’s Cannoli, a landmark in Little Italy. He had figured out a really great approximation of their recipe, so every year we would carefully stir together the ricotta, confectioners’ sugar, spices, and rum, spoon the cannoli filling into the crispy flour tortilla shells, and dust the whole thing with confectioners’ sugar. Then we would pile the cannoli on paper plates and deliver them to our friends and neighbors. Nowadays, I make cannoli in a gluten-free shell. Here’s how.”
Ingredients
  • Shells
  • 3 egg whites
  • 1/2 cup / 113 g sugar
  • 1/3 cup / 71 g butter, melted
  • 1 teaspoon / 5 g vanilla extract
  • 3/4 cup / 122 g sweet white rice flour
  • 1/4 cup / 31 g tapioca starch
  • 1 teaspoon / 5 g baking powder
  • Filling
  • 1 (15-ounce) container / 425 g whole milk ricotta cheese
  • 1/2 cup / 71 g confectioners’ sugar, plus extra for dusting
  • 1/4 cup / 59 g heavy cream
  • 1 teaspoon / 2.6 g cinnamon
  • 1/4 teaspoon / .9 g freshly grated orange zest
  • 11/2 teaspoons / .8 g rum
  • 1/2 teaspoon / 2.5 g vanilla extract
  • 1/4 cup / 43 g semisweet mini chocolate chips
  • 1/4 cup / 31 g toasted pistachio nuts, coarsely chopped (optional)
Instructions
Make the shells
  1. To make the shells, using a stand mixer with a whip attachment, whip the egg whites and sugar until very thick and pale and fluffy. Then whip in the butter and vanilla. In a small bowl, combine the flour, starch, and baking powder. Sprinkle into the egg white mixture and blend well.
  2. Drop by small spoonfuls onto a heated, greased Pizelle iron. Close the lid and cook 30 to 45 seconds, until no more steam is escaping and the shell is golden brown. Open the lid and immediately shape the shells around a cannoli tube form or a sanitized broom handle. Be careful because the cannoli will be super hot coming off the iron. I use a fork and then drape the shell around the cannoli form. Let the shells cool on the form before sliding them off. It’s helpful to have 4 or 5 cannoli forms so you can continue to bake while the previous batch is cooling.
Make the filling
  1. To make the filling, mix together the ricotta, confectioners’ sugar, cream, cinnamon, orange zest, rum, and vanilla until well combined. Stir in the chocolate chips and pistachio nuts.
Assembly
  1. Right before serving, fill a pastry bag with the filling (or use a zip-top bag with a corner snipped off) and gently squeeze the filling into each end of the shells. If you fill them too early, the shells will soften and may break. Dust with confectioners’ sugar and serve.
  2. You can make most of this ahead of time and assemble at the last minute: freeze the baked shells in an airtight container and refrigerate the filling until just before you’re planning to serve. If you want to assemble them ahead of time, melt together 1/2 cup of semisweet or dark chocolate and 11/2 teaspoons of butter and use a small pastry brush to gently paint the inside of the shells with the mixture. This acts as a barrier to the moisture, and also adds more chocolate flavor!
3.2.2124


gluten-free kohlrabi salad from frannycakes

kohlrabi salad

I grew up watching a steady diet of Star Trek: The Next Generation and Star Wars movie marathons. I have seen every Star Trek movie ever made but somehow managed to never watch A Christmas Story. Doctor Who is on any time I can’t find something new and interesting to watch on TV. And although I might be the only nerd who doesn’t think that Firefly was the greatest TV show ever, I am still a pretty huge sci-fi nerd.

Something about all that traveling to new worlds. Meeting new people. Eating new food.

The first time I saw kohlrabi, I was sure I was seeing a vegetable right out of a sci-fi movie. There was this weird spindly vegetable at the farmers market. I had been exploring sweet corn, berries and local chicken when I first noticed it. I saw this globe with green tentacles cut short and people passing right over it reaching for cucumbers that were perfect for dill pickles. I lived on a college campus with research farms – who knew what kind of genetic splicing might have found its way to the locals. Or what sort of alien life they had found…

Image via Gerwin Sturm on Flickr. (Licensed via Creative Commons)

It was cheap, so I bought some. The next week, it was cheap again, so I bought some more. That weird alien vegetable started to be a staple in my kitchen. It was always abundant and affordable at the local farmer’s market, and since the kohlrabi had a flavor similar to jicama or a seedless cucumber, it was easy enough to eat.

Kohlrabi, a member of the same family as cabbage, brussles sprouts and kale, is a vegetable that has become one of my favorites, although I seriously believe that at least part of the reason I love it is its alien appearance. The name is German from words meaning cabbage and radish. A perennial vegetable, it is common at farmers markets because it is easy to grow, but I have had a harder time finding it in traditional grocery stores.

(This is here as proof that I eat vegetables. It might take them looking alien to entice me at first, but I come around eventually…)

gluten-free kohlrabi salad from frannycakes

Gluten-Free Kohlrabi Salad
Recipe Type: Side
Cuisine: Middle Eastern
Author: Mary Fran Wiley
Prep time: 10 mins
Total time: 10 mins
Serves: 4
This recipe is adapted from Jerusalem by Yotam Ottolenghi and Sami Tamimi and is a way to eat the vegetable I had never tried. It is a great way to try Kohlrabi if you have never eaten it before.
Ingredients
  • 3 medium kohlrabies (1 2/3 pounds or 750 grams in total)
  • 80 grams (1/3 cup) Greek yogurt
  • 70 grams (5 tbsp) sour cream
  • 3 tablespoons mascarpone cheese
  • 1 clove garlic, crushed
  • 1 1/2 teaspoons lemon juice
  • 1 tablespoon olive oil
  • 2 tablespoons finely shredded fresh mint
  • 1 teaspoon dried mint
  • about 12 sprigs baby watercresss
  • salt and white pepper
Instructions
  1. Peel the kohlrabies, cut into 2/3-inch dice and put in a large mixing bowl.
  2. In a medium bowl, combine the yogurt, sour cream, mascarpone, garlic, lemon juice and olive oil.
  3. Add a healthy pinch of salt and a generous grind of pepper and whisk until smooth.
  4. Pour the dressing over the kohlrabi followed by the fresh and dried mint and half the watercress. Taste and add salt & pepper if needed.
  5. Gently stir and place in a serving dish. Garnish with the remaining watercress.
  6. Top with the remaining watercress
3.2.2124


gluten-free peanut butter chocolate cupcakes from frannycakes

Gluten-free Double Chocolate Peanut Butter Cupcakes

Just for one moment imagine you have met someone incredibly interesting. And that someone happens to be handsome. Fairly funny. A giant nerd who loves sic-fi and web related nerdery. He wears google glass and loves open-source software. Now imagine he can recite Shakespeare and quoted the first sentence of Pride & Prejudice when you were discussing your favorite books.

Don’t forget to imagine him as charming. The sort of charming that disarms you. Makes you want to hang on his every word. He tells you stories about a past filled with the types of risks you wish you took.

Oh, and then he kisses you. A real foot-popping kiss. An earnest, sweet kiss. The kind you both want to call all your girlfriends to discuss but want to keep it to yourself just a little bit longer.

Yes, imagine all that (although, if you would rather a surfer dude with a love of detective novels, feel free to replace my dream dude for yours in this little fantasy).

gluten-free double chocolate cupcakes from frannycakes

But as a cupcake. (Yes, I totally went there. And, no, I am not ashamed).

It is no secret that I have a life-long love affair with baked goods, so it should come as no surprise that I might have fallen in love with these particular cakes. Because unlike the boy, there is something real to the relationship. There is more than boyish charm and nerdy good looks. There is cake.

gluten-free peanut butter chocolate cupcakes from frannycakes

More precisely, there is moist chocolate cake, velvety chocolate buttercream, surprise peanut butter centers. This is a serious cupcake. Appropriate for any situation in which a cupcake needs to love you back. Like the time when the aforementioned boy decides you are not the girl of his dream, you know it’s ok because you have this cupcake.

A magic gluten-free cupcake that loves you.

gluten-free double chocolate peanut butter cupcakes from frannycakes

Gluten-free Double Chocolate Peanut Butter Cupcakes
Author: Mary Fran Wiley
Prep time: 1 hour
Cook time: 25 mins
Total time: 1 hour 25 mins
Serves: 30
This is a recipe for winning at life or at least for winning at dessert (or a bake sale or office party).
Ingredients
  • For the cupcakes
  • 63 grams (1/2 cup + 3 tablespoons) cocoa
  • 1 cup boiling water
  • 3 large eggs
  • 1 tablespoon vanilla
  • 235 grams (2¼ cups plus 2 tablespoons) GF AP flour*
  • 1 teasponn xanthan gum**
  • 300 grams (1½ cups) granulated sugar
  • 15 grams (1 tablespoon) baking powder
  • 5 grams (3/4 teaspoon) salt
  • 227 grams (2 sticks) butter, softened.
  • Filling
  • 170 grams (1 1/2 cups) confectioners’ sugar
  • 135 grams (1/2 cup) creamy peanut butter
  • 26 grams (2 tablespoons) butter, at room temperature
  • 1/2 teaspoon vanilla extract
  • For the Frosting
  • 8 large egg whites (30g each–total 225g, or 1 cup)
  • 400 grams (2 cups) granulated sugar
  • 560 grams (5 sticks) of unsalted butter, softened but cool, cut into cubes
  • 30 ml (2 tablespoons) pure vanilla extract
  • ¼ tsp salt
  • 400 grams (about 2 cups of discs) high quality chocolate
  • 1 teaspoon vanilla extract
Instructions
Bake the cupcakes
  1. Preheat the oven to 350 degrees Fahrenheit. Prepare the cupcake tins with papers & grease the tops.
  2. In a medium bowl, whisk together the boiling water and cocoa til smooth. Let sit for a couple minutes to come to room temperature.
  3. In a second bowl, lightly beat together the eggs, ¼ of the cocoa mixture and the vanilla.
  4. In the bowl of a stand mixer, combine the flour, sugar, baking powder and salt and stir on low to combine.
  5. Add butter and the remaining cocoa mixture and mix on low speed until all ingredients are moistened. Increase speed to medium for a minute and a half to develop structure.
  6. Scrape down the sides of the bowl and add the cocoa & egg mixture in 3 batches, beating for about 30 seconds after each addition.
  7. Use a scoop and fill the tins ½-2/3 full. You should end up with exactly 30 cupcakes.
  8. Bake for 20-25 minutes. If you are baking with multiple pans in the oven at once, rotate them halfway into baking.
  9. The cake should spring back when lightly pressed, or a toothpick inserted into the center should come out clean.
  10. Cool in the pans for about 5 minutes, and then move to a cooling rack until completely cool.
Make the filling
  1. While the cupcakes are baking, make the filling.
  2. In the bowl of an electric mixer fitted with the paddle attachment, or using a handheld mixer, beat together the sugar, peanut butter, butter, and vanilla at medium speed. The dough should end up slightly crumbly.
  3. Roll the dough into 30 balls, about 1 teaspoon each. Set aside.
For the frosting
  1. While the cakes cool, make the frosting.
  2. Combine the egg whites and sugar in a small pot until they reach 140 degrees fahrenheit.
  3. Transfer to a clean stand mixer bowl. Using the whisk attachment, beat until light and fluffy (soft peaks).
  4. Switch to the paddle attachment and add the butter one chunk at a time until it is all combined.
  5. Melt the chocolate in the microwave on half power, heating it first for 30 seconds, and then in 15 second intervals after that, always stirring after each burst of heat. Once melted, let the chocolate cool so that it is still melted but just warm, not hot – you don’t want it hot so that it melts the butter, and then add it to your frosting, beating and scraping down the sides so you have a velvety and evenly mixed buttercream.
Assemble the cakes
  1. Remove the centers from the cupcakes using a cupcake corer, melon baller or pairing knife.
  2. Place one peanut butter ball in each cake. Top with the tops of the centers so there is cake on top of the peanut butter. You just want the top 1/4 inch or so of the removed center.
  3. Pipe a generous swirl of buttercream on each cupcake.
Notes
*I test all recipes using Cup4Cup Gluten-Free All-Purpose flour and it is by far my favorite. If you cannot find it where you live, Jules Nearly Normal flour is a close second. [br]**Omit if your blend contains xanthan gum, guar gum or expandex.
3.2.2124


Peanut Butter & Jelly Cupcakes

My birthday is a once a year occasion. Which is sad because the more birthdays I have, the more excuses I would have to bake a cake. The good news here is that I have friends. And all of those friends have birthdays. And the best part is that friends with birthdays challenge me to make cupcakes, cakes and other desserts that I wouldn’t normally make.

gluten-free peanut butter and jelly cupcakes

Like these cupcakes. Peanut butter & jelly cupcakes. I had used the combination in some gluten-free blondies last fall, and thought that was enough exploration of the classic combination. A peanut butter & jelly chocolate at the French Laundry made me certain that I could never live up to something that elevated a childhood classic.

But when my friend/coworker/fellow WordPress geek/the person responsible for my further downfall into nerdiness, Andi, asked for peanut butter and strawberry jelly cupcakes for her work birthday treat, I couldn’t refuse. In fact, I spent a couple of weeks thinking about how I would make it happen. Peanut butter filled vanilla cakes with strawberry frosting? Strawberry cakes with peanut butter frosting? The ways this could have gone… But, I remembered. Joy the Baker had a recipe for Peanut Butter Birthday Cake in her cookbook. And that Joy, she has never steered me wrong.

gluten-free peanut butter & jelly cupcakes from frannycakes

So, I made a gluten-free buttermilk peanut butter cake. I frosted them with a classic American buttercream augmented with some peanut butter. But the crowning jewel? More of Mammacake’s home made strawberry preserves. (I might have used a whole jar…)

piping practice

These cupcakes also happened to be the first chance I had to use my new piping skills from the Wilton BlogHer workshop. I felt pretty accomplished piping buttercream flowers onto the tops of all of those cupcakes.

gluten-free pb&j cupcakes in holder

Gluten-Free Peanut Butter & Jelly Cupcakes
Recipe Type: Dessert
Cuisine: American
Author: Mary Fran Wiley
Prep time: 20 mins
Cook time: 25 mins
Total time: 45 mins
Serves: 24
The cake is adapted to be gluten-free (and cupcakes) from the Joy the Baker Cookbook by Joy Wilson. The frosting is how my mom taught me to make it when I was a kid. The preserves were stolen when Mammacakes wasn’t looking.
Ingredients
  • for the cake
  • 315 grams (2 1/4 cups) gluten-free all-purpose flour*
  • 1 gram (1 teaspoon) xanthan gum**
  • 10 grams (2 teaspoons) baking powder
  • 5 grams (1 teaspoon) baking soda
  • 3 grams (½ teaspoon) salt
  • 205 grams (3/4 cup) smooth peanut butter
  • 85 grams (6 tablespoons or 3/4 stick) butter, softened
  • 100 grams (½ cup) granulated sugar
  • 110 grams (½ cup firmly packed) brown sugar
  • 3 large eggs
  • 1 cup + 2 tablespoons (265 ml) buttermilk
  • for the frosting
  • 170 grams (1½ sticks) butter, softened
  • 65-130 grams (1/4-½ cup) smooth peanut butter
  • 675-900 grams (6-8 cups) confectioner’s sugar
  • 2 teaspoons vanilla extract
  • ½ cup (118 mls) milk
  • pinch of salt
  • filling
  • 1/2 pint jar of your favorite jam or preserves
Instructions
Make the cupcakes
  1. Preheat oven to 350 degrees Fahrenheit (175 C). Position one rack in the center and one in the top third of the oven. Line a cupcake tin with papers and grease the tops (just in case)
  2. In a medium bowl, whisk together the flour, xanthan gum (if using), baking powder, baking soda and salt. Set aside.
  3. In the bowl of a stand mixer, cream together the peanut butter, butter, sugar and brown sugar for 3-5 minutes. You want the mixture to be light and fluffy.
  4. Add the eggs one at a time, beating for 1 minute on medium and scraping down the sides of the bowl before each addition.
  5. Add half the flour mixture and mix on low speed and slowly add the buttermilk.
  6. Scrape down the sides and add the rest of the flour mixture until the batter just starts to come together. Remove the bowl from the mixer and finish stirring with a spatula.
  7. Use a spring loaded ice cream scoop or spoon to fill the cupcake papers 1/2-2/3 full.
  8. Place one cupcake tin on each rack and bake for 10 minutes. Rotate the pans and bake for another 8-12 minutes. You want a toothpick to come out clean and the top of the cakes to bounce back if pressed.
  9. Cool completely on a cooling rack.
Make the frosting
  1. In the bowl of a stand mixer combine the butter, 65 grams (1/4 cup) of the peanut butter, 450 grams (4 cups) of the sugar, the milk and the vanilla.
  2. Beat on medium for 3-5 minutes.
  3. Gradually add the remaining sugar 1 cup (115 grams) at a time, beating for 2 minutes after each addition.
  4. When the frosting is firm enough to pipe, stop adding sugar and add the salt. If the frosting is too firm or not peanut butter-y enough you can add more peanut butter. I used 1/4 cup and nearly the full amount of powdered sugar. Your results will depend on the humidity, the type of peanut butter and how soft your butter was.
Assembly
  1. Remove the centers of the cupcakes with a cupcake corer or a paring knife, being sure to leave a little cake at the bottom of your well.
  2. Pipe in the jam or preserves until the well is almost full. Replace the tops of your holes (you will toss some cake, just save the part that is the very top of the removed cake) to keep the jam from making the frosting mushy.
  3. Pipe your frosting on your cupcakes. I made rosettes because I don’t think these need that much frosting, but you will have enough frosting to do a normal swirl if you would like.
  4. Sprinkle with decorative sugar, if you feel like it. I used pink to represent the strawberry jam inside.
Notes
*I prefer Cup4Cup gluten-free all purpose flour and use it in all of my tests. You would also have good results with Jules Nearly Normal Flour and Better Batter.[br]**If your gluten-free all-purpose blend includes xanthan gum or an equivalent (the ones listed above all do), you can omit this.
3.2.2124


gluten-free strawberry macaron recipe from frannycakes

Gluten-Free Strawberry Macarons

Ah, the macaron. It might just be the perfect cookie. Crunchy. Chewy. Dreamy. With just a little bit of cream filling. Seriously, who needs a boyfriend when a cookie like this exists? They totally love you back. I swear.

Wait, I can’t be in love with a cookie? If you say so. But, before we go any further, I need to make sure that you are clear on the difference between a macaron and a macaroon. Macaroons are those chewy coconut cookies with a cherry on top. Macarons are the french delight that is two merengue and almond shells with a lovely filling in the middle.

I even made a little diagram of what makes a macaron (ok, I might be a little obsessed. I am totally fine with that.)
anatomy of a macaron

I decided to make macarons again when I discovered that MammaCakes had made some home made strawberry jam. Strawberries and almonds make a great combo (last summer I made this Strawberry Frangipane Tart with this same flavor profile).

I even made french buttercream for the center of the gluten-free strawberry macarons as a way to use up all the yolks left behind from the merengue. Planning ahead, it gets you every where. And by everywhere I mean that it gets you to velvety smooth buttercream.

strawberry macarons on wire rack

Now, let’s talk about how you go about adding flavor and color to a macaron.

  • Use gel food coloring. You don’t want to change the texture of the merengue by introducing liquid. A gel will not alter the consistency as much. And remember, a little goes a long way.
  • It is easiest to flavor the filling. The brain is a magic place, colors that match the flavor of the filling send a signal to your brain that the shell is flavored too. Even if it isn’t. Also, flavor elements can change the texture of the shell, so stick to changing the type of nut or the flavor of extract you use rather than try to add a puree to the merengue.
  • Make a bulls eye. Creating a ring of buttercream around a jam will keep it from leaking out the sides.

gluten-free strawberry macaron recipe from frannycakes

Gluten-Free Strawberry Macarons
Recipe Type: Dessert
Cuisine: French
Author: Mary Fran Wiley
Prep time: 1 hour
Cook time: 30 mins
Total time: 1 hour 30 mins
Serves: 18
This recipe is adapted from the Bouchon Bakery cookbook. It is best to use home made or small batch preserves when making these – they have a more intense fruit flavor than commercially produced jelly.
Ingredients
  • For the shells
  • 212 grams (1¾ cups + 2½ tablespoons) almond meal
  • 212 grams (1¾ cups + 1 tablespoon + 2 teaspoons) confectioners’ sugar
  • 82 (1/4 cup plus 1½ tablespoons) egg whites
  • 90 grams egg whites (1/4 cup plus 2 tablespoons – this is about 7-8 whites) egg whites (yes, you need both quantities, divided)
  • 1 vanilla bean, slit open
  • 236 grams granulated sugar (1 cup plus 3 tablespoons), plus a pinch (about 5 grams)
  • 158 grams (2/3 cup) water
  • Pink gel food coloring
  • 3-4 tablespoons of strawberry jam or preserves
  • 1 recipe Strawberry French Buttercream (recipe below)
Instructions
Make the shells
  1. Cut 2 sheets of parchment paper to fit your cookie sheets. Trace 2¼ inch circles with a fine point marker like a Sharpie approximately 1 inch apart in alternating rows of 3 & 4. Turn the parchment paper over and lay it on your sheet pans/ cookie sheets.
  2. Preheat the oven to 350°F (convection) or 400°F (standard).
  3. Place the almond flour in a food processor and pulse to grind it as fine as possible. This is really not an optional step unless your almond meal is ultra fine. Most isn’t, and skipping this step can leave you with lumpy macarons. (Although the flavor won’t be bad)
  4. Sift the almond flour and powdered sugar into a large bowl and whisk together. If you have more than a couple of tablespoons of almonds remaining in the sifter, re-grind the flour in the food processor. Create a mound in the bowl with the almond flour mixture, then make a 4-inch well in the center, leaving a layer of the flour at the bottom. Pour in the 82 grams | ¼ cup plus 1½ tablespoons egg whites and combine with a spatula, stirring until evenly distributed and paste-like. Scrape the seeds from the vanilla bean into the bowl and mix until they are fairly well distributed. Set aside.
  5. Place the remaining 90 grams (1/4 cup plus 2 tablespoons) of the egg whites into the bowl of a stand mixer fit with a whisk attachment. In a small saucepan, combine the 236 grams (1 cup plus 3 tablespoons) granulated sugar and the water and heat over medium-high heat until the syrup reaches 203°F/110°C, stirring only until the sugar is dissolved and the mixture is clear.
  6. While the syrup continues to cook, add the pinch of sugar to the egg whites, turn the mixer to medium speed (a 5 or 6 on my mixer), and whip to soft peaks. If the whites reach soft peaks before the syrup reaches 248°F/12o°C, reduce the speed to the lowest setting, just to keep them moving.
  7. When the syrup reaches 248°F/120°C, remove the pan from the heat. Turn the mixer to medium-low speed, and slowly add the syrup, pouring it between the side of the bowl and the whisk. Do not panic when the meringue deflates.
  8. Increase the speed to medium and whip for 5 minutes, or until the whites hold stiff, glossy peaks. Although the bowl might still be warm to the touch, the meringue should have cooled; if not, continue to whip until it is cool.
  9. In the bowl with the almond mixture, fold in one-third of the meringue, then continue adding merengue to the almonds little at a time (you might not use them all – I used about 90% each time I have made these. You can pipe the left over plain merengue out when you are done and make little pavlova shells) until when you fold a portion of the batter over on itself, the “ribbon” slowly moves. The mixture shouldn’t be so stiff that it holds its shape without moving at all, but it shouldn’t be so loose that it dissolves into itself and does not maintain the ribbon; it is better for the mixture to be slightly stiff than too loose. So go slowly! Take your time! You want to make sure that your mixture does not have any ribbons of plain merengue, where there are no almonds or your shells could crack.
  10. Fold in a small amount of gel food coloring while you are adding your merengue. If you want a more intense color once your mixture is uniform, you can add a smidge more, but you don’t want to over mix and deflate your batter.
  11. Transfer your mixture to a pastry bag fit with a ½-inch plain tip. Hold the bag upright about a half inch above the center of one of the traced circles and pipe out enough of the mixture to fill in the circle. Lift away the pastry bag and repeat, filling the remaining circles on the first pan.
  12. Next (and this is important!) Lift up the sheet pan and firmly (but not too hard) tap the bottom of the pan to the spread the batter evenly and smooth any peaks left by the pastry bag (there will be some, and if that doesn’t make them go away, wet your fingertip and tap them down).
  13. If you are using a convection oven, which I recommend, bake the shells for 8 to 10 minutes. You want to cook them until the tops are shiny and crisp. If you are using a standard oven, place the sheet pan in the oven and then immediately lower the oven temperature to 325°F, and bake for 9 to 12 minutes, again, until the tops are shiny and crisp.
  14. Set the pan on a cooling rack, and if using a standard oven, preheat it to 350°F again.
  15. Pipe the remaining meringue mixture into the circles on the second sheet pan and bake as directed above. Let cool completely.
  16. While you are waiting for your cookies to cool, make
Assemble the macarons
  1. Pipe a circle of buttercream on half of the macaroni shells, leaving the center empty, I used a wide plain circle tip but held the bag close to the shell to keep the circle wide & flat. Pipe or dollop jam in the middle, and gently place a second shell on top.
Notes
These will get even better if you have made them ahead of time and pop them (well-wrapped) in the freezer for a day or two and then let them come to room temperature before serving.
3.2.2124
Strawberry French Buttercream
Recipe Type: Dessert
Cuisine: French
Author: Mary Fran Wiley
Prep time: 5 mins
Cook time: 15 mins
Total time: 20 mins
This is a great way to use up the yolks left over from the macaron-making process. It is also the richest kind of buttercream, which secretly I think makes it the best. Also, make sure to use high quality jam or preserves – home made or small batch are best.
Ingredients
  • 38 grams (3 tablespoons + 1/2 teaspoon) granulated sugar
  • 38 grams (3 tablespoons + 1/2 teaspoon) granulated sugar (You do need both quantities, and yes, they are both the same)
  • 63 grams (1/4 cup + 1/2 teaspoon) egg yolks
  • 75 grams (1/4 cup + 2 1/4 teaspoons) whole milk
  • 250 grams (8.8 ounces) unsalted butter, cut into 1/2 inch cubes at room temperature
  • 1/2 teaspoon salt
  • 2 tablespoons strawberry preserves or jam
Instructions
  1. Whisk 38 grams of sugar and the egg yolks together in a medium bowl and set aside.
  2. In a medium sauce pan over medium heat, combine the remaining 38 grams of sugar and the milk.
  3. Stir to dissolve the sugar.
  4. When the milk is just below a simmer, slowly pour it into the egg yolks while whisking. Pour the combined mixture back into the pan and place over medium heat.
  5. Whisk continuously and bring to a gentle simmer and simmer for one minute. Lower the heat if necessary – you don’t want the mixture to curdle. It should be very thick.
  6. Remove from the heat and strain through a fine-mesh strainer into the bowl of a stand mixer.
  7. Fit the mixer with the whisk attachment and whisk on medium for 8 minutes, or until mixture is cool.
  8. Add the butter a little at a time, waiting between each new addition.
  9. When you have all the butter added, mix in the salt and the jam.
3.2.2124


Gluten-Free Chicken Tikka Masala

If you were to look at my text messages, emails or the nicknames assigned to people in GChat, you might think that half the people I know don’t have actual names. Or that I have friends who fancy themselves celebrities on a mission to have the cleverest of names. Maybe you would think I was a secret agent (actually, it would be pretty cool if you thought that). Read more

Relish-A curated list of the best of gluten-free in July 2013

Relish 07: A midsummer night’s dream

Relish-A curated list of the best of gluten-free in July 2013Conferences, schmoferences

Boy, oh boy, oh boy. I have been conferencing it up this summer. So far there has been BlogHer Food in Austin, WordCamp in Chicago and BlogHer 13 in Chicago and in just a couple of weeks I am going to Weapons of Mass Creation in Cleveland. I was able to eat safely at two of the three I have attended so far (can you believe that WordCamp had gluten-free cupcakes? From a bakery celiac friends trust? I was so excited I nearly cried – but don’t tell the nerds that…). WMCFest doesn’t provide food, so I am going to go armed with an arsenal of snacks. Maybe some of the new grown up items from Happy Family…

But let’s talk.

Can I just tell you that you are an amazing community? You all helped fund Erica from Celiac and the Beast‘s kickstarter campaign for her new book. Y’all are super cool like that. And the words of support when April, Erica and I were all handed death on a plate at a conference last weekend was nothing less than swell. I’m glad you all want me to live and the intestines of my gals to stay in tact.

But, you had to know there was going to be a but, can I ask that we all get a little less militant about food? There is a lot of vitriol surrounding the new Pilsbury products and the possibility of a GF Twinkie. Well, I know these things aren’t healthy. And neither are the cookies that I make. Sometimes you just need to be normal and eat refrigerated cookie dough from a tub after drama with some boy who said he’d call and then never did. I think these items might just be the key to moving on just a smidge faster.

Delicious eats.

I love food. And in the summer, when fresh fruit and vegetables are everywhere, food is even better. Here are a few of my favorites from this month.

Relish - Curated Gluten Free Recipes - July 2013

It is no secret that I don’t like beets. But everyone I know does, and frankly, they are so dang beautiful. So, try these Sauteed Beet Greens and Spring Onions (01) from Farm Fresh Eats. Some days I feel like moving to the country and eating a lot of peaches…(pardon the terrible music joke). These Moscato Honey Vanilla Poached Peaches (02)from Busy in Brooklyn look like they are made to inspire cheesy pop music (and I mean that in a good way). I continue my love affair with the food from The Tomato Tart’s kitchen with this delightful Gluten-Free Grilled Cheese with Spicy Berry Chutney (03). One day I am going to just show up at her house and demand dinner (I’ll do the dishes!). And last, but not least, these Roasted Heirloom Tomatoes with Fontina and Thyme (04) from Healthy Green Kitchen look like all my summer fantasies.

Little Treats

This month there are no shoes or fun new lip glosses, but there are some pretty nifty other things. Like books. Lots of books.

Relish - Curated Gluten Free Luxuries - July 2013

I loved this book before BlogHer, but after meeting Sheryl Sandberg and hearing her speak, I think everyone with a vagina should read her book, Lean In (01). And so should everyone who knows someone with one. I am currently working my way through Stephen King’s On Writing (02), and I think that if you write, you should probably read it too. I also just started The Ocean at the End of the Lane (03) and I am hooked. Lastly, I just read a piece on the New York Times about the Jerusalem (04) cookbook from Yotam Ottolenghi (author of Plenty), and realized that not only had I not cooked from it, but that I didn’t have it. Don’t worry, I am remedying that situation ASAP.

Coming up

Next month has more travel, a lot of birthday baking and lots more blog posts! But, while you’re here, take a moment to check out my new blog/design project and maybe (just maybe) like it on Facebook? It is a series of inspirational quotes designed to look pretty nifty (since I am a designer in my other life…) Like the one below:

Chronic Positivity 26: Little by little a little becomes a lot. - Tanzanian Proverb