Home » easy

Tag: easy

gluten-free chicken chorizo "paella"

Chicken & Chorizo “Paella”

Somehow, adulting* is taking all of my time these days. There seems to be something to do every night. Ballet. Yoga sculpt. Barre. Dance Cardio. Tap. French conversation group. Coffee dates with best friends. Museum dates with mom. Doctors appointments. Lots of doctor’s appointments. Being responsible and doing things like paying bills and negotiating better rates. Fitting in a day job.

*adulting: the tasks and duties of being a grown-up.

These days, there’s not always a whole lot of time to cook special dinners every night. Pasta and jarred sauce or boxed mac & cheese aren’t meals that I should keep as fixtures on my dinner rotation and lunches out add up pretty quickly. So what’s a girl on a budget with high food standards and a crazy schedule to do?

Hint, the answer isn’t decide chocolate is a food group and eat it for dinner. (I keep trying to make it happen, but I fear that its fate is the same as “fetch”…never going to happen).

stop trying to make fetch happen | mean girls

Answer: Maximize cooking productivity

It takes almost the same amount of time to cook a 2 serving batch of a dish like this as it does to cook a 6 serving batch. (It can also be a help for budget cooking – you aren’t wasting half used bunches of herbs). I’m not saying go all once a month cooking crazy (there’s not enough room in a shared apartment freezer for that to be possible), just make a couple extra servings.

Big batch cooking takes the pressure off of busy week nights and even frees you up for impromptu plans because you have backup meals in the freezer. (As a single lady, a big batch of meals to me is a normal-sized batch for a family).

The worst part of big batch cooking is if you eat the same dish for lunch and dinner 3 days in a row. If you can pay attention to your meal inventory, you can make sure that you never run out of options in the freezer and could have 2 or 3 different dishes tucked away at any one time.

“Paella” with chicken & chorizo and not a single creature from the sea. #singleladysupper #foodallergies

A photo posted by Mary Fran Wiley (@frannycakes) on Feb 4, 2015 at 8:40pm PST

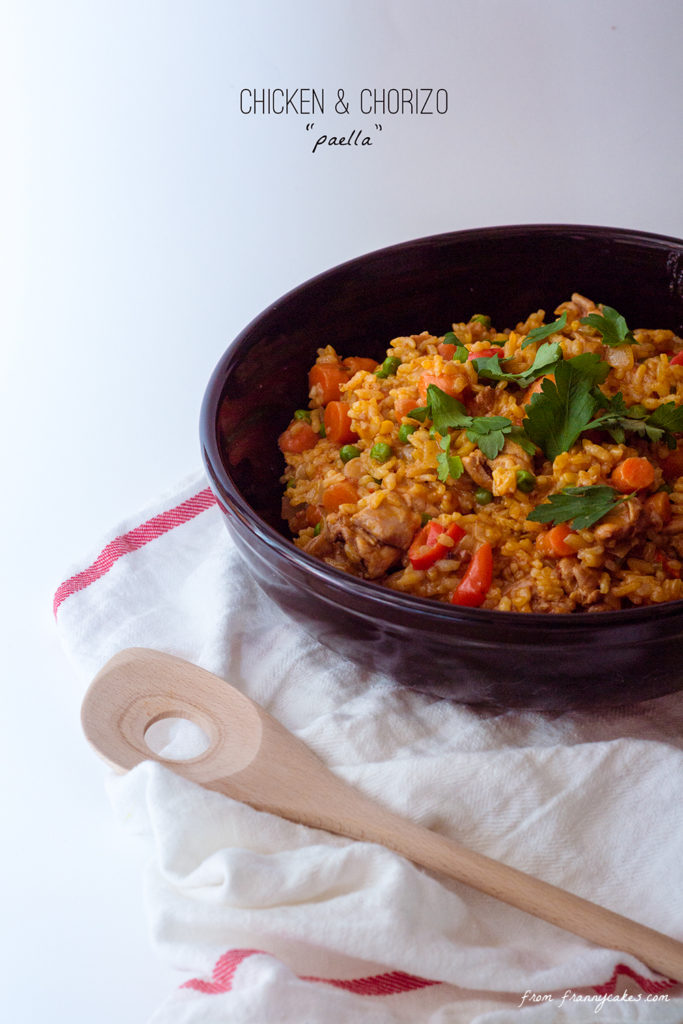
One of the meals I keep coming back to (I probably make a big batch every 6 weeks) is a chicken & chorizo paella that I have adapted from Save with Jamie. Now, all that’s “paella” about it is the method and possibly the pan, but it is still darn delicious. The chorizo and paprika give a spicy depth to the dish while the peppers and carrots round out the flavors with a little inherent sweetness. Parsley and a squeeze of lemon brighten the dish.

ingredients in gluten-free chicken & chorizo paella

The dish is pretty fluid and adaptable. Don’t have carrots? Add more peppers. Only 2 chicken thighs? I hear shrimp is good (it isn’t in my version of this dish due to my shellfish allergy).Want more veggies? Double the peas or serve it on a bed of a spicy green like arugula. No arborio rice? Short grain brown rice can be used as well. No parsley? Use chives or scallions in place of the stalks and skip the leaves.

gluten-free chicken chorizo "paella"

I could even see experimenting with different flavor profiles within the framework of this dish. You could easily swap out the chorizo for a different kind of fresh/uncooked sausage (the new Whole Foods in my neighborhood has a variety of fresh sausages) and changing the seasoning and veggies to match.

Chicken & Chorizo “Paella”
Recipe Type: Entree
Author: Mary Fran Wiley
Prep time: 10 mins
Cook time: 30 mins
Total time: 40 mins
Serves: 4-6 servings
This dish is great for making a big ol’ batch and portioning it in the freezer for easy grab & go meals or an excellent (and affordable) dish to be the centerpiece of a laid back potluck with friends. Adapted from one of my favorite chefs, Jamie Oliver.
Ingredients
  • 2 cloves of garlic
  • 1 onion
  • 1 large carrot or a handful of baby carrots
  • 15 g f(4-5 stalks worth) fresh flat-leaf parsley
  • 70 g (2.5 ounces) raw chorizo (or 1/4 of a package of Mexican chorizo
  • 4 skinless, boneless chicken thighs (about a pound or 450 grams)
  • olive oil
  • 1 teaspoon sweet smoked paprika
  • 3 1/4 cups (750 ml) water
  • 1 large red bell pepper or sweet red pepper. You can also use 6-8 mini sweet peppers
  • 1 tablespoon tomato paste*
  • 1 cube chicken stock
  • 300 g (1 1/2 cups) arborio rice
  • 100 g frozen peas (optional)
  • 1 lemon
Instructions
  1. Prepare a mise en place (Gather up and measure out each ingredient, set up your cutting board, knives and pans).
  2. Peel and mince the garlic. Next, peel and roughly chop the onion and carrot.
  3. Remove the leaves from the parsley and set aside. Finely chop the parsley stalks.
  4. Roughly chop the chorizo (you still need to break up the chorizo a little bit if it is the raw mexican kind so that it disperses evenly into the dish) and chicken thighs.
  5. Put a lug of oil into a large lidded shallow casserole or paella pan on a medium heat. Now, add in the garlic, onion, carrot, parsley stalks, chorizo, chicken and paprika. Cook all this for around 5 minutes, stirring regularly.
  6. In a tea kettle or pot over high heat, boil your water.
  7. While it is cooking, deseed and chop the pepper, then add to the pan and cook for an additional 5 minutes.
  8. Stir in the tomato paste and crumble in the stock cube over everything.
  9. Then add the rice and stir for a couple of minutes -this will help all those flavors permeate the rice.
  10. Pour in your boiling water and add a pinch of salt and pepper.
  11. Pop the lid on and cook until it starts to boil, then reduce the heat so your liquid is at a simmer for 15 minutes, stirring regularly. (If it looks like it is about to dry up before the rice is cooked, you can add a splash more water.
  12. If you like peas (or happen to have some hanging out in the freezer from the last time you made mushy peas and need a reason to use them), stir them through (from frozen is fine). Cook for about 5 minutes more – you just want ever
  13. Season to perfection, then chop the parsley leaves, scatter them over the paella, and serve with lemon wedges on the side for squeezing over.
3.2.2807

Gluten-Free Chicken Tikka Masala

If you were to look at my text messages, emails or the nicknames assigned to people in GChat, you might think that half the people I know don’t have actual names. Or that I have friends who fancy themselves celebrities on a mission to have the cleverest of names. Maybe you would think I was a secret agent (actually, it would be pretty cool if you thought that). Read more

gluten-free honey mustard chicken foil packet dinner for camping

A Camping Trip & a Foil Packet Dinner

You might have had a mild inkling that I am not an outdoorsy girl. Particularly if you have seen my instagram feed. Or my shoe collection.

When I was invited to this camping trip, a good friend asked if I even was going to have to buy new shoes so that I had appropriate footwear. (Clearly I own appropriate shoes – this first picture is proof…)

when frannycakes goes camping

I was very much undecided about a weekend filled with nature. I hadn’t been camping since Girl Scout Camp when I was 10. My idea of visiting nature is a mile or two hike through the forest preserve. Not spending 3 days away from civilization.

Somehow, I let them talk me into going. I am still unsure how that happened.

It started with crazy Chicago traffic, a third person I didn’t know, a broken down car and an emergency car rental. That first car ride is what made our trip. My friend Helen and I bonded with an acquaintance who needed a ride to the camping trip. (This was greatly aided by the Sour Patch watermelon candies that I grabbed on impulse at the grocery store…)

There was a lot of laughter. A little bit of singing. A lot of games. I spent time with acquaintances that I rarely get to see in real life. I bonded with some of the girls over our lack of outdoorsy-ness. We all got a little silly. We even got to watch lanterns released in lieu of holiday weekend fireworks.

So, if I ignore the fact that there were bugs and dirt, it was a pretty ok time. And the food was pretty spectacular.

It had to be the best – people expect things when you blog about food. Plain old burgers and dogs wouldn’t cut it if I was going to live up to my reputation. But I also had to be careful. There were 30 people on this trip, and I had to make sure that I didn’t end up coming in contact with food that would trigger an allergic reaction and necessitate an emergency room trip.

My solution to a crowded grill filled with gluten was a foil packet dinner. Packing up veggies and meat with something to add flavor makes for jealous camping buddies when your food is better than their burgers. This type of cooking is also great for cookouts where there is a shared grill, or for nights when you want to put together a fast and easy dinner using the grill so you don’t heat up your kitchen.

gluten-free honey mustard chicken foil packet dinner for camping

Honey Mustard Chicken & Sweet Pepper foil packet dinner

Recipe Type: Entree
Author: Mary Fran Wiley
Prep time: 5 mins
Cook time: 25 mins
Total time: 30 mins
Serves: 4
An easy to prepare dinner for camping, cookouts and family dinners on the grill.
Ingredients
  • 1 lb chicken tenders (about 12 tenders)
  • 8-12 small sweet peppers, seeded and sliced
  • 1/2 cup honey mustard
  • Salt & Pepper
Instructions
  1. Start your grill or fire and let it get hot – it should be hot enough to cook a burger.
  2. Set out 4, 12″ long pieces of foil.
  3. Divide the chicken and peppers evenly and center them on the pieces of foil.
  4. Sprinkle with salt & pepper.
  5. Pour 2 tablespoons of the mustard on top of each group of ingredients.
  6. Bring the short ends together and roll them down together, then roll up the open sides to create a packet.
  7. Place on the grill or over the fire, but off to the side so it isn’t directly over the flame, and cook for 20-25 minutes. You want the chicken to get golden brown on the bottom and the honey in the honey mustard to start to caramelize.
3.2.1337


raisinably delicious gluten free trail mix

Snack it to me: Raisinibly Healthy Snack Mix

This post is part of Snack It To Me – recipes for my favorite snack mixes. The posts are: Fairy Berry Gluten-Free Trail MixSour Patched Gluten-Free Trail MixCherry Cordial Gluten-Free Snack MixMango Lassi Trail MixApricocious Gluten-Free Trail MixRaisinably Delicious Snack Mix, Happy Endings Trail Mix, My go-to prepared snacks.

Raisins are a point of contention in my family. Well, between me and my sister they are. She, so very wrongly, believes that raisins have no place in anything. Not oatmeal cookies. Not Irish soda bread.

I think she might be an alien. Or at the very least adopted. There is no way such a raisin hater can be related to me.

You see, I am on the right side of this disagreement. The side where those little boxes of raisins were never a disappointment when they showed up in my halloween bucket. And I think they make a great addition to any boring cereal – they can help keep me from feeling the need to add sugar to plain chex.

Don’t worry though. I added some chocolate in there for you non-raisin fanatics. Or for those of you who think they are equally important in life.

raisinably delicious gluten free trail mix

Raisinibly Delicious Gluten-Free Snack Mix

Author: Mary Fran Wiley
Prep time: 5 mins
Total time: 5 mins
Serves: 6
This is a loose template meant to inspire you to create your own trail mixes and to help keep you from getting that hangry feeling (being so hungry you are angry) when you are out and about without a safe restaurant in sight.
Ingredients
  • 150 grams (about a cup) raisins
  • 50 grams (about a half cup or a generous handfull) dried goji berries
  • 50 grams (about a half cup) unsweetened dried coconut flakes
  • 50 grams (about a quarter cup sunflower seeds
  • 75 grams (about a half cup) good quality dark chocolate chips
Instructions
  1. Measure all ingredients in a large bowl and mix to combine. Store in a sealed container for up to a month.
3.2.1337


apricocious gluten free trail mix

Snack it to me: Apricocious Snack Mix

This post is part of Snack It To Me – recipes for my favorite snack mixes. The posts are: Fairy Berry Gluten-Free Trail MixSour Patched Gluten-Free Trail MixCherry Cordial Gluten-Free Snack MixMango Lassi Trail MixApricocious Gluten-Free Trail Mix, Raisinably Delicious Snack Mix, Happy Endings Trail Mix, My go-to prepared snacks.

apricocious gluten free trail mix

Ladies and gentlemen, this is Snack mix number 5.

A little bit of Apricot in my life,
A little bit of Almonds by my side.
A little bit of Chocolate’s all I need,
A little bit of mixing’s what I see.
A little bit of fruit dried in the sun,
A little bit of munching all night long.
A little bit of trail mix here I am,
A little bit of you makes me your fan!
Snack mix number five.

It has long been public knowledge that I have terrible taste in music. You are lucky there wasn’t a Backstreet Boys song that worked here, because then I might have tried to re-write the whole song and not just the chorus that I am sure is now stuck in your head. (It’s been in my head since I wrote “Snack mix number 5 is here.”)

Apricots are a persnickety fruit. I have bought them one too many times at the grocery store, excited because they are finally in season, only to get home and be disappointed because they are mealy or, even worse, bland. You know the moment when you take a bite and you have the heartbreaking realization that the fruit tastes like a shadow of itself? Yeah. I really hate that.

Which is why dried fruit is great. All the delicious apricot-y goodness is concentrated into a little pocket of joy. Add some almonds and a wee bit of white chocolate for good measure and you, my friend, will not be hangry when you get stuck on the CTA when they are rerouting your communte and messing with your dinner schedule. Instead, you will queue up an episode of Doctor Who and munch away, pleased with yourself for being a grownup and thinking a head. (You don’t need to tell anyone that you forgot that it was buried in the depths of your purse, your secret is safe with me).

Someday soon this flavor combo might be reincarnated as a cookie. Or a muffin. But for now, instant gratification is what it’s all about.

Apricocious Snack Mix (A gluten-free trail mix)

Recipe Type: Snack
Author: Mary Fran Wiley
Prep time: 5 mins
Total time: 5 mins
Serves: 4
No volume measurements are here because these are meant to be imprecise and easy. Either add each ingredient to the same bowl while it is on your kitchen scale, or just go ahead and wing it. With these ingredients you can’t go wrong.
Ingredients
  • 150 grams (3 handfulls) dried apricots
  • 150 grams (2 handfulls) almonds (I used blanched, but you can use roasted and salted here for a sweet & salty take on this mix)
  • 75 grams (really this is how much you want – i wanted one piece of chocolate for every 2-3 apricots) white chocolate callets or chips
Instructions
  1. Place a medium mixing bowl on a kitchen scale and tare (zero) it.
  2. Add each ingredient, weighing as you go. This recipe doesn’t need you to measure them out first.
  3. Mix to combine.
  4. Store in an air-tight container for up to one month.
3.2.1337


Snack it to me: Cherry Cordial Snack Mix

This post is part of Snack It To Me Week– a week full of recipes for my favorite snack mixes. The posts are: Fairy Berry Gluten-Free Trail MixSour Patched Gluten-Free Trail MixCherry Cordial Gluten-Free Snack Mix, Mango Lassi Trail Mix, Apricocious Trail Mix, Raisinably Delicious Snack Mix, Happy Endings Trail Mix, My go-to prepared snacks.

Chocolate should be a food group. And, in my professional opinion, it should be the base of the pyramid.

I mean, it is full of anti-oxidants and theobromine. It has been purported to do everything from boost your mood to decrease your appetite. Small studies have found that it is good for your heart, your skin and for diabetes prevention.

I even read that it can help make you smarter.

That is a whole heck of a lot of promises for any food to deliver on.

And to think something healthy was lurking in my love of desserts.

I am pairing it with dried cherries and coconut flakes today for a gluten-free trail mix that is a great sweet treat for the 3pm blues. Or the 10am blues. Or a last minute conference call. We can call this an all-occasion snack. But only if you don’t skip the chocolate.

cherrycordial

Snack it to me: Cherry Cordial Snack Mix

Recipe Type: Snack
Author: Mary Fran Wiley
Prep time: 5 mins
Total time: 5 mins
Serves: 4
This recipe was inspired by one of my day’s favorite treats: chocolate covered cherries. Those intensely sweet sugar-asked cherries died bright red and dipped in chocolate.
Ingredients
  • 100 grams high-quality chocolate calets (they look like slightly larger, flatter chocolate chips) or your favorite brand of semi-sweet chocolate chips
  • 100 grams dried cherries
  • 50 grams unsweetened dried coconut flakes
Instructions
  1. Weigh out ingredients and stir to combine in a medium mixing bowl.
  2. Store in an air tight container at room temperature for up to one month.
3.2.1337


gluten-free fairy berry snack mix

Snack it to me: Fairy Berry Trail Mix

This post is part of Snack It To Me Week– a week full of recipes for my favorite snack mixes.

My desk has two drawers, a shoe drawer and a snack drawer. I might be a snack food junkie.

shoedrawer

Well, sort of.

Living gluten-free for 7 years, I have learned to never take access to safe food for granted. Every time I go out to a new restaurant, there is a snack in my bag of some kind. Sometimes it is a granola/protein bar. Sometimes it  is a snack mix. Sometimes it is a box of crackers and a packet of almond butter. But there is always something. And often several somethings.

Having an easy to grab and delicious snack on hand is incredibly important for kids and adults.

snack it to me preview


This week, I am going to share 7 snack mixes that are endlessly adaptable, take less than 10 minutes to throw together. And above all are delicious. My goal is to rid you of that hangry feeling that can happen when you are out, hungry and there isn’t a decent gluten-free option in sight. (There is no GORP – good old raisins and peanuts for those of you that never went to Girl Scout Camp – on this list, I want show you just how fun snack mixes can be.)

They include:

  1. Fairy Berry Trail Mix
  2. Sour Patched Trail Mix
  3. Cherry Cordial Snack Mix
  4. Mango Lassi Trail Mix
  5. Apricocious Trail Mix
  6. Raisinably Delicious Snack Mix
  7. Happy Endings Trail Mix

And, once I have shared my recipes with you, I will share my favorite pre-made gluten-free snacks.

gluten-free fairy berry snack mix

I have admitted more than once to you that I often eat like a four year old. I love purple food. The more colorful the cereal, the happier I am. And I can never turn down fruit snacks.

So, I made you this mix.

This is not your ordinary trail mix. There are no nuts. No candy. No pretzels. No flashbacks to leaky tents and mosquito bites.

It appeals to my inner child (hence the name – what four year old girl doesn’t love fairies?). It is sweet and a little chewy. There are lots of little pieces to pop into your mouth. Bright colors.

And it appeals to the grown-up that I am trying to be. Jam packed with anti-oxidants and vitamin c. The sweetness of the cherries and blueberries is balanced by the tang of the goji berries. There are no artificial colors or refined sugars.

Enjoy!

Snack it to me: Fairy Berry Trail Mix

Recipe Type: Snack
Author: Mary Fran Wiley
Prep time: 5 mins
Total time: 5 mins
Serves: 4
Dried berries are like nature’s candy. Buy fruit without added sweetener – the naturally occurring sugars intensify as the fruits dry and additional sugar is not needed. Also, feel free to use this as a template for your own creations. Dried strawberries could be awesome here so could cranberries. Let your imagination run wild!
Ingredients
  • 50 grams dried blueberries
  • 50 grams dried cherries
  • 50 grams dried gogi berries
Instructions
  1. Weigh out and combine ingredients.
  2. Store in an air-tight container for up to one month.
3.2.1337


gluten free orange chicken stir fry from Jen Cafferty

Wednesday Wisdom: Fast Family Dinner – Orange Chicken

(gluten free) wednesday wisdom from frannycakes.com

Wednesday Wisdom is a series of posts with helpful ideas for getting started with being gluten-free, easy meal ideas and lifestyle thoughts from myself and my gluten-free friends. This week’s post is from Jen Cafferty from the Gluten & Allergen Free Expo.

When it comes to quick and easy dinners, one of my favorite things to make is stir-fry.  Asian stir-fry is already really easy to make and I have even simplified this chicken recipe more by using chicken nuggets.  I know that may sound gross, but the reality is that you are ultimately just frying some chicken with your vegetables and adding sauce, so why not start out with pre-fried chicken – the nuggets!

My favorite gluten-free asian sauces are by San-J.  They make a lot of wonderful sauces but my ultimate favorite is the Orange Sauce.  My husband finds it to be a little too sweet so we add a few splashes of sriracha chili sauce and it takes the sweetness away but still retains it’s orange flavor.
I hope you enjoy this recipe as much as our family does!  Jen
gluten free orange chicken stir fry from Jen Cafferty
Gluten Free Orange Chicken Stir Fry

Author: Jen Cafferty
Ingredients
  • 1 pound package chicken nuggets (we use Allergen Free Foods or Bell & Evans)
  • 1Tablespoons oil
  • 1 cup San-J orange sauce
  • a few splashes sriracha chile sauce (I like the bottle with the rooster on it)
  • 3 cups shredded cabbage (you can use a bag that was chopped for cole slaw)
  • 4 green onions, sliced (use the whites and greens)
  • 1 cup broccoli florets, cut into small pieces (you might want to heat them in the microwave for a minute to soften them)
  • 1 red pepper, sliced
  • any other veggies you love
  • cooked white or brown rice
Instructions
  1. Bake the chicken nuggets as suggested on the package. Once cooked, remove them from the oven and cut them into 1″ pieces.
  2. Heat a large skillet over medium heat. Add the oil.
  3. Add the vegetables to the skillet and saute for about 5 minutes until they are heated through and reduced slightly. Once the veggies are cooked, add the to the pan.
  4. Pour the orange sauce over the mixture and add a splash or two of the chili sauce. Stir to combine.
  5. Serve over white or brown rice or gluten-free noodles.
3.2.1337
We are all stories in the end, so make it a good one, eh? - Quote from Doctor Who

Hello 2013. I’m glad you made it. I have big plans for you. Now let’s have soup.

It’s a new year. A clean slate.

So, eyes front soldier.

I can tell you what there will not be. In my life or on this site. There will be no checking over my shoulder to see what I should have done. No looking in the mirror and wondering why. No questioning my choices. No, as MammaCakes woud say, should-a, would-a, could-a ‘s. It’s all about the path ahead. It is time to look forward. To think about where I am going.

Read more

gluten free maple cinnamon rolls

Gluten free maple cinnamon rolls

gluten free maple cinnamon rolls

Sometimes, it is all about the food.

And the smiles that warm cinnamon rolls can put on the face of a child. (Ok and the fact that the child in question started calling me the goddess of pastry doesn’y hurt either.)

Every morning, I walk through Union Station and I am haunted by the magical scent of warm cinnamon and butter rolled up in a yeasty dough. It is enough to drive a girl bonkers. Particularly when it is the scent of Cinnabon.

Seriously.

I have been craving cinnamon rolls for a year. So I finally did something about it.

I captured that magical scent and flavor combination in my very own kitchen.

These are easy to make, but they do take a little but of waiting. But they are totally worth it.

Gluten free maple cinnamon rolls

Author: Mary Fran Wiley
Prep time: 1 hour 15 mins
Cook time: 25 mins
Total time: 1 hour 40 mins
Ingredients
  • Dough
  • 160 ml milk (dairy or non-dairy), warmed
  • 35 grams sugar (2T)
  • 280 grams (2 cups) all-purpose gluten free flour*
  • 7 grams (1 t) active dry yeast
  • 40 grams (2.5 T) butter or EarthBalance
  • 1 teaspoon vanilla bean paste (or vanilla extract if you don’t have the paste)
  • Pinch salt
  • Filling
  • 210 grams (1 cup) Brown Sugar
  • 30 grams (2 tablespoons) Butter, melted
  • 1/4 cup (25 mL) Maple Syrup
  • 1 tbsp Maple Flakes or maple sugar (optional)
  • 1/4 tsp salt
  • Topping
  • 1/2 cup or so cream cheese frosting or
  • 1/4 cup powdered sugar
  • 2 T milk and
  • 1 teaspoon vanilla extract
Instructions
Dough
  1. Measure out your ingredients and prepare a mise en place.
  2. In a small bowl combine warm milk, a teaspoon of your sugar, a tablespoon of your flour and your yeast. Let sit for about 15 minutes – the mixture should have produced a decent amount of foam.
  3. In the bowl of a stand mixer combine the remaining flour, sugar, butter, vanilla and salt.
  4. Add in the yeast mixer and mix to combine. Once combined, turn the mixer speed to low-medium (mine was on 3) and let the dough “knead” for about 10 minutes.
  5. Watch the dough, if it is impossibly sticky add a little more flour a teaspoon at a time. (It was a bit humid in my apartment and I ended up adding 2 teaspoons of flour).
  6. After 10 minutes, place the dough in a greased bowl in a warm spot (my microwave is the warmest spot in my kitchen). Cover with plastic wrap or a damp towel. If you have a spare bowl for your mixer, pop it and the whisk attachment (or any bowl and the beaters for your hand mixer) into the freezer. You need it good and cold to whip the cream.
  7. Let the dough raise for 45 mins-1 hour. It should have just about doubled in size.
Filling
  1. Near the end of the rising time, mix together all the ingredients for the filling in a small mixing bowl.
Assemble
  1. Roll out the dough to 1/4” thickness and in a rectangle about 6×10″.
  2. Spread the filling on the dough in a thin layer.
  3. Roll the dough up along the long edge (you want a 10″ long tube).
  4. Place it on a cookie sheet, cover with a towel and set in a warm spot while your oven preheats to 350 degrees Fahrenheit.
  5. When the oven is warm, slice the roll into 6 even pieces.
  6. Arrange the rolls in a greased 8 or 9″ baking dish (shape is not important).
  7. Bake for 35 minutes, or until they are a light golden brown and bubbling.
  8. When the rolls are still warm, but before they are completely cool, slather them with leftover cream cheese frosting if you have it around. If not, mix together the powdered sugar, milk and vanilla and drizzle over the cinnamon rolls
Notes

*If you are not using a pre-blended flour, you can either use Shauna’s All-Purpose Blend and add 2 teaspoons xantham gum. Whisk well before using.
Or you can make your own with 90 grams (3/4 cup) tapioca starch, 100 grams (1/2 cup) sweet white rice flour, 60 grams (1/2 cup) sorghum flour. Add 2 teaspoons xantham gum and whisk together well to ensure that the gum is spread throughout the flour.

3.1.09