Home » Food » Recipes » Page 20

Category: Recipes

Apple Jicama Salsa

Apple Jicama Salsa in a bowl
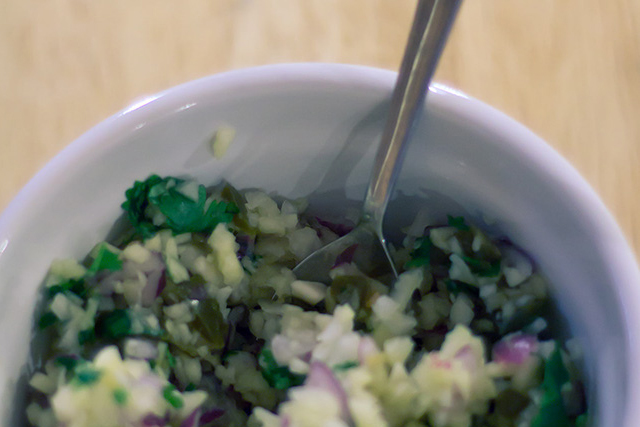
I bought jicama (also known as yam bean) at the grocery store last time I was there. This is an odd looking food – almost looking like a rutabaga on the outside. Once you peel off the brown papery skin, you are left with a crunchy, almost sweet vegetable. It looks like a potato on the inside, but unlike a potato, is delicious raw. Some people cook it in soups and stir-frys. It is originally from Mexico and is the only edible part of the plant (the seeds are used to poison bugs & rats).

I love eating it raw, in salads and as a chip. I forgot that I had bought this and it was at the bottom of my fruit bowl on the counter. When I found it, I felt that I had won the lottery.

I grabbed an apple, some onion and some jalapenos and made a salsa. And then the worst thing happened, I realized that I had no chips or crackers with which to eat my delicious concoction.

Apple Jicama Salsa
#ratingval# from #reviews# reviews
Print
Recipe Type: Dip
Author: Mary Fran Wiley
Prep time: 15 mins
Total time: 15 mins
Serves: 8
A refreshing, not hot salsa
Ingredients
  • 1/2 a jicama
  • 1 large apple (Pink Lady or Honey Crisp if available)
  • 1 small red onion
  • 1 clove garlic
  • 8 pickled jalapeno rounds
  • 2 T juice from jalapenos.
Instructions
  1. Peel & chop all the large vegetables.
  2. Wash & chop the cilantro.
  3. Chop the jalapenos and add them to taste.
  4. Mix all the chopped ingredients together and pour in the jalapeno “juice”.
  5. Refrigerate overnight.
Google Recipe View Microformatting by Easy Recipe
1.2.4


Strawberry Chocolate Chip Loaf

Strawberry Chocolate Chip Loaf

Strawberry Chocolate Chip LoafStrawberries were on sale at the grocery store on Saturday and it was easy to see why – they were so ripe they were about to turn bad. That meant that they were perfect for baking with.

Frankly, I feel that there is almost no combination as perfect as strawberries and chocolate. (Although, next time I have an idea that involves chocolate, I will probably say the same thing). I rummaged around my cabinets and was quite pleased to discover that I did indeed have some chocolate chips laying around. I would have had an entirely different post had there not been any in the cabinet. Most likely about what a good idea I had and how I just had to eat the strawberries plain (or how I made them into this salad).

I was originally going to make muffins, but I have this loaf pan that I got for Christmas that I really wanted to use. So, thanks for the loaf pan mom! I finally made a bread!

Strawberry Chocolate Chip Bread
#ratingval# from #reviews# reviews
Print
Recipe Type: Quick Bread
Author: Mary Fran Wiley
Prep time: 15 mins
Cook time: 80 mins
Total time: 1 hour 35 mins
Serves: 12
An easy, summery quick bread without xantham gum
Ingredients
  • 2 cups GF all-purpose flour blend (I used Cheatin’ Wheat Gluten Free flour)
  • 2 T flax meal
  • 1/2 cup sugar
  • 1/2 teaspoon salt
  • 1 tablespoon baking powder
  • 3/4 cup milk (I only had So Delicious coconut milk on hand…use whatever milk you have)
  • 1/4 cup canola oil
  • 2 large eggs
  • 1/2 cup chopped strawberries
  • 1/2-1 cup chocolate chips
Instructions
  1. Preheat your oven to 500°F.
  2. Whisk the dry ingredients together in a large mixing bowl.
  3. Beat the liquid ingredients together — milk, oil and eggs — until they are light.
  4. Add the wet ingredients to the dry ingredients and whisk together until just blended. It is ok if it is a little lumpy.
  5. Add in the strawberries and chocolate chips and give it a quick stir.
  6. Pour into a standard sized, greased loaf pan and place in the oven.
  7. Lower the temperature to 350 degrees.
  8. Bake for 45 – 60 minutes.
  9. You could also make this into muffins by using a muffin tin and baking at 400 for 15-20 minutes.
Google Recipe View Microformatting by Easy Recipe
1.2.4


Strawberry Salad in a bowl

Strawberry Feta Salad

Strawberry Salad in a bowlI had a craving for fresh fruit this weekend. It was especially strong when I realized that the farmer’s market in town had started and that I had slept through almost all of it on Saturday morning.

Disappointed, I went to Meijer instead. I didn’t need much in the way of food, just a few things (you know cereal fit for a 5 year old and some milk to have it with and that fruit that I was craving).

Today, while putting together recipes to post this week (I am going to be out of town and on local television, so I need to put these posts together in advance), I got hungry.

Faced with more strawberries than I needed for tomorrow’s quick bread, I saved some for myself to eat. I dressed them up with big-girl accompaniments (unlike my love of strangely colored food, shaped pasta and infantile cereal might lead you to believe, I have excellent taste in food).

Without further ado, a summer salad that can be a side, an appetizer or even a dessert.

Strawberry Feta Salad
#ratingval# from #reviews# reviews
Print
Recipe Type: Salad
Author: Mary Fran Wiley
Prep time: 5 mins
Total time: 5 mins
Serves: 2
Ingredients
  • 1 cup sliced strawberries
  • 2 oz crumbled feta
  • 1/4 cup cilantro leaves, chopped
  • 1/8 cup balsamic vinegar
Instructions
  1. Toss salad ingredients and then drizzle with vinegar to taste immediately before serving.
Google Recipe View Microformatting by Easy Recipe
1.2.4


Five minute sauce

This is a go-to answer for dinner chez moi. I am frequently not home until after 7pm and by then, I am usually so hungry that any bag of chips in my apartment is not safe. And there are nights I want a real meal and I just have to rush out the door. Since I eschew (mom, be proud that the education you paid for causes me to use pretentious vocabulary) food that comes already prepared this sauce is key. I tried buying some jars of sauce this winter because I was so busy and I was so disappointed. All of them were missing something. And I will be frank, spending $8-$12 to get my hands on a decent jar of sauce just doesn’t make my budget happy.

It can be adapted to what you have on hand and it cooks while your pasta is boiling. This sauce makes it so that I do not ever have to buy sauce in a jar ever again. Even when all I have time for is boiling noodles.


Five minute sauce
#ratingval# from #reviews# reviews
Print
Recipe Type: Sauce
Author: Mary Fran Wiley
Prep time: 2 mins
Cook time: 5 mins
Total time: 7 mins
Serves: 4
A sauce that cooks while your pasta boils.
Ingredients
  • 3 Tablespoons Olive Oil
  • 1 clove garlic
  • 1 red chili
  • 1/4 cup dried basil*
  • 1 large sweet pepper
  • 1 can diced fire roasted tomatoes
  • Salt & pepper to taste
Instructions
  1. Boil water.
  2. Peel & chop your clove of garlic. Chop your chili & remove the seeds. Dice your pepper.
  3. In a second pot, over medium heat, pour in the olive oil.
  4. Add the garlic and let it cook until it is aromatic (about one minute).
  5. Add the chili and the basil*. Cook for 30 seconds.
  6. Add the can of tomatoes (using all the liquid) and the pepper.
  7. Add salt & pepper to taste.
  8. Cook over medium-low heat until pasta is ready.
  9. Drain pasta and toss with sauce.
Notes

If you have fresh basil, use about 1 cup chopped. Chop the stems too, but keep them separate. Toss the stems and about 1/4 of the leaves in where I indicated adding the basil and stir the rest in about 30 seconds before the sauce is finished.

Google Recipe View Microformatting by Easy Recipe
1.2.4
Sweet Pepper Pesto Grilled Chees

Sweet Pepper Pesto

Sweet Pepper Pesto Grilled CheesAfter the Gluten Free Expo, I went straight to Whole Foods and bought a loaf of Rudi’s Gluten Free Multigrain Bread. I really hate gluten free bread. And I mean, I really hate it. I refuse to eat sandwiches any more because of my intense dislike of it. I don’t even like the popcorn bread that my dad makes that every one raves about. Maybe it is all in my head, but I digress. I had a grilled cheese sample at the expo and I was sold.

There is this great little restaurant in town that makes an awesome grilled swiss with pesto sandwich that I remember from my glutinous days. It was simply delicious. I wanted to recreate that experience tonight. But, the basil plants that I have are not doing so well because it is too wet and I was out of roasted red peppers. So, a pesto recipe was born.

I then used it to make a grilled cheese sandwich. I have to say, this might be my favorite discovery from the Expo.

Sweet Pepper Pesto Grilled Cheese
#ratingval# from #reviews# reviews
Print
Recipe Type: Sauce
Author: Mary Fran Wiley
Prep time: 5 mins
Cook time: 10 mins
Total time: 15 mins
Serves: 2
Sweet peppers, sweet onion and italian herbs make this fresh pesto delectable.
Ingredients
  • 4 small sweet peppers or 1 large
  • 1 small sweet onion
  • 1 clove garlic
  • 1 Tablespoon dried basil or 10-12 leaves fresh basil
  • 1/2 teaspoon dried oregano or 1 tablespoon chopped fresh oregano
  • salt to taste
  • 1/4 cup olive oil
  • 4 slices Rudi’s Gluten Free Multi-grain bread
  • 1/2 cup shredded mozzarella
  • 2 Tablespoons soft butter
Instructions
  1. Chop onion into quarters. Peel garlic. Remove stem ends and seeds from peppers. Combine in food processor or manual chopper along with herbs. Pulse until ingredients are finely chopped. Add olive oil and pulse until desired consistency is reached. I like mine chunky, but some people prefer theirs to have a finer dice.
  2. Heat a skillet over medium heat and butter one side of each slice of bread. Put 2 slices butter side down in the heated skillet and sprinkle on enough cheese to cover the slice (I used about 1/8 cup per slice). Spread pesto on top of cheese. Sprinkle with remaining cheese and top with the second slice of bread, butter side up. Place a heavy frying pan on top and cook for about 4 minutes. Remove frying pan, flip sandwiches and put the frying pan back on top. After about 4 more minutes, the bread should be golden and toasted. The cheese should be melty and gooey. Remove from skillet, cut in half on the diagonal and enjoy.
Google Recipe View Microformatting by Easy Recipe
1.2.4


Spaetzle with Lentils

Spaetzle mit Linsen

Spaetzle and lentils in a white bowlI have been fascinated by spaetzle since my mom made with with a nifty device perched on a pot of boiling water. If you have never had spaetzle, you are living a life of deprivation. They are what I might consider a perfect food. Tender, noodly, carby goodness. And they go with everything. You can eat them with cheese (Kasespaetzle). You can eat them with schnitzle. You can eat them with a brat. Or, you can eat them all alone, pan fried with some herbs and salt.

Today, as this is a meatless Monday post, I am eating my spaetzle with lentils. Red lentils to be exact. Most of the recipes I saw on the internet called for brown lentils – but I think brown lentils are ugly. And, in my kitchen are red lentils.  This dinner includes the use of one of the few processed foods that I keep around – bouillon. You can use bouillon cubes or stock, but your water needs to be seasoned, or the lentils will taste flat.

Spaetzle with Linsen
#ratingval# from #reviews# reviews
Print
Recipe Type: Entree
Prep time: 20 mins
Cook time: 20 mins
Total time: 40 mins
Serves: 2
Gluten free German dumplings with a lentil stew and crispy shallots, sage and brown butter.
Ingredients
  • 1 cup gluten free flour blend
  • 1/2 teaspoon xantham gum (if not in your mix)
  • 3 eggs
  • 1/8 cup milk
  • 1 cup red lentils
  • 2 cups stock or water and a bouillon cube
  • 1 tablespoon sage
  • 2 shallots
  • 4 tablespoons butter
  • Salt & Pepper to taste
Instructions
  1. Whisk flour and xantham gum together.
  2. Make a well in the flour and crack eggs into it.
  3. Pour in milk and mix.
  4. Cover and put in the fridge for an hour or overnight.
  5. When it is time to cook, cook the lentils in the stock as directed on the package. It should be thick, but still liquid. The lentils should have started to break down but should not be completely disintegrated.
  6. Now, if you don’t have a spaetzle maker use a colander and a spatula to push the batter through the holes into a pot of boiling water. Boil the dumplings in batches.
  7. Once the spaetzle is cooked, fry the sage and shallots in the butter.
  8. Remove the sage and shallots from the frying pan and drain the butter.
  9. Sautee the spaetzle in the greased frying pan.
  10. Top with cooked lentils, a drizzle of the browned butter and fried sage and crispy shallots.
Google Recipe View Microformatting by Easy Recipe
1.2.4

This actually made 3 servings for me, but I eat small, measured portions.

top view of Raspberry Filled Yellow Cupcakes

Raspberry Surprise

top view of Raspberry Filled Yellow Cupcakes
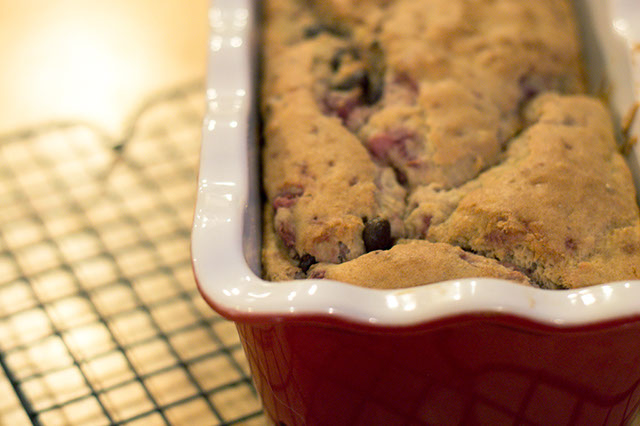
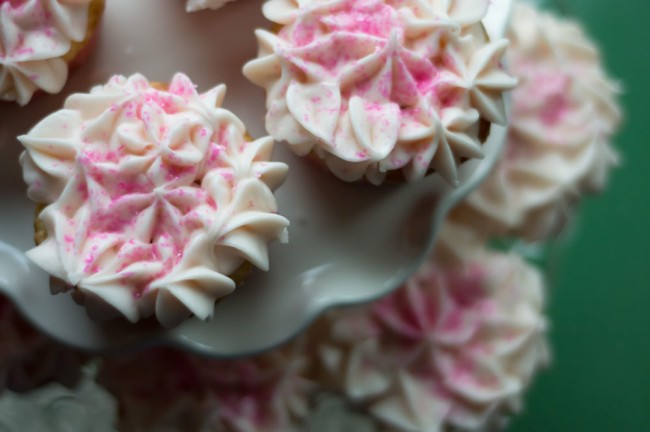
I have a bad habit, and that bad habit is baking. Where so many people open a pint of ice cream or pour a glass of wine to unwind, I find a comfort in pulling flours from the cabinet, fitting a mixer with the paddle & bowl and whipping up a batch of something warm and soft. I have always known exactly where I got it. My mother. I went home for Easter this weekend and my mom made quite a spread. She wouldn’t let me cook at all (she says I am a messy cook, I say I was a messy cook when I was a kid) but, she made these fantastic cupcakes. She even said I could share her recipe.

Raspberry Surprise
#ratingval# from #reviews# reviews
Print
Recipe Type: Dessert
Prep time: 20 mins
Cook time: 25 mins
Total time: 45 mins
Serves: 24
Gluten free yellow cupcakes with a raspberry filling adapted from <a href=”http://www.kingarthurflour.com/recipes/gluten-free-yellow-cake-recipe” title=”Yellow Cake Recipe from King Arthur Flour”>King Arthur Flour</a>
Ingredients
  • 3 cups Gluten-Free Multi-Purpose Flour Blend
  • 2 teaspoon xanthan gum (if not already in your blend)
  • 1 1/2 cup sugar
  • 1 1/2 sticks butter, softened
  • 1 teaspoon salt
  • 2 teaspoon gluten-free raspberry liqueur
  • 3 teaspoons baking powder
  • 4 large eggs
  • 1 cup milk, at room temperature
  • Raspberry jam for filling (about 1 teaspoon per cupcake)
Instructions
  1. Preheat the oven to 350°F.
  2. Using an electric mixer beat together the sugar, butter, salt, liqueur and baking powder till smooth. Add 1 egg, and beat for several minutes, until fluffy.
  3. Add the remaining eggs, one at a time, scraping between each egg.
  4. In a separate bowl, whisk together the flour and xantham gum (if needed).
  5. In the bowl of the mixer, beat in the milk alternately with the dry ingredients, adding about 1/3 of each at a time, and ending with the dry ingredients.
  6. Measure batter into prepared cupcake pan. Bake for 18-25 minutes, and a cake tester inserted into the middle comes out clean.
  7. Remove from the oven, and cool for 5 to 10 minutes before turning out of the pan to cool on a rack.
  8. Once the cupcakes are cooled, use a pastry bag fitted with a filling tip, squeeze a teaspoon of jam into each cupcake.
  9. Frost with raspberry cream cheese frosting.

Mom frosted them with a cream cheese frosting (here is a similar one from King Arthur Flour). This time she replaced the vanilla and some of the milk with the raspberry liqueur, adjusting liquids and sugar as she went until she got the consistency that she wanted. The liqueur added a hint of raspberry flavor and a pink tint. The butter in this recipe keeps the frosting from the full amount of tang you get with normal cream cheese frosting.

Meatless Monday: Onion Gallette

Let me qualify this recipe by saying that I really hate food that comes in packages, already mixed up. But, when you are sick, you just need easy. So, I cheated. I used a mix. I have a cold and I didn’t want to slave away over the stove. I wanted to assemble and toss in the oven. This recipe is the result of one of those I have nothing to eat but lots of food moments.

I am calling this a gallette because it sounds fancy. It could have been a flat bread, a pizza or a tart. By calling it a gallette, I elevated it into more than a 5 minute sick meal. It became French.

Caramelized Onion & Ricotta Gallette

[box]I find that my pantry tends to have some items that many people don’t keep around – I caramelize onions in large batches and keep them in the fridge, I happened to have made ricotta last week with my mom and I have some decent size herb plants that I picked up last weekend. But, let this recipe serve as an inspiration to you, let it be an outline for how to throw together an easy dinner.[/box]

  • 1 package Chebe Pizza Crust
  • 2 eggs
  • 2 T olive oil
  • 1/8-1/4 cup water
  • 1/2 cup ricotta
  • 1 cup caramelized onions
  • 1 T chopped fresh sage
  • 2-3 sprigs fresh thyme
  • 1/4 cup shredded mozzarella

Preheat the oven to 400. Mix eggs, Chebe mix and oil. Add water until the dough comes together into a ball. The dough will stand up to rolling and will no longer be crumbly. I used 1/8 cup. Roll the dough out on a greased baking sheet into 1/4″ thick sheet and a round-ish shape. Perfection is unnecessary, that is where this recipe gets its charm.

Spread the ricotta in a nice thick layer, leaving about 2-inches around the edge. Next, spread a nice thick layer of caramelized onions. Sprinkle with the mozzarella and herbs. To finish, fold up the edges so that they overlap the filling.

Bake 20-30 minutes. The crust doesn’t get too golden looking, so when the cheese looks good and done the crust is probably done too.

Purple Rice Pudding

Ok, I am 5. I am quite ok with this. I just think purple food is more awesome. Purple cauliflower, purple potatoes and purple carrots are all way more awesome than their normal colored counter parts.

And then, there is purple sticky rice. More purple food? Send it my way. I found this in my mom’s cabinets when I was home. It comes from Williams-Sonoma. It says on the label that it was processed in a plant that handles wheat and tree nuts, but it is just rice. I swear there are no dies.

There is no better way to eat said rice than in a rice pudding that turns a color that you would assume is unnatural. Along the lines of blue ketchup unnatural (do you remember that stuff?). I am going to love the next week. Rice pudding for breakfast & desert. Every day. Want to come over and share?

Purple Rice Pudding

  • 1 1/2 cups milk (I used 2% – skim is for wimps. If you need dairy free, use a second can of coconut milk and then add in some of your favorite non-dairy milk to get the right volume)
  • 1 can coconut milk (the real stuff)
  • 1 teaspoon cardamom (or cinnamon & nutmeg)
  • 1/2 cup sliced toasted almonds
  • 1/4 teaspoon salt
  • 1/2 cup evaporated cane juice (you could use regular sugar, I just happen to have this around from testing recipes in Babycake’s new book).
  • 1/2-3/4 cups raisins
  • 2 cups cooked rice (I used purple sticky rice, but really you could use what ever rice you have – it just won’t be purple)

Heat up the milk to a simmer in a large pot over medium heat. Add the rice and return to a simmer. While that is heating, whisk salt, evaporated cane juice & cardamom together with the coconut milk. Add to your pot as soon as the pot simmers with the rice. Cook until the mixture simmers again and starts to thicken. Remove from heat and add raisins. Put in another bowl and cool until pudding is room temperature or cover and store in the fridge for up to 5 days.

I think that it makes an excellent desert. And it is purple, which makes it even better.

Ricotta with my mamma

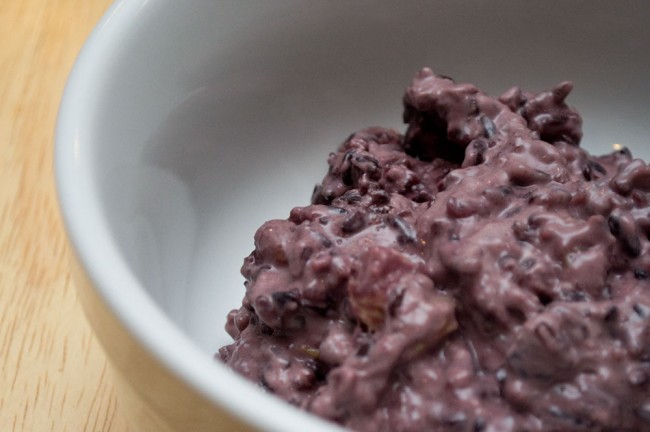
I really love going home. My mom’s kitchen is twice as big as mine and it is filled with exotic ingredients and fancy pots and a tool for everything. (Yes mom, it was me that took the purple sticky rice & the cranberry beans).

But more than the fancy kitchen is the sense of home and the fun that I get to have with my mom. Talking about ingredients, one upping each other with cupcake ideas & successes – she wins this round with lemon cupcakes with a lemoncello filling and lemon frosting with another dash of lemoncello. And no, she didn’t save any for me or give me the recipe.

Tonight, because I was only in town for one night, and because she has been bragging about this home made ricotta, we made cheese. We filled the house with the smell of buttermilk and whey and now have what looks like a science experiment in the fridge. But the little bit I was allowed to sample tastes divine. It is rich, slightly sweet and almost buttery tasting. It is home made, and it is real food. It has made it into the compendium of family recipes that my dad is compiling. One day I will sell out and get a cook book deal with all the deliciousness inside it. Until then, I will I will have to tide you over with the ricotta recipe. And pictures of it on this delicious crisp bread that I picked up at the local food coop last weekend.

Buttermilk Ricotta Cheese

  • 6 cups whole milk
  • 3 cups buttermilk
  • 2 cups heavy cream
  • 2 tablespoons vinegar

Pour all the ingredients in a large saucepan and bring to a simmer over medium heat. Simmer for a few minutes making sure that you have lots of little curds formed. Remove your pan from the heat and let it cool slowly (for about 20 minutes).

Strain the cheese through a cheesecloth lined strainer. This process takes a little while – you don’t want to put too much liquid in the strainer at any one time. If you think some curds have escaped, you can run the liquid through the strainer twice. Squeeze out the extra liquid.

Refrigerate in the strainer over night over a bowl to collect all the extra whey. The cheese will keep for about a week. Put the whey in a separate container and save to make something like my dad’s delicious english muffin bread.

I enjoyed my ricotta on a gluten free crisp bread with black berries from the food co-op and some University of Illinois Honey (as made famous on the Colbert Report). I might have died and gone to heaven. Now, go make your own ricotta and never buy it from a grocery store again.