Home » Food » Recipes » Page 4

Category: Recipes

charred tomatillo salsa verde with parsley | a gluten-free recipe from frannycakes.com

Charred Tomatillo & Jalapeno Hot Sauce

charred tomatillo hot sauce with parsley | a gluten-free recipe from frannycakes.comFlavor of the Month for July 2014: Parsley. Parsley doesn’t get as much love as it should. It is a versatile herb with a fresh taste and peppery bite. It is definitely more than just a garnish, and this month we are exploring ways to help this herb live up to its potential.

I have to credit my best friend from college with helping me out of my mild-spice comfort zone. There might have been an incident where the shaker top came off of the chipotle I was shaking into our dinner, letting the entire contents of the jar fall into the quinoa I was making. He said it was the best dish I ever made. I couldn’t even swallow one bite.

After that dinner, he made it his mission to get me to try spicy food every time we were out together, and slowly, I started to appreciate a little heat in my food. I’m still no hot sauce fanatic. I am never going to embrace habaneros, scotch bonnets or ghost peppers. But a little kick is a very, very good thing.

tomatillos | from charred tomatillo hot sauce on frannycakes.com

And when a friend had an early surplus of jalapenos, what else was I going to do? Let someone else claim them? Never!
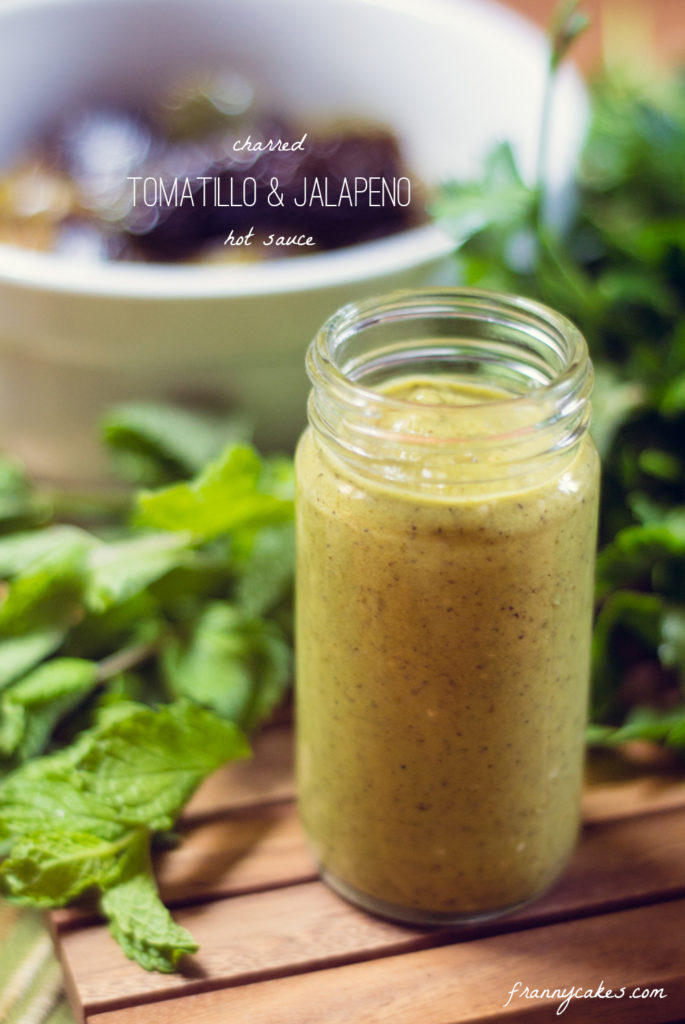
Sauce-y!

Since I had already obtained the peppers, when I was passing the small produce/ Mexican grocery on my way home, I saw that tomatillos were on sale. It was as if this sauce was calling to me. It wanted to be made!

charred tomatillos and jalapenos for hot sauce

I used parsley to avoid the “soapy” flavor that some people taste when they eat cilantro (even if it is one of my favorite herbs). This sauce balances the fresh, peppery taste of parsley and the sweet, bright taste of mint with the tangy tomatillo and the heat from the pepper. The charred skins add a layer of smoky depth to the sauce.

2014-07-03 19.53.29-1

The sauce was a hit with the friends I fed it to with tacos – there wasn’t any leftover for me! I had to make it again for the cookout I was going to for the fourth, where it was equally successful.

charred tomatillo hot sauce with parsley and mint | a gluten-free recipe from frannycakes.com

I promise it is easy, and it will make you a star at your next cookout or potluck. You can even use it to make chilaquiles for an easy, make it look fancy, breakfast nachos kind of morning. (Just heat the sauce and tortilla chips in a skillet until they are warmed through and not mushy, top with a fried egg, queso fresco and any other toppings you might like – tomatoes, parsley, leftover green onions, radishes and maybe even bacon bits).

Chilaquiles with Charred Tomatillo and Jalapeno Hot Sauce topped with an egg and queso fresco

Without further ado – the recipe for this hot sauce/salsa verde.

charred tomatillo salsa verde with parsley | a gluten-free recipe from frannycakes.com

Charred Tomatillo Hot Sauce With Parsley & Mint
Recipe Type: Sauce
Author: Mary Fran Wiley
Prep time: 5 mins
Cook time: 20 mins
Total time: 25 mins
Serves: 6
This sauce has been a hit every where I have taken it. You can vary it by using cilantro in place of the parsley or using oregano in place of the mint. You might also consider adding a splash of tequila to the sauce. I didn’t call it a salsa verde because it is a bit thicker than most salsas, but it is really great anywhere you would use salsa verde.
Ingredients
  • 2 fresh jalapeños
  • 1 – 1¼ lbs (450-500 grams) tomatillos
  • 2 spring/green onions, trimmed
  • 2 cloves of garlic, peeled
  • 2 tablespoons cider vinegar
  • 2 tablespoons extra virgin olive oil
  • ¼ cup mint leaves, lightly packed
  • 1 cup fresh parsley leaves, lightly packed
  • Salt, to taste
Instructions
  1. Remove the papery outer husks of your tomatillos and discard.
  2. Heat a griddle or skillet on the stove over high heat (if you have a cast iron one, this would be best). When the skillet is hot, arrange the tomatillos and jalapeños evenly on the skillet. Turn them every couple minutes so that you char as much of the outside as possible. It took me about 20 minutes to get a good charring. Try not to squeeze the tomatillos as they start to soften – you want all those juices to make it into your sauce.
  3. You can either transfer them straight to your blender, or you can let them cool off a little bit. (Hot items in your blender require taking out the center part of your lid and covering it with a towel to prevent explosions). I’m inpatient and never wait. I do, however, like to chop off the stems of my charred peppers before adding them to the blender.
  4. In your blender, add your spring onions, garlic, cider vinegar, olive oil, mint and parsley. Add the charred tomatillos and jalapeños. Blend on high until you have a smooth sauce.
3.2.2708


relish 18 | june 2014 | frannycakes picks gluten-free treats

Relish 18: Tastes like summer

relish 18 | june 2014 | frannycakes picks gluten-free treats

Relish is a compendium of things to enjoy greatly and that add a little flavor to your gluten-free life. And it is fresh, sunny and a tropical treat.

Well, I am mostly moved in now. I still have some stuff at my parents’ house and a living room with no where near enough furniture, but I am getting there. My dining room is all set and I have been cooking and baking up a storm in my new kitchen. (Single lady suppers anyone? This week there was tikka masala, steak with a parsley & mustard sauce and pasta with the famous Marcella Hazan sauce. Oh, and some friends came over for a pre-holiday taco dinner. )

I turned 30. One of my college roommates had a baby. A dear friend got hitched. I made it to a few festivals and a conference. I’d say it was quite the month.

relish 18 | june 2014 | frannycakes picks gluten-free treats

Who’s thirsty?

Summer is for front porch sitting, festivaling, outside cooking and beach walking. Most of these things can be improved upon with a cocktail, and the internet is delivering quite the variety.

relish 17 | june 2014 | frannycakes picks gluten-free treats

I’ve never actually had a mudslide (other than those horrible pre-mixed bottles friends bought in college), but this Coconut Kaluha Mudslide (01) recipe from Irvin at Eat the Love has me thinking of excuses to make it. Over at GFree Foodie, they shared a Peach Cooler (02) from Tina, A Girl Who Loves to Eat. And then there was this Blackberry Shrub Lemonade (03) from Kitchen Confidante. Can we just say “oh, boy!”? I love me a gin cocktail (in fact, I made a fabulous one with basil and grapefruit last year! (04)

Flavor of the month

He’s tall. Ultra nerdy. Has a thing for dessert and… Oh, wait. We are talking about real life. I was thinking about writing a few recipes based on an ingredient, flavor or theme. You know, now that I am cooking every day again, I think it could be fun.

Besides, summer gives us the perfect chance to try this out. Produce is abundant – I trip over it on my way home every Wednesday at the neighborhood farmers market. This month is all about parsley – the least appreciated of the fresh herbs I have at my disposal this season.


Minted Mushy Peas on Gluten-Free Toast

Minted Mushy Peas

My roommate, Helen, doesn’t much like mushy peas. In fact, there is this lovely pub in our neighborhood that offers them as a side, and she regularly tells me what a terrible choice ordering them is.

Minted Mushy Peas on Gluten-Free Toast

But I love them. I don’t know if it is the severe lack of mushy peas that I had growing up, or the fact that they have a distinct flavor of summer, but it was love at first bite.

And then I put them on toast. It might have been life changing.

Yes. Peas. Life change.

(I know, I know, it’s no buttercream on toast or cream cheese and jelly sandwich, but it is good. Really, really good.)

I read one too many recipes involving mint and peas and then saw one too many photos of avocado toast. It was bound to happen.

Peas are sweet and taste like summer. Mint is sharp, cooling and lightly sweet. It’s all that is good about summer produce (or a bag of veg that you keep in your freezer but are never really excited about and a bunch of fresh herbs that you grab at the grocery store).

mintmushypeas-process

A couple minutes of cooking. Thirty seconds of blending. Maybe throw in a side of chicken sausage and call it dinner.

If you are going to eat them on toast, please buy good bread. The Udi’s Millet Chia bread is pretty stellar. So is Turano’s rye-style gluten-free bread (although I can’t seem to find a link to it…it is a local Chicago company, and I’ve gotten it a few times…)

You can also just put a dollop on your plate like mashed potatoes. But green. And summery.

Minted Mushy Peas
Recipe Type: Side
Cuisine: British
Author: Mary Fran Wiley
Prep time: 5 mins
Cook time: 5 mins
Total time: 10 mins
Serves: 4
This recipe is adapted from Jamie Oliver’s magazine – a great read for anyone who loves food.
Ingredients
  • 2 tablespoons olive oil
  • 1 bunch spring onions, chopped
  • 1 handful fresh mint, leaves picked
  • 1 pound (500 grams) fresh or frozen peas
  • 2 large knobs (2-3 tablespoons, but you don’t have to measure carefully) butter (optional)
  • Sea salt and freshly ground black pepper
Instructions
  1. Heat the olive oil in a pan and add the chopped onions, mint, and peas.
  2. Cover and leave for a few minutes to steam.
  3. Pop everything in the blender or food processor and blend until smooth. If you don’t want to dirty another dish, you can use a potato masher, but your peas won’t be quite as smooth.
  4. When it’s done add the butter (optional) and season carefully, to taste. (And try not to eat it all while tasting…)
  5. These can be eaten hot when freshly made or cold for up to 3 days after making them (provided you kept them in a sealed container in the fridge.)
3.2.2708


Creamy Summer Chickpea Salad with feta, tomatoes, onion, lemon juice, olive oil and fresh herbs

Creamy Chickpea Salad

Summer Creamy Chickpea Salad | from FrannyCakes | Gluten-Free, Nut-Free, Vegetarian

They made a reality show about summer in Chicago for Bravo last year. The show might have been so terrible that even I couldn’t watch it. Just about the only part they got right was that summer is magic. And that we really only get 100 days of it.

I moved into the city proper just as the city was coming alive for the season, and I have already seen just how bonkers fun it is going to be.

Because in just 10 days I have made more than one trip to 2 different farmers markets (I actually have to walk through one to get home on Wednesday nights).  Every day has started with a green smoothie because I can pick up produce that I know I am going to use within 48 hours.

This week, I had my first rainy commute and first jerk on the bus. I cured it with a dirty chai.

My roommate picked a photo for our fridge (probably the most ridiculous picture that I have taken in a while), You know, because who wouldn’t want to hang up a photo of two friends and a blue wig?

I’ve made #singleladysupper a few times.

And I went to a neighborhood festival. My neighborhood’s festival to be more precise. I went twice. Once for an 80’s cover band on Friday night and once to go see my cousin play with Xoe Wise.

FrannyCakes moved to Andersonville

Summer has had quite the start.

So, to make sure that I have time to go to as many summer happenings as possible, I need meals that are easy to make, filling and delicious. And chickpea salad is one of my go-to moves for a meal in minutes that can last for a couple of days or that can be a side dish perfect for bringing to the next barbecue  on my calendar.

And if we’re being honest here, I make this when I run out of meat and can’t fathom dragging my butt to the grocery store. Or when turning on the oven or cooking something for more than a couple minutes on the stove means that I’ll melt. It is even perfect for mornings when right before you leave for the day you realize that there is a 1pm meeting on your calendar and have to cancel your lunch plans with friends.

Hashtag tastes like summer, hashtag single lady supper

Sure, the base is a pantry staple, but the herbs are all fresh. This time of year, tiny tomatoes are in season, so you can taste the sunshine when you bite into them and they pop with that subtle sweetness. Herbs by the bunch are some of the first produce to make it to the summer markets here in Chicago, and they might just be the secret to better savory cooking.

This makes a great entree for dinner and leftover lunch for one, or a perfect side for four.

Creamy Summer Chickpea Salad with feta, tomatoes, onion, lemon juice, olive oil and fresh herbs

Creamy Summer Chickpea Salad
Recipe Type: Salad
Author: Mary Fran Wiley
Prep time: 10 mins
Cook time: 5 mins
Total time: 15 mins
This makes a great entree for one with the right amount of leftovers for lunch or it can be a side for 4. See notes for allergy substitutions. Recipe is adapted from Jamie Oliver.
Ingredients
  • 1 small red onion, peeled
  • 1 fresh red chillies, deseeded
  • 2 handfuls ripe red or yellow tomatoes
  • 1 lemon
  • extra virgin olive oil
  • sea salt
  • freshly ground black pepper
  • 1, 15-ounce (425 g) can chickpeas, drained, or around 4 large handfuls of soaked and cooked chickpeas
  • 1 handful fresh mint, chopped
  • 1 handful fresh green or purple basil, finely ripped
  • 1 cup crumbled feta cheese
Instructions
  1. Finely slice your red onion and red chillies and put them in a large mixing bowl
  2. Roughly chop your tomatoes (I quartered mine, but you can chop them smaller if you want), and add them to the bowl with the onion and chillies.
  3. Scrape all juices and remaining bits from your cutting board into the bowl with the onion and chili.
  4. Dress the vegetables with with the juice of half of your lemon and 3 tablespoons of good extra virgin olive oil. Season with salt and pepper to taste.
  5. In a frying pan, heat the chickpeas in a pan until they are warmed through, then add about 90% of them to the bowl. This should leave 1/4 cup or so of the chickpeas.
  6. Mash the remaining chickpeas and add these to your other ingredients in the mixing bowl – they will give a nice creamy consistency to the salad and help keep the oil and lemon juice emulsified..
  7. Give a good stir and then allow the salad to marinate for a little while and serve at room temperature. (If you are making a to-go lunch, skip the waiting part)
  8. When you are ready to serve (or pack up to go), add the fresh herbs and taste the salad. You may need to add the juice from the remaining half of lemon or a little more salt and pepper.
  9. Top with crumbled feta to serve (or stir it in before you pack your lunch bag).
  10. Just as you’re ready to serve, give the salad a final dress with the fresh mint and basil. Taste one last time for seasoning – you may want to add the juice from your remaining lemon half at this point. Place on a nice serving dish and crumble over the feta cheese.
Notes
If you have dairy allergies, sheep’s feta tastes better than cow’s anyway. If you also can’t do sheep cheese, GoVeggie has a vegan grated topping that is similar to parmesan. Add this to taste as the amount will be different than the amount of feta required.
3.2.2310


relish 17 | may 2014 | frannycakes picks gluten-free treats

Relish: Maybe Daisies

relish 17 | may 2014 | frannycakes picks gluten-free treats

Relish is a compendium of things to enjoy greatly and that add a little flavor to your gluten-free life. And sometimes things are uncertain.

Hello, June. Thanks for showing up. After a long winter, and a May that just seemed so very, very long – which happens when you are excited about something big that happens to be imminent.

I moved the last week in May to an apartment less than half an hour from my office – a huge change from my old 2.5 (and often longer) commute. I now live with one of my good friends, Helen. I am currently living in a 1920’s apartment decorated in what my cousin called “transitional nomad” style. Soon, I hope to have it feeling like home – but for now, Old Faithful, my KitchenAid, has a home. And that is good enough for me.

If you missed it, while I was in transition, a few friends wrote guest posts for me. Check out posts from Jean, Jane and Willow with tasty treats!

Chow

Thank goodness the weather here in Chicago has finally warmed up and (mostly) stayed that way. Meaning produce is starting to appear at the farmers markets. Walks to the grocery store are enjoyable. And it’s time for food that tastes like summer.

relish 17 | frannycakes' favorite GF recipes from may 2014

There is something about popcorn. It’s comforting. It’s tasty. And it is a flavor chameleon. This Coconut Cacao Popcorn (01) from Aime at the Healthy Apple looks simply fantastic. Summer is here, and I love a good smoothie to cool down. An Açaí Smoothie (02) from Kitchen Confidante fits that bill perfectly. Brussels sprouts and potato salads are two of my favorite foods, and Irvin’s combination of the pair (03) seems downright genius. Some nights, you just need a little steak, and Pete from No Gluten, No Problem delivered some (04). He even made it better by adding bourbon – sounds like celebration food to me.

Mixed Messages

I know most people don’t share my outright aversion to box mixes. I’m sure if you scroll through the archives here you will find more than one post where I have talked about how little I like them. And that’s mostly true. I’ve eaten one too many beany, gritty, dense cake from a mix in my life. The chemical after taste from many commercial baking mixes feels like an insult to anyone who is eating a dessert.

These days, there are a few standouts out there. Mixes that I don’t mind cooking from and am not embarrassed to serve to my friends. so if you are more comfortable baking from a mix or you need something that comes together easily, these mixes are all ones that I have no problem keeping a spare of in my pantry.

relish 17 | four stand-out GF mixes

Brownies are one of my favorite desserts, and I have my recipe memorized, but I know that isn’t reality for most home cooks. Cup4Cup is my favorite commercially available flour blend, so when I heard they had a brownie mix (01), I knew it was going to be good. Their products are developed for customers who don’t settle for something that is good for gluten-free. It has to be actually good. And they succeeded.

Hands down the best gluten-free cake mixes on the planet are Kyra’s Bakeshop cake mixes (02). They make great cakes and cupcakes as-is, or you can dump the cake mix (the snicker doodle variety, if you have it) on a pan of frozen peaches, add a little melted butter or oil, and you have an easy, peasy cobbler.

When I saw this mix at the GFAF Expo in April, I wasn’t sure what I loved more – the mix or the outfits that all the Bumbalooza staff members were wearing. Their mixes are unique, fun and delicious. If baking from scratch isn’t your thing, and you want to make something a little more exciting than a basic cake or brownies, this pink lemonade donut mix (03) is a great place to start.

Last but not least is the bread and pizza flour blend (04) from Karen at Blackbird Bakery. It is by far my favorite pizza crust mix. All of the blends have been developed with a specific end-use in mind, rather than being multi-puropse like other blends. I think that is how this one is such a stand out. A pizza crust that is crunchy with just enough chew is hard to find in the gluten-free world, but this one is head and shoulders above the rest. It requires a bit more work and patience than some of the other blends out there, but it is well worth it.

Up next

I have officially moved into my new apartment, and it feels great to be cooking my food for every meal. I’ve started exploring the rich food culture in my new neighborhood. There is an asian grocery, a persian market, a middle eastern deli and a european importer all in walking distance from my new home. There is even a grocery store that I have dubbed food heaven on my way to work.

I’ve been spending my evenings inventing clever hashtags (#kaledit and #singleladysupper have been making regular appearances on my instagram) to use when I share my kitchen adventures.

Presents!

The lovely folks at Cup4Cup are giving away one of their brownie mixes to one of my readers. Enter by leaving a comment with your idea of the perfect brownie. You must be in the US and over 18 to win. Entries must be in by 12am CST on June 12, 2014.

Asparagus Tomato Mozzarella Salad by Jane Bonacci on FrannyCakes

Asparagus, Tomato & Mozzarella Salad

This is a guest post from Jane Bonacci, The Heritage Cook to keep things here interesting while I await the arrival of my kitchen utensils in my new apartment.

Asparagus Tomato Mozzarella Salad by Jane Bonacci on FrannyCakes

When my friend Mary Fran put out the word that she needed some help with guest posts for her blog, I immediately raised my hand. Mary Fran and I met last year in Austin during BlogHer Food. Always upbeat with a smile on her face, I had an immediate feeling that we would become friends – and I was right!

Since we both have to eat gluten-free, we gathered a few other friends who also have dietary restrictions and went off to find a beautiful lunch. When you are in the middle of the frenzy of a conference, it is nice to step away for a few minutes and enjoy getting to know people a little better. We had a fabulous Mexican meal, shared a lot of laughs, and made new friends. This is what I love best about going to conferences!

Today’s recipe is full of the flavors of spring and summer and perfect for brunch, lunch, or dinner on hot summer days. And best of all it is naturally gluten-free!

Asparagus Tomato Mozzarella Salad by Jane Bonacci on FrannyCakes

I love Caprese Salad, an Italian classic with heirloom tomatoes, mozzarella cheese and fresh basil. These three ingredients represent the colors of the Italian flag and are often found in a variety of dishes, most notably this salad and Margherita pizza.

If tomatoes aren’t at their peak, it’s OK because marinating them for a few minutes in the vinaigrette gives them a huge bump in flavor. You can use any variety you like, but heirlooms are my personal favorite. When they aren’t in season, I usually buy Roma tomatoes (pear-shaped) because they have a lot of meat, few seeds and less moisture. That makes them perfect for most salads.

If you are making this later in the year and can’t find asparagus in the grocery store or farmer’s market, you can substitute zucchini, cucumber, summer squash, potatoes, or other vegetables you like for an equally delightful dish.

Asparagus, Tomato and Mozzarella Ingredients by Jane Bonacci

You can throw this salad together in just a few minutes and have it on the table in less than an hour.

The Artist and I really enjoyed this salad. I had planned on it being our whole meal, but he had a long bike ride to recuperate from and needed more protein. So we added a rotisserie chicken to round out the meal. It was absolutely perfect for this balmy evening.

Enjoy this salad when you can and thank you Mary Fran for this opportunity to share this recipe on your beautiful blog. It is an honor!

Gluten-Free Tips:

This salad is naturally gluten-free. If you choose to use a store bought dressing, make sure you read the label and be certain it doesn’t have any gluten in it. Dressing are one place where gluten likes to hide!

Kitchen Skill: How to Trim Asparagus

The best way to know where to cut asparagus (part of the stalk is tough and woody) is to hold one stalk at both ends and bend it until it snaps in two. Set the tender stalk next to the rest of the bunch and cut them all to that length.

Asparagus, Tomato and Mozzarella Salad with Lemon Vinaigrette
Author: Jane Bonacci – The Heritage Cook
Serves: 4
This flavorful salad is perfect for springtime lunches or as a starter before dinner and is naturally gluten-free.
Ingredients
  • Salad
  • 1 bunch fresh asparagus, tough ends trimmed off and discarded, stalks cut into bite-sized pieces
  • 2 large or 3 medium tomatoes, cored and cut into small wedges
  • 1 ball of fresh mozzarella (stored in water), drained, patted dry and cut into small cubes
  • 2 tsp fresh thyme leaves
  • 4 whole lettuce leaves, preferably butter, red or green leaf lettuce
  • Lemon Vinaigrette
  • 1 tbsp freshly squeezed lemon juice
  • 1 tbsp champagne, sherry, or white wine vinegar
  • 2 tsp minced shallots
  • 1 tsp Dijon mustard
  • 6 tbsp organic olive oil
  • Kosher salt and freshly ground black pepper, to taste
  • Pinch of sugar, if needed
Instructions
  1. Fill a large mixing bowl about half full with water and add ice to chill it. Set aside.
  2. In a 4-quart saucepan, bring water to a boil, salt it lightly and add the asparagus. Cook until the asparagus is just barely tender, about 4 minutes. The cooking time will depend on the size of the pieces. Nibble on pieces, testing until they reach the doneness you like.
  3. Using a slotted spoon transfer the asparagus to a wire strainer. Place the wire strainer in the bowl of ice water – the strainer will make it much easier to strain the chilled asparagus. Leave in the water just long enough to stop the cooking process.
  4. When lightly cooled, lift the strainer with the asparagus from the water and drain thoroughly. Transfer to another mixing bowl. Add the tomato wedges* and mozzarella cubes. Set aside while you make the vinaigrette.
  5. In a medium jar with a tight lid, combine the lemon juice, vinegar and shallots. Let it sit and macerate for about 3 minutes. This will take a little of the sharpness off the vinegar and lightly sweeten the vinaigrette. Add the remaining vinaigrette ingredients. Place the lid on the jar, tighten it and shake the jar vigorously until the mixture is smooth and emulsified.
  6. Pour 1/3 to 1/2 of this mixture over the salad and toss until everything is evenly coated. Add more if you like. Taste the salad and add salt and pepper to taste. Pass the extra dressing at the table and then store remaining dressing in the refrigerator up to a week.
  7. Place a lettuce leaf on each serving plate. Divide the salad evenly between the plates, placing it atop the lettuce leaves. Serve immediately.
Notes
* If your tomatoes are not full of flavor, toss separately with some of the vinaigrette and let sit for about 2 to 4 minutes. Then use a slotted spoon to transfer the tomatoes to the bowl with the cheese and asparagus and continue making the salad as directed. You can use the dressing that was on the tomatoes to dress the rest of the salad.
3.2.2310


gluten-free caramel hazelnut tart from GF Doctor on FrannyCakes.com

Gluten-free Caramel Hazelnut Tart

This is a guest post from Dr. Jean Layton, GFDoctor to keep things here interesting while I await the arrival of my kitchen utensils in my new apartment.

It is still too early for local fruit where I live up in Washington. Our strawberries are still occasional tiny green nubs surrounded by brilliant white blossoms. The gooseberries are green pea sized not anything close to beautiful big grape sized fruits that add so much to my summer tarts.

Tarts are my favorite quick to bake dessert when I’ve invited friends over, crispy crust with sweet centers.

gluten-free caramel hazelnut tart from GF Doctor on FrannyCakes.com

This tart goes together without much fuss.

The crust is stirred together, then pressed in place, no need to roll.

It bakes for 15 minutes with the hazelnuts from the filling inside, so no pie weights are needed. Best of all, the caramel topping melds and cooks in the same amount of time. Which means that the hardest part of enjoying this tart is the wait for it to cool.

Using hazelnut flour in combination with sweet rice flour gives a tender, short crust.  If you need to avoid dairy, the crust can be made with coconut oil instead.

Gluten-free Hazelnut Tarts
Author: Jean Layton
Serves: 4
This recipe creates 4 4 inch tarts or one large 12 inch tart I prefer to use the small tart pans because the caramel won’t slide out when cutting to pool on the plate. With the smaller tart, each guest can get their own, keeping the caramel safe inside till my friend cuts it open and dips each bite in cinnamon whipped cream. it is no more trouble than making one.
Ingredients
  • Crust
  • 1 cup hazelnut flour (Bob’s Red Mill makes a great one)
  • 1 cup sweet rice flour
  • Pinch of salt
  • ⅓ cup sugar
  • ½ cup cold unsalted butter- cut into small bits.
  • 2 cups whole hazelnuts
  • Caramel
  • 1 cup white granulated sugar
  • 2 tablespoons honey
  • 2 tablespoons water
  • 1/8 teaspoon salt
  • 1/2 cup heavy cream
  • 2 tablespoon unsalted butter
  • Cinnamon Whipped Cream
  • 1 cup heavy cream
  • ¼ cup sour cream
  • ¼ cup organic cane sugar
  • ½ teaspoon cinnamon
  • pinch of salt
Instructions
Make the crusts
  1. Preheat oven to 350 degrees(180 C or gas mark 4)
  2. Stir together till one color: flours, salt and sugar.
  3. Combine the flour mixture and the butter.
  4. Flatten the butter bits between your fingers into the flour till well combined
  5. Divide into 4 portions
  6. Place each amount into a tart pan
  7. Press and smooth the mixture into the pan, making sure to get the crumbs to go up the sides.
  8. Evenly divide the hazelnuts amongst the tart crusts, or spread them out over the bottom of one large crust.
  9. Bake for 15 minutes.
Make the caramel
  1. Combine the sugar, honey, water and salt in a 2 quart saucepan. Don’t substitute a smaller pan, when the cream is added later, it bubbles up and can overflow a smaller one.
  2. Heat the sugar mixture over medium high heat till the sugar melts, stirring continuously.
  3. Using a wet pastry brush, wipe the sides of the pan of all sugar crystals are gone.
  4. Continue to cook till dark brown, swirling the pan every few seconds to make the color even.
  5. Once the cooked sugar is the color of dark brown sugar, add the cream all at once and from the side.
  6. The mixture and extremely hot steam will bubble up.
  7. Remove from heat, drop in the butter and stir.
  8. Remove the tarts from the oven.
  9. Top each one with caramel, pouring over each nut first then adding a bit to make it about half full.
  10. Allow to cool to room temperature.
Make the whipped cream
  1. Beat cream till soft peaks form
  2. Beat in sour cream, organic cane sugar, cinnamon and salt till firm peaks form.
To serve
  1. Serve each tart with a large dollop of Cinnamon Whipped Cream on the side.
3.2.2310


Perfectly Moist Gluten-Free Banana Bread

In case you missed the news in Relish, I am moving! I lined up a couple of guest posts to keep the content coming while I pack up, move and unpack it all again 🙂 Today’s post is from Willow of Will Cook for Friends.

Gluten Free Banana Bread from Willow at Will Cook for Friends on FrannyCakes

Hello everyone! Pleased to meet you – I’m Willow. I am so excited to be guest posting here in Mary Fran’s space, and sharing this delicious banana bread with you!

Now, I’ve eaten a lot of banana bread in my day. I mean, a lot. (Is it possible to have too much banana bread? I don’t think so.) One of my earliest childhood memories was sitting at the dining room table with my mother, eating slice after slice of warm banana bread with her. By the time everyone else in the house had figured it out, most of the loaf was gone. I’m like a banana bread magician – now you see it, now you don’t!

(Actually, now that I think about it, I’m also an ice cream magician. And a pie magician. Mm, pie…)

Now that I’m all grown up, making banana bread is one of my favorite ways to treat myself. It’s quick and easy to pull together, and since it’s packed with bananas and nuts, it’s easy to convince myself that it’s good for me. Which, let’s face it, it’s good for the soul, so… it counts.

Gluten Free Banana Bread from Willow at Will Cook for Friends on FrannyCakes

Even though I don’t adhere to a strictly gluten-free diet, I love to make gluten-free recipes whenever I can, and this banana bread has definitely become one of my favorites. To be completely honest, I like it even more than its traditional counterpart. The hardest part of making regular banana bread is not over-mixing the ingredients, which can lead to a tough, dense bread. When you’re making it gluten-free, there’s no fear of over-mixing, and the bread turns out moist and tender every time. Plus it opens the door to using more nutrient-dense flours, like oat and almond flour, which helps me feel a little less guilty when I eat half the loaf while typing up a blog post.

Err… yeah.

Gluten Free Banana Bread Recipe by Willow Arlen on FrannyCakes

When it comes to making banana bread, the riper your bananas are, the better. We’re talking brown-speckled and verging on mushy. Whenever I buy a bunch of bananas, I get a couple more than I think I’ll need for just snacking and smoothie making. When the extras start to get overripe, I peel them, put them in a zip-top bag, and throw them in the freezer. Then when I’ve got enough frozen bananas to make a loaf, I just pull them out, let them thaw, and mash. They’ll turn brown and kind of slimy after being frozen (appetizing, right?) but don’t worry, that’s exactly how you want them. Once they’re mashed and mixed into the batter, they give the perfect level of sweetness and moisture.

I may or may not be hoarding a secret stash of overripe bananas in my freezer for this very purpose. You never know when the urge for banana bread will strike!

Perfectly Moist Gluten-Free Banana Bread
Recipe Type: Breakfast
Author: Willow Arlen
Ingredients
  • 1 cup (130g.) sweet sorghum flour, plus a little extra for the pan
  • ½ cup (45g.) gluten-free oat flour
  • ½ cup (56g.) almond flour
  • 1 tsp. Psyillium husk powder
  • 1 ½ tsp. Baking powder
  • ½ tsp. Baking soda
  • ½ tsp. Fine grain sea salt
  • 4 large bananas, very ripe* (about 2 cups mashed)
  • ½ cup light brown sugar, packed
  • 2 large eggs
  • ½ cup milk, or dairy-free substitute
  • 1 TBSP white vinegar
  • 2 TBSP melted coconut oil
  • 1 tsp. vanilla extract
  • 1/2-1 cup pecans or walnuts, roughly chopped, or chocolate chips or other add-ins (optional)
  • *thawed, if frozen.
Instructions
  1. Preheat oven to 350 degrees F. Lightly grease a 9×5 inch loaf pan, and sprinkle about a TBSP of gluten-free flour into it (any of the flours will work). Tip the pan to all sides until the bottom and sides are coated in flour, then turn the pan upside down over the sink and tap out any excess. Set aside.
  2. In a bowl, whisk together all of the flours, psyillium husk powder, baking powder, baking soda, and salt.
  3. In a large bowl, mash together the bananas, brown sugar, and eggs. Add the milk, vinegar, coconut oil, and vanilla extract, and mix until well combined.
  4. Add the dry ingredients to the wet ingredients, and mix until there are no dry spots left. Add the nuts, chocolate chips, or other add-ins if using, and fold them in.
  5. Pour the batter into your prepared loaf pan, and bake for 55-60 minutes, or until a toothpic inserted in the center comes out mostly clean, but still moist. Remove from the oven and let cool at least 30 minutes before removing from the pan.
  6. Enjoy!
3.2.2310


Cheerful Chimichurri Bowl from The Blender Girl by Tess Masters | FrannyCakes

Cooking the Books: The Blender Girl

the blender girl cookbook review

[box type=”info”]I was not compensated in any way for this post, but I do consider Tess a friend. The cookbook is great, and I wouldn’t write about it if I didn’t love it.[/box]

I am never going to be a raw-food enthusiast or a vegan. It is really not ever going to happen – you know, with my love of butter and macarons and maybe even bacon. But I do love all kinds of foods – brussells sprouts, green beans fresh from the garden and carrots are a few of my favorite things. It’s all about balance because, for the most part, I want to eat better and have the chance to indulge on those cakes I so dearly love.

So, I have been collecting cookbooks with a healthier focus lately. I know how to make a killer cake and I can whip up pancakes or brownies from memory, and I can whip up a dinner from the random things in my pantry. But, and this is a big but, I tend to get in a rut. I buy the same vegetables week after week and my go-to dinners are always delicious. They aren’t as exciting as they could be.

Or, there is the breakfast connundrum. I know I need to eat it. I know that Fruity Pebbles are really not the best choice for a strong breakfast and I am struggling with the concept of greens for breakfast. (If you follow me on Instagram you know that I have been slowly adding greens to my smoothies but I have yet to declare kale smoothies a favorite food. It’s all about the baby steps).

This book, much like Brassicas, makes veggies and green beverages sexy. The photos hook you. The recipe names just sound delicious. The writing keeps you engaged. (Ok, most people don’t read cookbooks cover to cover like I do, but that is besides the point.) You might just start to believe that intense green smoothies taste good.

I can hear Tess in every recipe head note – friendly and passionate with just a dash of kooky. In The Blender Girl, Tess’ notes about health and ingredients come off as smart suggestions – the kind your best friend might make if she was a nutritionist or raw vegan belnder expert. She walks the line between confidently talking about nutrition/ her dietary preferences and diet evangelism. I almost believe I could be a vegan. Almost.

Cheerful Chimichurri Bowl from The Blender Girl by Tess Masters | FrannyCakes


While I am not turning into a raw vegan on an alkaline diet, I am working green smoothies into my mornings and I appreciate a good chimmichuri. When a recipe calls for a soaked date, I will probably substitute some local honey. If I can’t find maple syrup, I might just use agave nectar. It is quite possible that I will never embrace green powder or confuse cashew cream for the real deal. It’s all good with this cookbook. There are often substitutions listed so that you can use foods that fit your diet, taste or budget. If there aren’t any listed, you should go for it anyway. Cooking is about passion and making yourself happy.

So far, I have made the Chia Choo-Choo, Cheerful Chimichurri Bowls, Papaya Pleasure, and Rosewater and Cardamom Lassi. All of them have lived up to what I was imagining after reading the recipes. The book is perfect for anyone looking for creative ways to add fruits and veggies to their diet.

The Rating

Author: Tess Masters
Title: The Blender Girl
Format: paperback, full color photos
Stars: 5/5*
Buy it or Forget it: Buy it, buy it, buy it.
Must try recipes: Every one in the book? I might be addicted to the Chia Choo Choo, Cheerful Chimichurri Bowls and Rosewater Cardamom Lassi
*Read more about my cookbook review criteria.

Make something


Cheerful Chimichurri Bowl from The Blender Girl by Tess Masters | FrannyCakes

The recipe requires a few pans and some coordination in the kitchen for all of the moving parts, but the results are delightful. You could substitute whatever veggies you happen to have on hand or that are in season where you live in place of the ones used in the recipe. You could grill the veggies outside in the summer and make the quinoa in a rice cooker. The star of the recipe is the chimichurri. A vibrant herb-based sauce much like pesto or pistou but without the nuts or cheese, chimichurri is a great alternative to those sauces for people with dairy or nut allergies. It is also fabulous on grilled steak or fish.

Cheerful Chimichurri Bowls from The Blender Girl
Recipe Type: Entree
Author: Tess Masters
Prep time: 10 mins
Cook time: 45 mins
Total time: 55 mins
Serves: 6
This awesome vegetarian entree is one of my favorites from the book. It is easy to put together, and the ingredients can be swapped out based on what you have on hand. Plus, you can make this dish in under an hour, and there is no wasted time.
Ingredients
  • Sauce
  • 3/4 cup (180 ml) olive oil
  • 1 cup (50g) finely chopped flat leaf parsley, plus more to taste
  • 2 tablespoons finely chopped tarragon, plus more to taste
  • 2 tablespoons finely chopped mint, plus more to taste
  • 1 teaspoon dried oregano, plus more to taste
  • 1/2 cup finely chopped green onions (white and green parts), plus more to taste
  • 4 cloves garlic, plus more to taste
  • 2 tablespoons freshly squeezed lemon juice, plus more to taste
  • 2 tablespoons freshly squeezed lime juice, plus more to taste
  • 1/2 teaspoon red pepper flakes, plus more to taste
  • 3/4 teaspoon natural salt, plus more to taste
  • 1 1/2 teaspoons red wine vinegar, plus more to taste
  • Bowls
  • 4 large sweet potatoes, cut in to large chunks
  • olive oil
  • 10 cloves of garlic, peeled
  • Natural salt
  • Red pepper flakes
  • 2 1/2 cups (475g) quinoa
  • 4 large portobello mushrooms, stemmed and cut into large slices
  • 1 brunch asparagus, ends snapped off
  • freshly squeezed lemon juice
  • 2 bunches rainbow chard, stalks removed and leaves roughly chopped
  • 2 avocados, pitted, peeled and thickly sliced
Instructions
Make the sauce
  1. In a blender, combine all the chimichurri ingredients and blend on high for 30 to 60 seconds – you want the herbs well pureed. Taste and tweak the flavors to your liking.
Make the bowls
  1. Preheat your oven to 400 degrees Fahrenheit.
  2. Toss the sweet potato, a generous pour of olive oil (1/4-1/2 cup) and 8 cloves of the garlic with a healthy pinch each of salt and pepper flakes. Spread in a single layer on a baking sheet lined with parchment paper. Bake for about 45 minutes, when the sweet potatoes are tender.
  3. Meanwhile, in a dutch oven (or any oven-proof pot with a lid), combine the quinoa with 5 cups of water, a teaspoon of salt and a tablespoon of olive oil. Bring to a boil over high heat and then reduce heat to medium and simmer for 5-10 minutes or until the water has reduced to below the level of the quinoa. Place the lid on the pot and transfer the quinoa to the oven to bake for 30-40 more minutes alongside your veggies.
  4. In one bowl, toss the mushrooms with olive oil, coating them well. (The original recipe calls for 1/4 cup, but I used half that). In a separate bowl, toss the asparagus with 2 tablespoons of olive oil, 2 tablespoons of lemon juice and 1/4 teaspoon salt.
  5. in a large frying pan, over medium high heat, sauté the mushrooms for about 10 minutes – until tender and cooked through. Remove from the pan and place on a plate lined with paper towels. Sauté the asparagus in the pan next. They should cook for about 5 minutes – you want them to still have a little bite. Once cooked, place them on the plate with the mushrooms.
  6. Add the chard, a tablespoon of olive oil, two tablespoons of lemon juice and a pinch of salt and pepper flakes for about 2 minutes – until just wilted.
  7. This should all finish up cooking right about the time your sweet potatoes and quinoa are ready to eat. Dish up the quinoa and veggies and top with about 1/4 cup of the chimichurri and a couple slices of the avocado in each bowl.
3.2.2310


a review of brassicas by laura russell

Cooking the Books: Brassicas by Laura Russell

a review of brassicas by laura russell

[box]Two disclaimers: First, a copy of Brassicas was provided by Ten Speed Press free of charge for this review. Second, I consider Laura a friend, but I would not have written about the book if I didn’t love it.
Jump to the recipe for Charred Brussels Sprouts with Fig Glaze[/box]

Vegetables are beautiful. I seem them all the time on Pinterest. Looking just a little bit sexy and tempting…and then I see a macaron. I have this problem. You all know about it. I love dessert. If candied kale were a thing, I probably would have jumped on that band wagon ages ago. Probably around the same time I decided that cupcakes were an acceptable coping mechanism.

It’s why this blog is mostly of the dessert flavor.

But I’ve been branching out lately. I even made Gluten-Free Kale & Sweet Potato Lasagna. So, when my friend Laura Russell (the brilliant writer behind the Gluten-Free Asian Kitchen), told me she was writing a cookbook about vegetables, I was tentatively excited. I mean, we’re talking veggies. And she had to go and choose the healthiest type of veggies – brassicas, which incidentally, is the title of the lovely cookbook that comes out on April 8th.

Spicy Kale Stir Fry from Brassicas by Laura Russell

There are no recipes for candied kale or broccoli brownies in this book. (I am actually relieved by this – the whole avocado / black beans in brownies trend freaks me out). And it is downright amazing. That’s right. I said that about a cookbook all about vegetables. Freaking amazing. I want to make and eat everything in the cookbook kind of amazing.

When the book first arrived, I opened it and left it on my desk at work. At least three coworkers paged through it at my desk when they came to see me – before I even got to look. There is currently a waiting list of friends who want to borrow it because they can’t buy it yet. The book itself is gorgeous. Rich, slightly moody photos of vegetables making you want to saunter into your kitchen and get to cooking. The book has chapters on kale, broccoli, root brassicas and leafy brassicas.

There is a handy-dandy chart in the back to help you identify and adapt the recipes no matter if you are gluten-free, soy-free, nut-free, egg-free, vegetarian, vegan or fish/shellfish free. Most of the recipes are naturally gluten-free or say right in the recipe notes how to make the recipe without an gluten-containing ingredients. Which is excellent, because when I am making dinner, I need it all spelled out for me – it’s nothing like making cupcakes (those I can do blindfolded with one hand tied behind my back).

This cookbook might just get me to eat my vegetables with a bit more zeal. Let’s be clear though – this is not your mamma’s diet food. This is not a lose weight in three weeks kind of book. This is a see how wonderful and complex these ingredients are kind of book. This is an explore that crazy looking UFO veggie kind of book. This is a make your friends jealous when you Instagram your dinner kind of book.

The Rating

Author: Laura Russell Title: Brassicas: Cooking the world’s healthiest vegetables
Format: hard cover, full color photos
Stars: 5/5*
Buy it or Forget it: Buy it, Instagram your dinner and fall in love with vegetables
Must try recipes: Charred Brussels Sprouts with Pancetta and Fig Glaze, Spicy Kale Stir Fry
*Read more about my cookbook review criteria.  

Let’s get cooking

The best part of cookbooks? Trying new recipes! I made the Spicy Kale Stir Fry last week and ate it for three meals straight. Then I made these Brussels sprouts, and I decided that the recipe really was only 2 servings – my dinner and leftovers for lunch.

making charred brussels sprouts with fig glaze

Due to my dad’s pork allergy, I made this recipe using turkey bacon in place of the pancetta. It was still incredibly delicious, but I can only imagine how good it would be as written. That might just be the best part of this cookbook – the recipes can work as a framework for a dish, rather than being a roadmap that has to be followed to the letter.

This recipe might be love.

charred brussels sprouts with fig glaze from brassicas by laura russell

Cooking the Books: Brassicas by Laura Russell
Recipe Type: Vegetable
Author: Laura Russell
Prep time: 10 mins
Cook time: 15 mins
Total time: 25 mins
Serves: 4
“NOTHING TASTES BETTER with Brussels sprouts than cured pork, which is why I unapologetically offer you recipes that flavor sprouts with both pancetta and bacon. Here, the salty pancetta plays well with the sweetness from the fig jam, and you can finish the dish with a drizzle of balsamic vinegar to add a tangy note (see variations). I found fig jam near the grocery store’s cheese counter (not in the jams and jellies aisle), but you could also try apricot or peach jam instead. You may want to add a touch more jam than I suggest, but strive for a subtle sweetness rather than a cloying, sticky mess.”
Ingredients
  • 3 tablespoons olive oil (divided)
  • 3 to 4 ounces pancetta, diced
  • 1 1/2 pounds Brussels sprouts, trimmed and halved (or quartered if large) through the stem end (about 6 cups)
  • 1/4 teaspoon kosher salt
  • 2 tablespoons fig jam
  • 1 tablespoon water
  • 1/4 teaspoon freshly ground black pepper
Instructions
  1. In a large (12 inches or wider) frying pan, heat 1 tablespoon of the oil over medium heat. Add the pancetta and cook, stirring occasionally, for about 3 minutes, until crisp. Using a slotted spoon, transfer the pancetta to a small bowl. Return the pan to medium-high heat and add the remaining 2 tablespoons oil. Add the Brussels sprouts, keeping them in a single layer as much as possible. Having a few extra sprouts is fine, but if they are mounded in a pile, they will not brown or cook evenly. If necessary, use a larger pan, cook them in two batches, or pull out the extra for another use. Stir in the salt. Cook, stirring occasionally, for about 10 minutes, until the Brussels sprouts are tender and well browned—even charred in spots. If the sprouts are browning too quickly, lower the heat to medium.
  2. Add the fig jam and the water and stir until the jam melts and coats the Brussels sprouts. Add the reserved pancetta and the pepper and stir to combine. Taste and add additional salt or pepper if needed. Serve warm.
  3. variations
  4. For a sweet, salty, tangy version, add a drizzle (a teaspoon or less) of balsamic vinegar at the end. Aged balsamic is an especially good choice. Although I prefer pancetta here (I like its unsmoked rich pork flavor), you can use bacon in its place.
Notes
Reprinted with permission from Brassicas: Cooking the World’s Healthiest Vegetables: Kale, Cauliflower, Broccoli, Brussels Sprouts and More by Laura B. Russell. Copyright © 2014 by Laura B. Russell. Published by Ten Speed Press, an imprint of the Crown Publishing Group, a division of Random House, Inc. All rights reserved. No part of this excerpt may be reproduced or reprinted without permission in writing from the publisher
3.2.2265