Home » slider

Tag: slider

GF Ratio Rally: Pinwheel Sugar Cookies

I found out that my new coworkers already read my blog. They asked me questions about my baking on my first day. And they have asked for something spectacular for the company Christmas party. Peppermint brownies? Eggnog blondies? Decisions, decisions.

But, let’s procrastinate those decisions and talk cookies.

These cookies are brought to you by the numbers 3, 2, 1.

Read more

gluten free pumpkin mousse pie

GF Ratio Rally: Pumpkin Mousse Pie

gluten free pumpkin mousse pieI am going to dedicate this post to my mom. She helped me pull together the recipes for this month’s rally while I am supposed to be on bed rest. And this month you will really see where I get my baking sense from.

Oh, you read that part where I am on bed rest? I had surgery last Thursday and it was a little rockier than we had anticipated. I am waiting for electric leads to scar into place in my spine and because they were placed with no wiggle room, I have to stay put so that everything stays where it was placed. The good news is that the surgery was successful, and when you are reading this, I will be at the doctor’s office for my post-op appointment. And hopefully talking my sister into some Pei Wei.

Now, back to the pie.

I have baked this crust before for Gluten-Free Girl’s summer Pie Party. And I love it. It is light, flaky and delicious.

You can bake pie crust from scratch. Really, you can. It is not scary, and you never need to buy frozen pie crust again. Just make a double recipe of crust and freeze the spare. If you have a food processor, this takes about 10 minutes and once you make it a couple of times, you will never need a pre-made crust again.

The entire rally this month is full of proof.

gluten free ratio rally logo

The crust is great. The ratio is so basic, I will never forget it. 3-2-1. Flour-fat-water. I should be telling you that the ratio reigns supreme. But as important as the ratio is, there is a secret. The secret to pie crust is not the ingredients, or their amounts, but how cold your ingredients are. I keep my vodka in the freezer at all times, if you don’t you’ll want to prepare ahead. I also tend to keep an extra pound or two of butter in the freezer (I buy it when it goes on sale). If you only keep enough butter on hand for your current baking (if such a person exists), then you need to freeze your butter (or vegan alternative). This recipe will also work with Crisco in pace of butter. But again, you want to make sure that it chills in the freezer over night.

There is no need to vary the ratio. You can add a teaspoon of sugar for a sweet pie, if you want. But you don’t need it.

Now, onto the pies. That’s right, pies plural. Mom and I made 2. I will link you to the Apple Maple Cream Cheese pie, but I want to talk to you about this pumpkin mousse pie. Yes, pumpkin mousse. I love traditional pumpkin pie. I really do, but I was certain that someone else was going to post about it (and they did, so go to the list of posts if you want a traditional pumpkin pie). I wanted to do something that put a new spin on a perennial favorite.

Mom and I made a pumpkin mousse pie to do just that. You simmer the pumpkin and cream with spices and then chill it and fold it to some cream that you have whipped and make an incredibly light and airy pie with just the right amount of spice for the season.

Before you bake my pie, make sure you take a moment to see all the other delicious pies from this month’s Ratio Rally hosted by Lisa from Gluten Free Canteen.

Charissa from  Zest Bakery made Apple Galette with Pisco Soaked Golden Raisins
Claire from Gluten Freedom made Autumn Pumpkin Spice Pie
Meredith from Gluten Free Betty made Blueberry Pie
Jean Layton made Cheese Crusted Apple Pie
Erin from The Sensitive Epicure made Chess Pie 
Silvana Nardone from Silvana’s Kitchen made Chicken Potpie
TR from No One Likes Crumbley Cookies made Chocolate Mousse Pie
gretchen from kumquat made deep dish chocolate bourbon pecan pie
Lisa from Gluten Free Canteen made Frangipane Apple Pie & Tart
Shanua from Gluten Free Girl & The Chef Fresh made Pumpkin Pie
Caneel from Mama Me Gluten Free made Green Tomato Pie 
Kate from katealicecookbook made Kale & zucchini tart
Caleigh from Gluten Free[k] made Leek and Potato Pie 
Rachel from The Crispy Cook made Maple Walnut Pie 
Morri from Meals With Morri made Spinach – Prosciutto Ricotta Quiche & Muffin Tin Pie Variations 
Brooke from B & the boy! made Pot Pie
Mary Fran | frannycakes made Pumpkin Mousse Pie and Apple Maple Cream Cheese Pie
Jenn from Jenn Cuisine made  Sweet Potato and Duck Pot Pie 
Meaghan from The Wicked Good Vegan made Vegan Gluten-Free Pumpkin Pie with Pumpkin Seed and Ginger Topping 
~Mrs. R from Honey From Flinty Rocks made Mock Apple Pie
Irvin from Eat the Love made Double Butterscotch Apple Pie


Pumpkin Mousse Pie
#ratingval# from #reviews# reviews
Print
Recipe Type: Dessert
Author: Mary Fran Wiley
Prep time: 30 mins
Cook time: 2 hours
Total time: 2 hours 30 mins
Serves: 8
A twist on a traditional and well-loved pie.
Ingredients
  • For the crust
  • 15 grams ground flax seeds
  • 45 grams brown rice flour
  • 45 grams sweet white sorghum flour
  • 30 grams sweet rice flour
  • 20 grams tapioca starch
  • 20 grams corn starch
  • 1/8 teaspoon salt
  • 1 stick butter, frozen
  • 1 tablespoon vodka, ice cold*
  • 1/4 cup ice water*
  • For the mousse
  • 1 15-oz can pumpkin puree
  • 1 cup plus 2 cups chilled heavy cream
  • cup granulated sugar
  • teaspoon cinnamon
  • teaspoon fresh nutmeg
  • 1/8 teaspoon salt
  • 4 fresh cardamom pods
  • 3 star anise pods
  • 2 tablespoons chopped crystallized ginger
  • 1 ½ teaspoons vanilla extract
  • 1 empty teabag meant for loose leaf tea or spice bag
Instructions
  1. In a food processor, combine the flours, salt and butter. Pulse until the mixture resembles sand.
  2. Add the vodka and then add the water a little bit at a time. You want to add water just until you can get the dough to start to come together. If you add too much water, your crust can get tough.
  3. Pat the dough into a 4″ disk and wrap in plastic wrap. Chill for at least 30 minutes while you make the filling.
  4. In a medium saucepan, stir together the pumpkin, 1 cup of the cream, the cinnamon, nutmeg and salt. In the tea bag, add the cardamom, star anise and ginger. Close and add to the pumpkin mixture. Bring to a simmer and stir constantly. Simmer for 5 minutes. This is really more of a popping than a simmer because the mixture is so thick. Remove the tea bag of spices.
  5. Put the mixture in a bowl and refrigerate.
  6. Meanwhile, roll out the crust. Put in a pie pan, crimp the edges and pierce the bottom with a fork. Blind bake the crust with pie weights or dry beans in foil for 35-40 minutes. For the last 5 minutes of baking, brush with an egg wash if you want your crust to brown further.
  7. Chill the crust completely.
  8. Whip the remaining 2 cups cream until you have peaks. Fold 1/2 of the whipped cream into your pumpkin mixture to lighten it up. Then gently fold the pumpkin mixture into the whipped .
  9. Fill the pie crust with the mousse and decorate with some star anise and cinnamon (don’t eat the anise!). You will have some extra mousse. Just eat it with a spoon. I won’t tell. Or make a second crust and don’t fill either as full as the picture.
Notes

Don’t have a scale? Use 1 1/4 cups of a commercial all purpose blend.

You might not need all the water, be careful or your dough will bake up hard on the edges and be hard to cut.

Google Recipe View Microformatting by Easy Recipe
2.1.7


gluten free iced double chocolate chunk ginger chip cookies

Chocolate & spice cookies

gluten free iced double chocolate chunk ginger chip cookies

I have been having an incredibly busy couple of weeks. Have you missed me? Life has been topsy turvy, I launched 2 website redesigns at my day job, have a third one launching this week. I am probably going to be having surgery on Thursday (if everything goes according to plan). Needless to say, October has been one heck of a crazy month.

I also realized that the month is mostly over, and I haven’t baked much at all this month. There has been so much going on that I hadn’t been able to just stop and take a few hours to create a recipe and bake something. And I really needed to bake something. And I had no idea what to bake. So I did what any baking-obsessed girl would do. I pulled out 2 things from my cabinet and hoped that I could make a dessert that would be delicious. Thank goodness it worked.

Lately, I have been obsessed with ginger. There were brown butter ginger doughnuts, bourbon ginger peach pie, ginger pumpkin doughnuts. I had been buying these awesome ginger chips (chocolate chip sized bits of candied ginger) until they stopped carrying them at Williams-Sonoma. I had to settle for regular crystallized ginger & chopped it myself. and I finally got my hands on some of those new Enjoy Life Mega Chocolate Chunks. So clearly I had to make ginger & chocolate cookies. I am in love with the texture of these. They are soft but not crumbly. They are wonderfully delicate with just a touch of chew.  I want to start a campaign to get Enjoy Life to add these cookies to the package. They are that good.

Iced Double Chocolate Chunk Cookies with Ginger Chips
#ratingval# from #reviews# reviews
Print
Recipe Type: Dessert
Author: Mary Fran Wiley
Prep time: 20 mins
Cook time: 7 mins
Total time: 27 mins
Serves: 60
Chocolate & ginger make a delightful pair and in these cookies, they dissolve in your mouth.
Ingredients
  • 385 grams (3¼ cups) gluten free all purpose flour*
  • 1½ teaspoons xantham gum**
  • 55 grams (6 tablespoons) cocoa powder
  • 1 teaspoon ground cloves
  • 2 teaspoons ground cinnamon
  • teaspoon baking powder
  • 1 tablespoon baking soda
  • 170 grams (1½ sticks) butter or Earth Balance Buttery Sticks, softened
  • 215 grams (1 cup firmly packed) dark brown sugar
  • 1 large egg***
  • 1 teaspoon vanilla
  • 100 grams crystallized ginger, chopped
  • 100 grams (1/3 package) Enjoy Life Mega Chocolate Chunks
  • 170 grams (1½ cups) confectioners sugar, sifted
  • 1 tablespoon milk****
  • 1 tablespoon lemon juice
Instructions
  1. Sift together flour, xantham gum (if using), cocoa, cloves, cinnamon, baking powder and baking soda. Set aside.
  2. In the bowl of a stand mixer (this recipe won’t work with a hand mixer – the dough is too stiff) cream together brown sugar and butter.
  3. Scrape down the sides of the bowl and add the egg. Beat to combine.
  4. Pour in the vanilla, scrape down the sides and beat again.
  5. Add the flour mixture to the butter mixture in 3 even groups, scraping down the sides between additions.
  6. Mix in the ginger & chocolate chunks and stir until they are evenly distributed.
  7. Separate the dough into thirds, put them into seperate ziploc baggies and chill the dough for at least 30 minutes or up to 2 days.
  8. When you are ready to bake, preheat the oven to 350 degrees.
  9. Grease or line your cookie sheets with parchment paper.
  10. Divide the dough (it will be pretty stiff) into balls the size of ping-pong balls (about 2 tablespoons of dough) and as you put them on the cookie sheet, smoosh them so they are about 3/8 of an inch thick. Leave about an inch of space between the smooshed dough.
  11. Bake for 6-8 minutes.
  12. Once your cookies are baked, combine the sifted powdered sugar, milk and lemon juice together. Dip the still warm cookies into the glaze and set on a cooling rack (put news paper or a cookie sheet under the rack to collect drips). If the icing is too thick, add more lemon juice or milk ½ teaspoon at a time to achieve your desired consistencey.
Notes

*I used Williams-Sonoma Cup for Cup flour blend, but I also highly recommend the Jules Nearly Normal flour for people who can’t have dairy (I also use this blend fairly regularly). You can also use this all-purpose blend from No Gluten, No Problem.

**If your blend already has xantham gum (or Expandex, guar gum, etc,) you can omit this.
*** If you can’t have eggs, dissolve 1 tablespoon ground flax with 3 tablespoons warm water.
****Feel free to use any kind of “milk”. I use the So Delicious unsweetened coconut milk, but you can substitute with what you prefer (Soy, almond, hemp, dairy, etc.)

Google Recipe View Microformatting by Easy Recipe
2.1.7


gluten free toffee chocolate chip cookies

Cookies!

gluten free toffee chocolate chip cookies

I am sitting in the Westin where the Gluten & Allergen Free Expo  is in Dallas and all I can think about is the bag of these cookies that I left on my kitchen table when I left.  (I know, cookie abuse).

I would love to paint you a picture of the comedy of errors that was our 8 hour adventure to Dallas. There were cancelled flights, gate changes and airline rebookings galore. There was one little box of dried fruit and gluten-free airline snacks were few and far between.  I am about to melt into bed from exauhstion.

But, I digress, this isn’t a post about air travel woes.

I love chocolate chip cookies. In college, I had the recipe for toll house cookies memorized. I could whip up a batch half asleep when I wanted to do something nice for my roommates before I left for the day or at 3 in the morning as sustenance to get a study group through a marathon final exam study session. I am not even sure if I measured most of the time because I knew the recipe so well.

I have made so many failed batches of gluten free chocolate chip cookies that I was certain that I was never going to eat a good one again.

But man, I had a craving for some cookies. As much as I love pumpkin, I needed a break from pumpkin-themed baked goods. I wanted a good, old-fashioned chocolate chip cookie. And, since I know a thing or two about chocolate chip cookies, I wanted to elevate these beyond the ones that you learned to make in junior high. They have a soft, chewy center with crispy golden edges where the sugars caramelized. The secret to the dynamite flavor? Semi-sweet chocolate chips (I beg you not to use milk chocolate! They will be too sweet) and toffee bits. The toffee bits melt slightly into the cookies and add a surprise layer of caramel goodness.

Oh, and there is no creaming til light and fluffy, no letting your butter soften and no pre-heating the oven. Just go with me here. And don’t deviate from the recipe. At least the first time. You will be happy you listened to me.

Cookies!
#ratingval# from #reviews# reviews
Print
Recipe Type: Cookie
Author: Mary Fran Wiley
Prep time: 10 mins
Cook time: 15 mins
Total time: 25 mins
Serves: 36
Cookies are something that I don’t make very often. They aren’t the prettiest of baked goods, but there is something magical about the chocolate chip variety. And these are just a step above your run of the mill chocolate chip cookies.
Ingredients
  • 250g (2 cups) gluten free all-purpose flour
  • 2 teaspoons xantham gum (if your blend doesn’t have it)
  • 1 teaspoon baking powder
  • teaspoon salt
  • 170g (1½ sticks)unsalted butter, cold
  • 200g (1 cup lightly packed) brown sugar
  • 100g (½ cup) granulated sugar
  • 1 tablespoon vanilla extract
  • 1 egg
  • 1 egg yolk
  • 200g chocolate chips
  • 100g heath chips
Instructions
  1. Sift together your flour (or flours), xantham gum (if using), baking powder and salt.
  2. Grate the butter on a box grater or microplane into the bowl of a stand mixer.
  3. Cream together the sugars and butter untill the mixture resembles sand. You don’t want to get to the light and fluffy stage.
  4. Add the vanilla, egg & yolk. Stir to combine.
  5. Add the flour in 2 parts. Scrape down the bowl and mix completely before adding more flour.
  6. Stir in heath bits and chocolate chips.
  7. Scoop 2 teaspoon portions onto a greased cookie sheet at least 2 inches apart.
  8. Preheat oven to 375 degrees and pop your cookie sheet in the freezer for 15-20 minutes while your oven heats up.
  9. Put the cold cookie sheet in the oven and bake for 10-12 minutes. Let cool on the tray for about 5 minutes then transfer to a cooling rack. Maes about 3 dozen cookies…if you don’t eat half the dough yourself.
Google Recipe View Microformatting by Easy Recipe
2.1.7


gluten free pumpkin spice cupcakes

Gluten Free Pumpkin Spice Cupcakes

gluten free pumpkin spice cupcakesToday felt like fall. There was a chill in the air. It rained a gloomy rain. I was wishing I had worn a sweater. This week is framed by college football. An Illini game last Saturday and a Notre Dame game this weekend. Fall has arrived.

And so has the insane amount of weekends filled with obligations. Blondie and I have one weekend “off” between now and November. There is a football game (our second in a row), a trip to Dallas, Blondie is running the Chicago marathon, reservations at Girl & the Goat, my aunt’s 60th birthday and a wedding.

But all that happening is ok because that means it is fall, and fall means pumpkin everything. Pumpkin lattes. Pumpkin soup. Pumpkin pancakes. Pumpkin pasta sauce. Carved pumpkins. And pupkin cupcakes.

That’s right. Pumpkin cupcakes. Gluten-free pumpkin cupcakes.

Here is the recipe in stop motion. It might make you a little hungry, so grab a snack before you watch it, and don’t say I didn’t warn you.

(I made this video for a class I am taking at U of I to get my portfolio beefed up for grad school)

Gluten-Free Pumpkin Spice Cupcakes with Cream Cheese Frosting
#ratingval# from #reviews# reviews
Print
Recipe Type: Dessert
Author: Mary Fran Wiley
Prep time: 15 mins
Cook time: 22 mins
Total time: 37 mins
Serves: 18
The flavor of fall in a cupcake.
Ingredients
  • 240 grams (2 cups) gluten free all purpose flour
  • teaspoon xantham gum (omit if your blend contains this)
  • 2 teaspoons baking powder
  • teaspoon salt
  • 1½ teaspoons of pumpkin pie spice
  • 1 stick (for the cake) + 5 tablespoons (for the frosting) butter, softened
  • 175 grams (3/4 cup) pumpkin puree
  • 320 grams (1½ cups packed) brown sugar
  • 2 large eggs
  • 1/4 cup milk (I used SoDelicious coconut milk)
  • 8 ounces cream cheese
  • 1 teaspoon vanilla
  • 225-350 grams (2-3 cups) powdered sugar
  • orange food coloring
Instructions
  1. Preheat oven to 375 degrees.
  2. Whisk dry ingredients together.
  3. Cream together the whole stick of butter with the brown sugar.
  4. Mix in the eggs one at a time.
  5. Add half the flour and mix til combined.
  6. Next, stir in the milk and pumpkin puree. And mix thoroughly, scraping down the sides of your bowl.
  7. Add in the rest of the flour and mix completely.
  8. Use about 3 tablespoons of batter per cupcake. Don’t overfill your cupcake pan!
  9. Bake for 20-25 minutes. A toothpick should come out with just a crumb or two.
  10. Beat together the cream cheese (straight from the fridge) and 5 tablespoons of the butter until the mixture is light and fluffy. Add in the vanilla and 1/2 cup of sugar. Stir to combine. Add the remaining sugar a bit at a time so you don’t send powdered sugar flying around your kitchen. Keep adding sugar until the frosting is the desired consistency. Add color if desired.
  11. Pipe frosting on to each cupcake, and decorate as desired.
Notes

I have had great success with both Jules Nearly Normal flour and Cup4Cup All Purpose flour. If you are making your own blend use 80 grams sorghum flour, 8- grams brown rice flour, 80 grams sweet white rice flour and 80 grams tapioca starch.

Google Recipe View Microformatting by Easy Recipe
2.1.7


GF Ratio Rally: Raspberries & Cream doughnuts

raspberries and cream gluten free doughnut montage

I might have a thing for doughnuts. I made 3 kinds of baked doughnuts earlier this summer with grown up flavors like honey lavender and ginger brown butter. (I might have also shown you that I have a ridiculous sweet tooth with those powdered sugar doughnuts).

When we were kids, doughnuts were a special tradition. On the morning of my first day of first grade, the ceiling collapsed in the kitchen. The fan was still spinning while it was sitting on the kitchen table. My dad, the breakfast superhero, couldn’t cook. So, he did what any dad would do. He went out to get doughnuts and started a tradition that lasted until I went away to college.

My favorites? Chocolate snowballs (powdered sugar-covered, chocolate whipped cream filled), Boston Creme and strawberry. Oh and pumpkin or apple spice doughnuts.

gluten free ratio rally logo

For this month’s Gluten Free Ratio Rally (in which we all create a recipe based on a ratio – you can learn more at Shauna’s introductory post), Meg thought we should all make doughnuts or fritters. The timing was perfect. School has just started; the air was cool this morning. And I had a whole bottle of canola oil.

My first two attempts at doughnuts were miserable failures. I tried one where you create a yeast sponge that you let sit overnight (hockey pucks) and another with the ratio that everyone else seemed to find workable (sand).

I sat down and did some math from recipes of chefs I admire (Jamie Oliver, Baked, Alton Brown, etc.). My ratio is radically different from the other ones that you will see. I used no eggs. I used a lower flour to liquid ratio. But I ended up with doughnuts that are like eating clouds. They were good plain (I had to taste to make sure), they were excellent with just the glaze (again, I had to taste them to verify) and they were pretty close to perfection once I filled them with cream and dipped them in the glaze again.

My ratio was 3:2:1:1. Flour:Liquid:Sugar:Fat. Pretty simple. You can scale this recipe down if it is just for 2 or scale it up to feed a small army.

If you are going to buy a flour blend, I made some of these with the Cup4Cup flour from Williams-Sonoma (that bag cost $20! You better believe I will be baking with it). You will have equally fantastic results with Jules’ Nearly Normal Flour. Want to blend your own? There is a break down in the recipe notes on how to do this.

Yeast doughnuts are not for the time-pressed, and I made these a little more complicated than just your basic doughnut. There is time involved (lots of waiting). You don’t have to fill yours, or cook raspberries to make a juice. (I also used the pulp to flavor my yogurt and cooked the leftover juice into a syrup for adding to bubbly water).

Think of the doughnut as a blank canvas with infinite possibilities. And then think of just how worth it a warm straight-from-the-fryer doughnut is. (KrispyKreme did not end up all over the country for nothing! Warm doughnuts are a superb treat).

Before the recipe magic, here are links to all the other participants in this month’s event, hosted by Meg at Gluten-Free Boulangerie 

Charissa  from Zest Bakery made Picarones (Sweet potato/pumpkin fritters)
Jenn from Jenn Cuisine made Mini raspberry doughnut cakes
Lisa from Gluten Free Canteen made Apple Butter Maple Syrup Donuts, GF 
gretchen from kumquat made peach cider doughnuts
Brooke from  B & the boy! made Apricot Fritters 
Meg from Gluten-Free Boulangerie made Old-fashioned raised doughnuts & cake doughnuts
Rachel from The Crispy Cook made Chocolate Doughnuts with Chocolate Glaze
Caneel from Mama Me Gluten Free Thai Fried Bananas
Jean Layton made Cinnamon Apple FrittersOK
Silvana from Silvana’s Kitchen Vanilla-Glazed Chocolate Chip Doughnuts 
Claire from Gluten Freedom made Chocolate Coconut or Cinnamon-Glazed Vanilla Cake Donuts 
Jeanette from Jeanette’s Healthy Living made Pumpkin Spice Donuts
Shauna from Gluten-Free Girl & the Chef made Gluten-free yeast doughnuts 
Caliegh from Gluten Free(k) made Beetroot Fritters
TR from Nobody Likes Crumbly Cookies made Sweet Pepper Fritters 
Pete from No Gluten, No Problem made doughnut holes
Britt from GF in the City made fritters
Tara from A Baking Life made Gluten Free Brioche Doughnuts 
Irvin from Eat the Love made Vanilla Doughnuts

Gluten Free Raspberries & Cream doughnuts
#ratingval# from #reviews# reviews
Print
Recipe Type: Breakfast
Author: Mary Fran Wiley
Prep time: 2 hours 30 mins
Cook time: 10 mins
Total time: 2 hours 40 mins
Serves: 6
I really love doughnuts and this recipe has you making every last bit from scratch. But don’t worry. I won’t tell anyone that you decided to fill them with store bought jam and didn’t make a glaze but topped them with powdered sugar instead. No matter what, as long as the dough is right, you can’t go wrong.
Ingredients
  • 160 ml milk (I used SoDelicious), warmed
  • 35 grams sugar
  • 250 grams (2 cups +1 tablespoon) all-purpose gluten free flour*
  • 7 grams (1 t) active dry yeast
  • 40 grams (2.5 T) butter or EarthBalance
  • 1 teaspoon vanilla bean paste (or vanilla extract if you don’t have the paste)
  • Pinch salt
  • 3 tablespoons butter
  • 1/2 cup raspberry juice**
  • 1 cup powdered sugar
  • 1 cup [url href=”http://frannycakes.com/recipes/master-recipes-pastry-cream/”]pastry cream[/url]
  • 1 cup heavy cream or coconut milk cream
Instructions
  1. Measure out your ingredients and prepare a mise en place.
  2. In a small bowl combine warm milk, a teaspoon of your sugar, a tablespoon of your flour and your yeast. Let sit for about 15 minutes – the mixture should have produced a decent amount of foam.
  3. In the bowl of a stand mixer combine the remaining flour, sugar, butter, vanilla and salt.
  4. Add in the yeast mixer and mix to combine. Once combined, turn the mixer speed to low-medium (mine was on 3) and let the dough “knead” for about 10 minutes.
  5. Watch the dough, if it is impossibly sticky add a little more flour a teaspoon at a time. (It was a bit humid in my apartment and I ended up adding 2 teaspoons of flour).
  6. After 10 minutes, place the dough in a greased bowl in a warm spot (my microwave is the warmest spot in my kitchen). Cover with plastic wrap or a damp towel. If you have a spare bowl for your mixer, pop it and the whisk attachment (or any bowl and the beaters for your hand mixer) into the freezer. You need it good and cold to whip the cream.
  7. Let the dough raise for 45 mins-1 hour. It should have just about doubled in size.
  8. Roll out the dough to ½” thickness and cut it into small circles (I used a small cup and they were about 2.5” in diameter.) Place them onto a greased baking sheet. Keep re-rolling the dough until you use it all up. (I got 15 mini-doughnuts from this recipe).
  9. Let them rise for another 45 minutes.
  10. While the doughnuts are raising, melt the 1 ½ tablespoons butter and combine it with ½ cup raspberry juice and ½ cup powdered sugar. Whisk until smooth. If it is too runny, add more powdered sugar, too stiff add more liquid
  11. With about 10 minutes of rising time left, heat 1 quart of oil in a big, deep pot (I used my 5 quart dutch oven). You want it to be about 370 degrees.
  12. Fry the doughnuts for about a minute on each side. You want them to turn a nice golden color.
  13. Set on a cooling rack.
  14. Once all the doughnuts are fried and are cool enough to touch, dip them into the glaze. This first dip doesn’t have to be perfect – it just helps the flavor seep into the doughnut.
  15. Take your bowl and whisk out of the freezer. Beat the heavy cream or non-dairy cream until you have stiff peaks. Add the pastry cream and beat about a minute more, until you have a uniform cream.
  16. Fit a pastry bag with a narrow plain tip and fill it with the filling (the fancy name for this is diplomat cream).
  17. Poke holes in the sides of all of your doughnuts with a skewer and then insert the pastry tip in the hole. Squeeze about 1 ½ tablespoons of filling in each doughnut.
  18. Dip them one more time in the glaze and top with sprinkles (optional).
Notes

*If you are not using a pre-blended flour, you can either use [url href=”http://glutenfreegirl.com/gluten-free-holiday-baking-2010/”]Shauna’s All-Purpose Blend[/url] and add 2 teaspoons xantham gum. Whisk well before using.
Or you can make your own with 90 grams (3/4 cup) tapioca starch, 100 grams (1/2 cup) sweet white rice flour, 60 grams (1/2 cup) sorghum flour. Add 2 teaspoons xantham gum and whisk together well to ensure that the gum is spread throughout the flour.
**I made mine by cooking a half pint of raspberries in 2 cups of water with a half cup of sugar for about 30 minutes – you can use store bought or just use milk and vanilla extract

Google Recipe View Microformatting by Easy Recipe
2.1.7


salted caramel swirls

No, we didn’t win that ring.

salted caramel swirls

It was kind of a busy weekend.

Blondie and I saw friends, had dinner with my family (because my cousin got engaged!), went to a baking demo, went out for lunch, managed to get in a few photos for my class and I made caramels.

Blondie and I were going to do a scavenger hunt/race for an engagement ring on Sunday. But we skipped it. To go to a gluten free baking demo at Williams Sonoma. But I will tell you more about that tomorrow, once I bake something with their new gluten free flour.

jam sessionBlondie graciously jammed on his guitar so I could do some homework. (Rapid fire shots combined into one swell image).

The real story is this caramel recipe. And a cookbook that I think you need.

You see, I was that strange kid that absolutely adored bulls eyes and cow tail candies. The chewy caramel filled with the creamy crumbly white sugar stuff.

This was my second time making the recipe, and it is divine.  (It sure made my dad happy too, he is the one who got me hooked on this type of candy as a kid).

Let me start with the book.

It is Sugar Baby by Gesine Bullock-Prado. Now, before you get all conspiracy theorist on me, yes, she is Sandra’s sister. I refuse to hold this against her (mostly because Sandra was super gracious to the neighborhood kids when she filmed While You Were Sleeping).

Almost the entire cookbook is gluten free. Simply because when you are cooking with sugar and making candies, you don’t need flour. (There are a half dozen recipes at the back of the book, but you could substitute your favorite cake, crepe or pâte à choux recipe for hers and just follow the technique and recipes for frosting and and other bits).

There are recipes for several different fudges, marshmallows, rock candy, milk candy and to top it off, cotton candy.

Another bonus? The ingredients are listed in both US measurements and by weight. (I made the caramels using both sets of measurements). For those of you afraid of relinquishing your measuring cups, the conversions are there. For those of you not in the states or who have started to use scales for baking, the weights are right there for you.

The instructions are clearly written in a friendly voice. She sounds like a friend teaching you how to do these things in the kitchen might sound. There are sweet stories in the recipe head notes and all the recipes look fabulous. (I would like an excuse to make fairy floss, so someone needs to have a party for me to bring it to).

I am sure this book is not dentist approved, but the recipes are fun and approachable. Plus, the author lists variations for each recipe.

Now, a few tips:

  1. Use a metal bowl for your stand mixer, if you have one of those beautiful Kitchen Aids with a glass bowl, whipping the fondant takes twice as long.
  2. The sharper your knife the better. I used a very sharp, serated knife.
  3. Cold caramel-fondant rolls smush less. Although, I think the smushed ones taste just fine.
  4. If it is super humid, you might need an extra tablespoon of cornstarch in your vanilla bean cream. It’s quite alright. It will still taste divine.
  5. Don’t use vanilla extract in the fondant. If you don’t have vanilla bean paste, scrape the seeds from a vanilla bean or use ground Tahitian vanilla beans (I used vanilla bean paste the first time and ground vanilla beans the second time).
  6. Consult the photo tutorial from the author. It helped me visualize many of the steps.

Finally, a recipe.

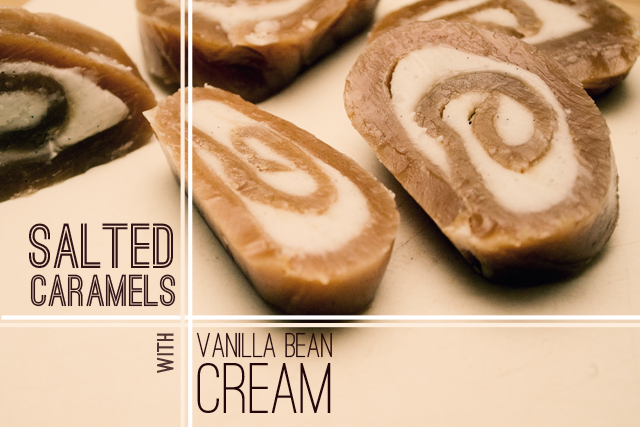
Salted Caramels with Vanilla Bean Cream
#ratingval# from #reviews# reviews
Print
Recipe Type: Candy
Prep time: 5 mins
Cook time: 75 mins
Total time: 1 hour 20 mins
Serves: 40
This recipe is adapted from Sugar Baby by Gesine Bullock-Prado. This is a brilliant interpretation of one of my childhood favorites, and this recipe happens to be gluten free (unlike the industrial variety). These take a bit of time to prepare, and are a good Saturday afternoon project.
Ingredients

Caramel

  • 1½ cups heavy cream
  • 400 grams (2 cups) sugar
  • 1 cup light corn syrup
  • stick (55 grams) unsalted butter
  • 1 teaspoon vanilla extract
  • 1 teaspoon sea salt

Vanilla Bean Cream

  • 2 cups sugar
  • cup water
  • 2 tablespoons corn syrup
  • pinch salt
  • stick (55 grams) unsalted butter
  • teaspoon vanilla bean paste or ground vanilla beans
  • 1-2 tablespoons cornstarch, plus additional to dust counter
Instructions
  1. Line a half sheet pan with parchment paper and grease well. Really, grease it. You do not want to end up with a sticky mess.
  2. Prepare your mise en place. (That means get your ingredients out and measured when you start). Cut both measures of butter into small pieces.
  3. Make the caramel. In a medium saucepan with a heavy bottom over medium heat, combine the cream, sugar and corn syrup. Clip a candy thermometer on your pot and stir the mixture gently. When it starts to boil, put your spoon down and step back from the stove. Wait while your sugar bubbles along. (If your pot is too small, it will boil over and make a huge mess. You are better off using a pot that is a little too big – as long as enough of your candy thermometer is submerged to effectively measure the temperature.) When it hits 257 degrees Fahrenheit, remove the pot from the heat, stir in the butter, vanilla extract and salt. Pour it into your prepared pan and spread evenly. Set aside.
  4. Make the vanilla bean cream. In the bowl of a stand mixer (preferably a metal bowl), place the chopped butter. In a clean pot, combine the sugar, water and corn syrup. Put the pot over medium heat, attach a candy thermometer and stir until the mixture becomes clear. Boil the mixture until it reaches 245 degrees Fahrenheit. Pour in the bowl of the stand mixer. Slowly bring the mixer to medium and mix until translucent. Add the salt and vanilla bean paste (or ground vanilla bean). Continue beating until the mixture is white, shiny and mostly opaque. Add 1 tablespoon of cornstarch. Raise the speed to high and beat like crazy. I beat it for about 10 minutes the first time I made these, and 20 minutes the second time. It was super humid, so I also added a little extra cornstarch to help the mixture dry out. Once the mixture looks like it is starting to dry, stop the mixer. It should hold its shape pretty well. Turn it out onto a cornstarch dusted surface and knead. You should have a soft, pliable dough.
  5. Assemble the rolls. Press the cream onto the caramel, leaving a half inch at each of the long ends. Remove the caramel from the pan and cut in half lengthwise (I used a pizza cutter for this). Roll the caramel and fondant into logs. Slice with a serrated knife. If your rolls smush or the fondant squeezes out, refrigerate the candies for about 10 mins. Then continue slicing.
Notes

Try using instant espresso powder in the fondant to create caramel frappucino candies.

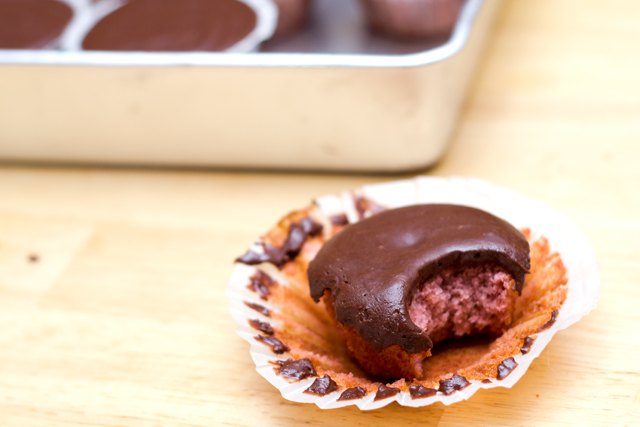
You can make fat rolls (like the ones pictured), by leaving a half inch of fondant from the short sides, cutting the caramel in half lengthwise, and then in half crosswise to make 4 shorter, wider rolls.

Google Recipe View Microformatting by Easy Recipe
1.2.4


GF Ratio Rally: Confetti Cake

gluten free confetti cake with blue frostingI can’t believe that it has been a month since I posted about making gluten-free pasta from scratch. Or, that just 2 months ago, I was making cream puffs and apricot dumplings.

gluten free ratio rally logo

This month’s challenge: white or yellow cake. It is the host’s daughter’s birthday, and we are all bringing cake to the party.

When I was a younger, my mom brought me up with a general disdain for baking from boxes. And I loved funfetti cupcakes when they were brought in as treats to school. Especially when they were baked in sugar cones.

As a kid, I had a cake that was decorated like a hamburger and one that was ballet shoes. I had the kind of cakes that you normally don’t get when your mom bakes your cake. Really cool cakes that taste good. But I remember being envious of those kids and their funfetti cupcakes.

I was envious of the sprinkles inside the cupcakes. Not the actual taste.

gluten free confetti cake cross sectionWhen I heard it was Kate’s daughter’s first birthday this month, I couldn’t wait to put sprinkles inside my cake. Because, really, they are better when they are inside.

I used a modified version of Ruhlman’s ratio. I couldn’t remember baking a cake without liquid. And his ratio somehow forgot that. I found an article on fine cooking about cake ratios. It was a bit less straightforward than a 1:1:1:1 ratio, but that’s ok. I did all the math for you. You can thank me later. When you squeal with delight because there are sprinkles inside your cake (or cupcakes), and you didn’t use a box mix.

My ratio ended up being 2:2:1:1:.75… flour:sugar:eggs:butter:liquid

Now, let me explain the wonky ratio. Yes, I said wonky.

Complex ratio math:

  • flour = sugar
  • eggs ≥ fat
  • eggs + liquid = sugar
  • add chemical leveners, flavorings and gums as needed.
Oi, that’s complex. What does it mean? It means that it is a good thing I paid attention in math. If you have 300 grams of flour, you have 300 grams of sugar plus some eggs and liquid that weigh as much as the sugar. Got it? Me either. I kind of winged it. Meh, it happens.
This month’s rally was hosted by Kate at Gluten-Free Gobsmacked. See all the other fabulous cakes:

Britt  @ GF in the City made Boston Cream Pie
brooke @ B & the boy! made White Cake with Apricots & Blueberries
Caleigh @ Gluten Freek[k] made White Chocolate Cupcakes
Caneel @ Mama Me Gluten Free made Fresh-Squeezed Lemon Cake
Caroline @ The G-Spot made Dark Chocolate Raspberry Cupcakes
Charissa @ Zest Bakery made White Russian Cake
Claire @ Gluten Freedom made Banana Rum Cupcakes with Rum Glaze (alcohol-free!)
Dr. Jean Layton @ GFDoctorRecipes made Mocha Buttercream Yellow Birthday Cake-Gluten-Free
Erin @  The Sensitive Epicure made Chocolate Hostess CupCakes Dupes
gretchen @  kumquat made coconut boston cream pie cupcakes
Karen @ Cooking Gluten-Free! made Traditional Birthday Cake
Kate Chan @ Gluten Free Gobsmacked made GF Basic White Birthday Cake
Kate @ KateAliceCookbook made Lemon tea cake
Lisa @ Gluten Free Canteen made Frangelico Cupcakes with Nutella
Marla @ Family Fresh Cooking made Lemon Poppy Seed Muffins
Shauna @ Gluten-Free Girl and the Chef
The Healthy Apple made Gluten-Free Chocolate Pistachio Pound Cake
TR Crumbley@ No One Likes Crumbley Cookies made Gluten Free Tiramisu Cake
Winnie @ Healthy Green Kitchen made Gluten Free Vanilla Cupcakes
Rachel @ The Crispy Cook made Czech Cherry Bublanina 

Gluten Free Confetti Cake
#ratingval# from #reviews# reviews
Print
Recipe Type: Dessert
Author: Mary Fran Wiley
Prep time: 20 mins
Cook time: 40 mins
Total time: 1 hour
Serves: 10
Even better than my classic yellow birthday cake is a cake with sprinkles baked inside. This cake is easily made vegan with a couple of simple swaps.
Ingredients
  • 100 grams (1/2 cup) sweet white rice flour
  • 50 grams (scant 1/2 cup)tapioca starch
  • 50 grams (1/3 cup) brown rice flour
  • 50 grams (1/3 cup) sorghum flour
  • 1/4 teaspoon salt
  • 1/2 teaspoon xantham gum
  • 4 teaspoons baking powder
  • 300 grams (1 1/2 cups)sugar
  • 150 grams (6 T) butter, softened, or earth balance
  • 1 teaspoon vanilla extract
  • 5 (150 grams) egg whites, or 4 flax eggs
  • 1 cup cold milk (I don’t drink milk, so I only use So Delicious when I bake)
  • 1/4 cup non-pareils
  • 225 grams (2 sticks) butter, very, very soft (again, sub Earth Balance for vegan)
  • 1 1/2 cups powdered sugar
  • 1/2 cup powdered, dry milk, or powdered dry soymilk (Whole Foods carries this)
  • food coloring
Instructions
  1. Preheat oven to 350 degrees & prepare pans by greasing them and lining with parchment paper.
  2. Sift together dry ingredients.
  3. In the bowl of a stand mixer, cream together the butter, sugar and vanilla until light and fluffy.
  4. Add egg whites and beat for a minute or two on medium.
  5. Add the flours and mix a bit more, scraping down the sides. The batter should look a little thick.
  6. Add in the milk and mix until combined.
  7. Add in the nonpareils and give it a quick mix. Over stirring here will cause the color to spread throughout the batter and not be in concentrated little flecks.
  8. Pour into the prepared pans and bake for 35-45 minutes.
  9. Let cool in the pan for 5 minutes and then turn out onto a wire rack to cool completely.
  10. For the frosting: whip together the powdered sugar, soft butter and powdered milk. Add food coloring as necessary and add additional powdered sugar to get the desired consistency.
  11. When the cake is cool, spread a filling (I used lemon curd) on one of the layers and stack the cakes. Frost and top with more sprinkles!
Notes

Vegan swaps: use 4 flax eggs (1 tablespoon ground flax dissolved in 3 tablespoons water). Use Earth Balance Buttery Spread in place of butter and powdered, dried soymilk in place f the powdered dry milk.

To use a gluten free flour blend (or if you can bake with gluten flour), you need 1 1/2 cups of flour. (For a non-gf cake or if you use Jules Nearly Normal Flour, you can omit the xantham gum).

Google Recipe View Microformatting by Easy Recipe
1.2.4
gluten free strawberry chocolate cupcake

Strawberries and chocolate, part 3

gluten free strawberry chocolate cupcake with pan

Blondie and I went to Williams Sonoma on Sunday to take my mom for coffee on her break and to look around for a wedding gift. And I might need some help on figuring out what exactly we should buy. I hate buying strictly from a registry. In fact, for close friends I skip the registry and just buy a nice gift. I like to think that I am good at gift-giving.

Anyways, we were wandering through the store and we walked by the pizza stones. I stopped, picked up a small one and told Blondie that I thought that I needed to get one.

He asked me what the point was.

I guess this shouldn’t suprise me. This is the same boy who said that all you really need is a 1/4 cup measuring cup. (I think this is because he has melted or snapped the handles off of the 99¢ set that he got when he moved into his first apartment).

I explained the science behind it to him, and a woman who was working right there said I sounded just like my mother.

Apparently, I am that age. You know, the age where you turn into your mother. You realize you say the same kind of things and you share hobbies and that for the first time in your life you aren’t fighting the inevitable.

I think it also was the first time in forever that I walked out of that store without a new pan or spice blend for my kitchen in ages. Or a gift. We ended up not buying the gift just yet.

Oh well.

I decided that I wanted vanilla cupcakes with vanilla bean frosting last night. And then I remembered that this month’s Ratio Rally is white or yellow cake. And if I baked those, I would have to wait a whole week to share them. And I couldn’t leave you hanging that long.

So last night,  I invented these cupcakes. The method is similar to the way I made my gluten free chai cupcakes and results in the perfect cake texture.

I swear I have more imagination than this. But I really love strawberries and chocolate. Together.

Strawberry Cupcakes with Ganache
#ratingval# from #reviews# reviews
Print
Recipe Type: Dessert
Author: Mary Fran Wiley
Prep time: 15 mins
Cook time: 90 mins
Total time: 1 hour 45 mins
Serves: 24
These are very possible the best strawberry cupcakes ever.
Ingredients
  • 110 grams (1 cup) tapioca starch
  • 140 grams (1 cup) sweet white sorghum flour
  • 80 grams (1/2 cup) brown rice flour
  • 20 grams (3 tablespoons) flax meal
  • pinch of salt
  • 350 grams (1 3/4 cups) sugar
  • 1 Tablespoon baking powder
  • 2 sticks unsalted butter, very soft, cut into 1 inch cubes
  • 4 eggs
  • 1 cup (240 ml) milk (I used coconut milk)
  • 1/4 cup strawberry jam
  • 2 tablespoons strawberry liqueur
  • pink food coloring (optional)
  • 1/2 cup milk
  • 75 grams (3/4 cup) cocoa
  • 85 grams (3/4 cup) powdered sugar
  • 1 stick soft butter
  • 1/8 teaspoon salt
  • 1 tablespoon strawberry jam
  • 2 tablespoons strawberry liqueur
  • 200 grams (1 3/4 cup) powdered sugar
Instructions
  1. Preheat oven to 350°. Line cupcake pans with paper liners; set aside.
  2. Combine flours, sugar, baking powder and salt; mix on low speed until combined. Add butter, mixing until just coated with flour. Add eggs, one at a time. Add the strawberry liqueur and jam to a small bowl with the milk and whisk together.
  3. With mixer on medium speed, add wet ingredients in 3 parts, scraping down sides of bowl before each addition; beat until ingredients are incorporated but do not overbeat. At this point you can add some pink food coloring if you want. Otherwise the cake will be just slightly pink.
  4. Using an ice cream scoop for even cupcakes, divide batter among liners, filling about two-thirds full.
  5. Bake, rotating pan halfway through, until a cake tester inserted in the center comes out clean, 18 to 24 minutes. Transfer to a wire rack to cool completely. Repeat process with remaining batter.
  6. While cupcakes are cooling, make the ganache. Sift together the cocoa and the 3/4 cup of powdered sugar in the bowl of your stand mixer, fit with the whisk attachment. Bring milk to a simmer and add it to the bowl of the mixer. Beat together until smooth. Scrape down the sides and beat until incorporated. Let cool to room temperature. Cube the butter & whisk it in. Add the strawberry liqueur and jam, mix until combined. Add the powdered sugar 1/2 cup at a time until it has reached the desired consistency.
Notes

If you prefer more of a frosting, double everything in the ganache except for the 2nd powdered sugar. You will need to triple or quadruple it.This way you can top your cupcakes with a fluffy dome of frosting.

Google Recipe View Microformatting by Easy Recipe
1.2.4