Home » weight » Page 2

Tag: weight

gluten free mini bundt

Ratio Rally: Gluten-Free Mini Vanilla Chai Bundt Cakes

This post is part of the Gluten-Free Ratio Rally, a group of gluten-free bloggers inspired and empowered by Ruhlman‘s Ratio and started by Shauna at Gluten-Free Girl. We get together each month and post many different takes on the same theme. This month that theme is Gluten-Free Tarts and the rally is being hosted by Adina from Gluten Free Travelette.

gluten free mini bundt

This post is brought to you by the number 1.

Since Big Bird isn’t at risk of getting fired, I thought a Sesame Street reference would be OK.

And the ratio is full of them, so there is that.

The ratio

1:1:1:1 ish. Butter:Flour:Sugar:Eggs

And heck, throw in some liquid (up to 1 part) for good measure.

I mean, that is where pound cake got its name. A pound of butter, a pound of eggs, a pound of sugar and a pound of flour. Equal parts. Awesomely delicious.

Now, put that in a bundt and you have a winner.

I don’t want to get too crazy into the science here, but you can vary any of these ingredients by up to 20% and your ratio should still work. I added liquid, cut back a little on the sugar and added a little extra flour so that there was an even cup measurement for those of you who still bake by volume (someday you will see the light, I just know it). I also cut back on the butter and eggs, to make room for the liquid. (How the flavors got into the cake).

Kiss my bundt.

Ok, I just had to.

Mostly because Bundts are awesome. They are usually a dense cake, like a pound cake, baked in a pretty pan and topped with a glaze. Easy peasy.

How about a scene from a romantic comedy about bundts?

(I had to, mostly because I love that movie, even if it wasn’t filmed in Chicago)

Ok, enough sillyness.

Chai is one of my favorite things. I drink double dirty soy chai lattes. My first recipe on this blog was for Gluten Free Chai Latte Cupcakes. In my first Ratio Rally, I shared a recipe for chai gluten-free cream puffs.

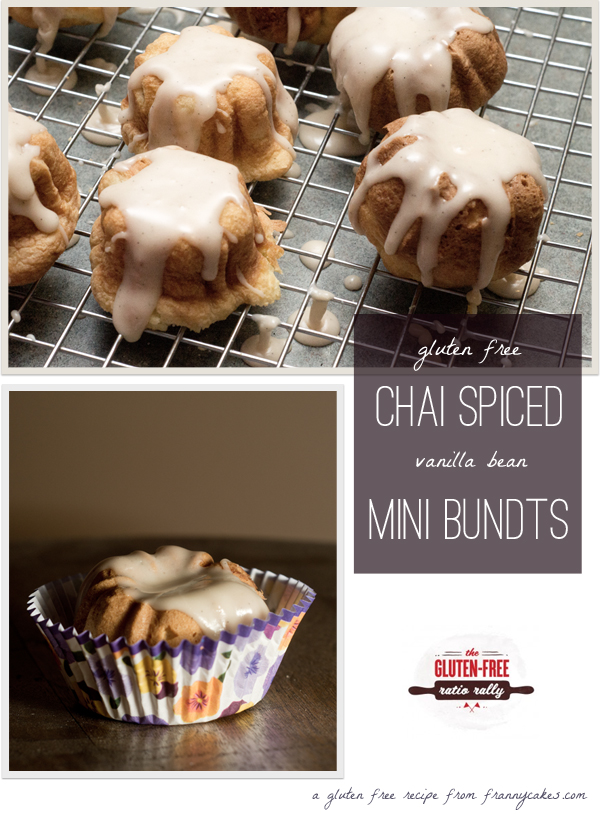
And it is back again. Chai spiced vanilla bean bundt cakes. In minature.

Bundts are elegant and un-fussy, and can be whipped up in a jiffy. They are even a breeze to decorate. Excellent for a last minute birthday treat.

This month’s rally is over at GFTravelette – make sure you go check it out!

Gluten-Free Mini Vanilla Chai Bundt Cakes

Recipe Type: Dessert
Author: Mary Fran Wiley
Prep time: 30 mins
Cook time: 40 mins
Total time: 1 hour 10 mins
Serves: 18`
A fun take on a bundt! With milk steeped with spices, the cake combines some of my favorite flavors
Ingredients
  • 1/2 cup (120 mls) milk
  • 5 green cardamom pods
  • 2 star anise
  • 1 teaspoon grated fresh ginger
  • 4 cloves
  • 210 grams (1 1/2 cups) gluten-free all purpose flour
  • 1/2 teaspoon xantham gum (omit if using a blend that includes this)
  • 1 g baking soda (1/4 teaspoon)
  • 2 grams (1/2 teaspoon) baking powder
  • 1/2 teaspoon salt
  • 175 grams (3/4 cup + 2 tablespoons) sugar
  • 125 grams (1 stick + 1 tablespoon) butter, softened
  • 1 tablespoon vanilla bean paste
  • 2 eggs
  • 1 vanilla bean
  • 3 tablespoons milk
  • 1/2-1 cup powdered sugar
  • 1/4 teaspoon salt
Instructions
  1. In a small sauce pan over low heat, simmer the milk, cardamom pods, star anise, cloves and fresh ginger for 20 minutes. Remove from heat and set aside to cool for a few minutes while you prepare your miss en place.
  2. Preheat the oven to 350 degrees and grease your mini bunt pan.
  3. Whisk together the flour, xantham gum (if using), baking soda, baking powder and salt in a medium bowl and set aside.
  4. Cream together the butter and sugar until light and fluffy, using a stand mixer on medium-high and beating for about 5 minutes. Add the vanilla bean paste.
  5. Beat in the eggs one at a time, scraping down the sides after each addition.
  6. Strain the steeped milk, and add 1/3 to the batter.
  7. When it is fully incorporated, add half the flour, and scrape down the sides of the mixer. Repeat until you are out of milk and flour (it should go milk – flour- milk -flour – milk). Mixing on no higher than medium, and scraping down the sides after each addition.
  8. Use a #40 scoop (or fill the wells of the pan no more than half way), and divide the batter into the pan.
  9. Bake for 20 minutes, until the cakes are golden brown and a tooth pick inserted into the center comes out clean. Cool on a wire rack.
  10. Bake the remaining batter.
  11. While the cakes are baking, split the vanilla bean and scrape the seeds into the 3 tablespoons of milk in a liquid measuring cup or a bowl with a spout. You want this to sit for 20-30 mins.
  12. When the cakes are done and cooling, whisk the powdered sugar and salt into the vanilla milk. You want a glaze that is thick and opaque, but not so thick it won’t pour. If it is too thin, it will run off the cakes. My advice? Have a test cake and when you think you are close drizzle a little and see how it works. If the glaze gets too thick, add a half a teaspoon of vanilla extract.
  13. Serve in cupcake papers for a pretty, special treat.
3.1.09


The other recipes this month:
gluten free white cupcake recipe

A very happy birthday treat

gluten free white cupcake recipe

Let’s celebrate.

There are always excuses not to. Maybe there is no money. Maybe you are sad. Maybe you are sick. Maybe you are just grumpy & miserly and don’t ever want to have fun (it’s ok, sometimes even I feel that way).

I have as many reasons as the next guy to not want to celebrate. I can’t find the strength to get to the gym. Real pants make me want to cry. An ill-timed night out with friends can ruin my life for a month. But those are the absolute wrong things to focus on. They can give you grey hair before your time. And we all know that would just lead to more fretting.

And you know, girls just wanna have fun.

So really, let’s celebrate.

Have a party. I mean, heck, it was a birthday after all.

We can throw a little party with a few dozen cupcakes.

Cupcakes with chocolate frosting.

And maybe a few sprinkles thrown in the batter for good measure.

And maybe some balloons. Balloons are good for a birthday.

Happy 32nd birthday Kurt!
Balloons are always appropriate

It is good to celebrate.

And don’t forget to smile, it’ll do you good. And maybe eat a cupcake. Because cupcakes are theraputic.


Gluten Free White Cupcakes

Recipe Type: Dessert
Cuisine: American
Author: Mary Fran Wiley
Prep time: 20 mins
Cook time: 50 mins
Total time: 1 hour 10 mins
Serves: 48
My favorite white cake recipe made into cupcakes with a simple chocolate frosting. Add GF sprinkles to the batter for a “funfetti” feel. This is adapted from the Cake Bible’s White Velvet Cake recipe. This recipe makes 48 cupcakes, a 4-layer 8″ cake or a 3 layer 9″ cake.
Ingredients
  • 1 1/2 cups (360 ml) milk at room temperature
  • 7 large (210 grams) egg whites (pasteurized are fine), at room temperature
  • 1 large egg, at room temperature
  • 1 1/2 tablespoons vanilla extract
  • 460 grams ( 3 1/4 cups) gluten free all purpose flour*
  • 2 teaspoons xantham gum**
  • 450 grams (2 1/4 cups) granulated sugar
  • 7 grams (1 teaspoon) salt
  • 1 1/2 sticks (170 grams) butter, at room temperature and cut into cubes
  • 85 grams (6 tablespoons) vegetable shortening
  • 1 cup gluten-free sprinkles (optional)
  • 1 Recipe Easy Chocolate Frosting (below)
Instructions
  1. Preheat oven to 350°F. Line 2 cupcake tins with papers (if you have 4, by all means line them all), grease the tops of the pans and set aside.
  2. In a small bowl, mix together 1/2 cup of the mil, the egg whites, egg and vanilla extract.
  3. In the bowl of a stand mixer fit with the paddle attachment, combine the dry ingredients including the sugar on low speed for 30 seconds.
  4. Add butter & shortening and mix on low speed for 30 seconds. Add the remaining milk and stir untill just moistened. Increase the speed to medium and mix for a minute and a half.
  5. Scrape down the sides of the bowl and add the egg/milk/extract mixture in 3 groups, scraping down the sides before each addition.
  6. Using a large ice cream scoop, divide the batter evenly among the cupcake papers, making sure that none of them are more than 2/3 full (or you could have a little bit of a mess).
  7. Bake 2 trays at a time for 20-25 minutes, until a toothpick inserted into the center comes out clean.
Notes

*I use Cup4Cup gluten free flour in my kitchen, and it is my favorite, but I have also had good experiences with the following: Jules Nearly Normal Flour, Better Batter All-Purpose flour or King Arthur Flour’s Gluten Free All Purpose Blend.

**If your blend has xantham gum or expandex in it, you can omit this.

3.1.09
Easy Chocolate Frosting

Recipe Type: Dessert
Cuisine: American
Author: Mary Fran Wiley
Prep time: 20 mins
Cook time: 10 mins
Total time: 30 mins
An easy chocolate frosting that you can adapt to be as firm or as soft as you like.
Ingredients
  • 340 grams (1 1/2 cups) powdered sugar
  • 150 grams (1 3/4 cups) cocoa (I used Hershey’s Special Dark Cocoa, the dark helps cut the sweetness a little bit)
  • 1 cup milk or cream
  • 225 grams (1 cup or 2 sticks) butter
  • 565 grams (2 1/2 cups) powdered sugar
  • 2 teaspoons vanilla extract
Instructions
  1. In a large bowl, whisk together the first amount of powdered sugar and the cocoa.
  2. Bring the cream to a simmer in a small saucepan. Stirring constantly so the milk does not scald. Whisk this into the powdered sugar mixture. Let cool to room temperature, about 20 mins.
  3. Beat soft butter, vanilla extract and salt until creamy. Add the 2½ cups of powdered sugar and mix slowly until incorporated. With mixer on low, add the chocolate mixture a spoonful at a time.
  4. If the frosting is too loose, add up to an additional half cup of powdered sugar.
  5. This makes enough to frost a layer cake or put a good amount on 48 cupcakes (see photo for how much I used per cupcake)
3.1.09
gluten free sweet potato tart

GF Ratio Rally: Tarts

This post is part of the Gluten-Free Ratio Rally, a group of gluten-free bloggers inspired and empowered by Ruhlman‘s Ratio and started by Shauna at Gluten-Free Girl. We get together each month and post many different takes on the same theme. This month that theme is Gluten-Free Tarts and the rally is being hosted by Charissa from Zest Bakery.

gluten free sweet potato tart

The inspiration for the recipe

Frankly, I want chocolate. I want chocolate dipped in chocolate with melted chocolate and caramel on top. I have been having a rough go of things over the past few weeks.

I’ve been swamped at work.

My plan to spice up my life has worked a little too well, and I feel a little thrown.

My leg started turning purple again – and the color being normal was the only real progress that had been made since this all started.

I went to the dentist. <- that right there is reason enough to live on chocolate for a month.

But, when you want to eat your feelings, it is best not to.

I still wanted something comforting.

And fall-y. (Yes, that is a word now).

Orange food means fall, right?

So, sweet potatoes.

And since it is starting to get chilly in the mornings and evenings, i thought some nice cheese would help warm me up.

There you have it, orange + cheese + pie crust = parmesan sweet potato tart.

gluten free ratio rally logo

The ratio

Is still pretty close to 3 parts flour, 2 parts fat and 1 part liquid. The fats and liquids are just redistributed a little bit.

There is an egg yolk for fat, but also to act as a binding agent and a little bit of the liquid.

Then there is the buttermilk, which (please don’t ever buy low fat buttermilk for baking unless it is specifically called for) adds fat & liquid to the mix. I learned this trick from Lena over at Cup4Cup – it makes a dang tasty pie crust. I think it beats my old vodka trick.

Pulse it all in a food processor. Let it rest for 30 minutes or so, this re-chills your ingredients and makes the dough easier to handle.

GF Ratio Rally: Tarts

Author: Mary Fran Wiley
Prep time: 40 mins
Cook time: 40 mins
Total time: 1 hour 20 mins
Serves: 8
This tart will fit into a 9″ round perfectly. If you want to use a rectangular tart like pictured, you will end up with a wee bit extra filling. Use the extra crust and filling to make a mini tart or two in a ramekin.
Ingredients
  • The crust
  • 113 grams (1 stick) cold unsalted butter
  • 210 grams (1 1/2 cups) all-purpose gluten-free flour (I prefer Cup4Cup)*
  • 1/2 teaspoon xantham gum**
  • 5 grams (1 teaspoon) granulated sugar
  • 1/2 teaspoon salt
  • 1 large egg yolk
  • 1/4 cup buttermilk***
  • The filling
  • 2-3 medium sweet potatoes, cut into 1/4 inch slices
  • 6 sprigs of thyme with the leaves pulled off and the branches discarded
  • 2 tablespoons of olive oil
  • generous sprinkling of coarse salt & fresh ground pepper
  • 1 1/4 cup heavy cream
  • 1 egg
  • 115 grams (about 1 1/4 cups) finely grated parmesan cheese
  • 1/4 cup roughly chopped fresh sage
Instructions
  1. Cut the butter into fourths and place in a food processor. Add the flour, sugar and salt. Pulse until you have a mixture that is the texture of wet sand.
  2. Add the egg yolk & butter milk. Pulse until just combined.
  3. Gather the dough up, press it into a disc about 4″ in diameter. Wrap it in plastic and place it in the refrigerator. You can do this up to 24 hours before you want to make the tart.
Make the filling
  1. Line a rimmed baking sheet with parchment paper & preheat the oven to 350 degrees Fahrenheit.
  2. Peel & slice the sweet potatoes into 1/4inch thick slices. (Slice them one at a time and guage how many you need – drop them into your tart pan and see how full it gets, when it is mostly full, you have enough just in case we have very different ideas about what a medium sweet potato is)
  3. Lay them out flat and drizzle with olive oil, and sprinkle with thyme, salt and pepper. It is important that you don’t skip seasoning the potatoes.
  4. Bake them for 15-20 minutes. You want them to just be softening.
  5. In a small bowl, lightly beat the egg and cream together.
Assemble the tart
  1. Raise the oven temperature to 375 degrees Fahrenheit, and place a clean baking sheet on the middle rack of the oven.
  2. Take the dough out of the freezer, and on a well floured surface, roll it out to be 2″ wider and longer than your tart pan.
  3. Gently lift the dough and pace it into the tart pan. Press the dough into the edges and fix any tears with extra dough.
  4. Line the bottom of the tart pan with sweet potato slices and top with 1/4 of the parmesan cheese and then 1/4 of the sage. Repeat 2-3 more times (until you run out of potatoes).
  5. Slowly and carefully pour the egg and cream mixture over the potatoes and cheese. Be patient, it has to seep all around your potatoes to fill in all the air pockets.
  6. Top with any remaining parmesan and sage.
  7. Place the tart pan on top of the hot baking sheet in the oven. Bake for 40-45mins. When the crust is lightly browned and the cheese is golden and bubbly, your tart is done.
  8. Let cool for 10 minutes before removing the tart from the pan to allow the filling to set up.
Notes

*Frankly, I think Cup4Cup works the best of any of the blends you can currently purchase. Jules Nearly Normal and Better Batter are suitable alternates if you can’t have dairy or can’t find the Cup4Cup in your area.
**If you use any of the commercial blends I mentioned, you won’t need this, but if your flour blend doesn’t contain any gums, expandex or other binding agent, you will need this
***If you don’t have buttermilk use the following: 3 tablespoons + 2 1/2 teaspoons heavy cream and 1/2 teaspoon vinegar. Combine and let sit for 5 minutes before starting

3.1.08

This post is linked to: Slightly Indulgent Tuesdays


Spice up your life! (A recipe for gluten-free spiced brownies)

It is really easy to get stuck in a routine.

Wake up. Get coffee. Get on the train. Read 30 pages in a novel. Walk a few blocks. Finish coffee. Get to the office. Pour another cup of coffee. Answer emails. Do design-y stuff. Walk a few blocks. Get on the train. Catch up on twitter. Go home. Eat dinner. Do blog-y stuff. Go to bed.

Lather, rinse, repeat.

Routine is comfortable, familiar. Known.

I have to say, I like my little routine. I read 9 novels this summer and I only read while on the train. Ok, I might have developed an unhealthy dependence on coffee. (Blame Mammacakes. I started sneaking sips of her coffee when I was 4 and she would leave a mug on the table). But the routine is mine.

But it is just that. A routine. Like a treadmill (the world’s most torturous piece of gym equipment).

Sometimes, you just have to do this:

(Yes. Really. A Spice Girls video.)

Maybe that means ordering a latte when you normally order a chai.

Maybe that means just going for it , whatever it happens to be. A new job. A date . A new cooking technique. Ordering something other than the usual.

A good friend told me that I need to just take a day and go for it. Do something I normally wouldn’t. Have fun just because I can. Shake things up to see where the pieces fall. Not a calculated risk. No weighing pros and cons. Just making things happen.

So, here’s to spicing things up.

Let’s start by spicing up some chocolate decadance.

gluten free mexican spiced brownies

At my super fabulous day job (yes, I am going to keep rubbing in how much I love it), we do fun things. Like brewing (gluten-free) beer and taco potlucks.

Last week, we had one of those potlucks. And I forgot to sign up. Because, really, would you expect me to bring anything other than dessert?

A concerned coworker asked if I was going to participate. Of course I was going to. I asked him what he wanted. His answer? Mexican Spiced Brownies.

It was the perfect excuse to make a new variation on one of my favorite treats (I even have my go-to gluten-free brownie recipe memorized) .

Fudgy bits of chocolate heaven, with a kick. They were such a hit at the potluck, all I got was that little corner of a brownie. I blame [my coworker] Shellie. (She swears that ice cream eaten with the brownies makes them even better).

gluten free mexican spice brownies being eaten

Gluten-Free Mexican Spiced Brownies
#ratingval# from #reviews# reviews
Print
Recipe Type: Dessert
Author: Mary Fran Wiley
Prep time: 15 mins
Cook time: 35 mins
Total time: 50 mins
Serves: 16
Oh baby. Decadent, fudgy brownies with a kick. Please and thank you.
Ingredients
  • 310 grams (11 ounces) dark chocolate, chopped
  • 230 grams (8 ounces/ 2 sticks) butter, chopped in 1 inch cubes
  • 1 tablespoon vanilla extract
  • 1 teaspoon salt
  • 10 grams (2 tablespoons) cocoa powder
  • 300 grams (1 1/2 cups) granulated sugar
  • 110 grams (1/2 cup) firmly packed brown sugar
  • 5 eggs
  • 150 grams (1 1/4 cups) gluten-free all-purpose flour like Cup4Cup*
  • 1/2 teaspoon chipotle
  • 1/2 teaspoon paprika (spicy if you have it)
  • 1 teaspoon cinnamon
  • 5 grams (1/2 teaspoon) fresh, finely grated ginger
Instructions
  1. Pre-heat the oven to 350 degrees Fahrenheit. Grease and line a 9×13 pan with parchment paper.
  2. In a medium pot over low heat, melt the butter and chocolate and salt.
  3. Once melted, remove the pot from the stove and stir in the vanilla, cocoa powder and sugars.
  4. In a sperate bowl, whisk together the gluten-free flour, cinnamon, ginger, chipotle and paprika.
  5. Add the eggs to the melted chocolate mixture in 2 groups, stirring to incorporate. As soon as the eggs are mixed in, add the flour in 2 groups.
  6. Be careful not to over-mix the batter. You want to incorporate as little air as possible into the batter or else you will end up with a brownie that is less chewy and more cake like.
  7. Pour the batter into the prepared pan and bake for 35-40 minutes. They are better a little under done than to be over cooked.
Notes

I use Cup4Cup flour or Jules’ Nearly Normal Flour when I use all-purpose flour. If you want to make your own bend for this recipe, use 10 grams ground flax meal, 40 grams sorghum flour, 20 grams brown rice flour, 20 grams white rice flour, 30 grams tapioca starch, 30 grams sweet white rice flour

2.2.8

This post is linked to: Slightly Indulgent Tuesday


gluten free chocolate chip cookie sandwiches

Birthdays deserve special treats

gluten free chocolate chip cookie sandwiches

Birthdays really do deserve special treats.

Not boring, normal things.

Not something that you make to cheer yourself up when you are feeling blue. (Don’t tell me you never baked to make yourself feel better).

Birthdays deserve a little extra something.

A chocolate chip cookie might be a classic, but it is not what birthdays are made of.

It was almost a challenge. I promised my friend Matt a treat for his birthday. But it couldn’t be a normal treat, he already has had gluten-free birthday cake doughnuts and a red velvet cake.

But, he asked for chocolate chip cookies.

I couldn’t just bake cookies. That is too simple. Too easy. Not a big enough challenge. Not enough opportunity to impress people with ma skillz. (No, that is not a typo. I am trying to be cool. How is it working?)

more cookie sandwiches

Cookie sandwiches on the other hand are a much more exciting treat. Almost like an ice cream sandwich that doesn’t melt. Brilliant for when you have to commute with these bad boys to the city.

These were quite the hit with Matt & his coworkers. (And the extras were a hit with mine). So next time you need to impress someone who asks for just a chocolate chip cookie, this could be your answer.

Birthdays deserve special treats
#ratingval# from #reviews# reviews
Print
Recipe Type: Dessert
Author: Mary Fran Wiley
Prep time: 60 mins
Cook time: 45 mins
Total time: 1 hour 45 mins
Serves: 24
What is better than chocolate chip cookies? Chocolate chip sandwich cookies. Like an ice cream sandwich that doesn’t melt. It is brilliant. They do take a couple hours from start to finish, but you can make the frosting while the cookies bake – as long as you let the cookies cool completely before piping on the frosting.
Ingredients
  • 1 recipe [url href=”http://frannycakes.com/recipes/gluten-free-chocolate-chip-cookies-a-classic-treat/”]Gluten-Free Chocolate Chip Cookies[/url] using tablespoon sized scoops
  • 4 large egg whites (30g each–total 120g, or 1/2 cup)*
  • 200 grams (1 cups) granulated sugar
  • 280 grams (2.5 sticks) of unsalted butter, softened but cool, cut into cubes
  • 15 ml (1 tablespoon) pure vanilla extract
  • 1/4 tsp salt
  • 150 grams (about 3/4 cups of discs) high quality chocolate
  • 1 1/2 teaspoon vanilla bean paste
Instructions
  1. Bake the cookies, using tablespoon sized drops of cookie dough.
  2. While the cupcakes are baking, make the frosting. If this process intimidates you, Sweet Apolita made a pretty sweet tutorial.
  3. Combine the egg whites and sugar in a small pot until they reach 140 degrees fahrenheit.
  4. Transfer to a clean stand mixer bowl. Using the whisk attachment, beat until light and fluffy (soft peaks).
  5. Switch to the paddle attachment and add the butter one chunk at a time until it is all combined.
  6. Remove half of the frosting and set aside. Melt the chocolate in the micorwave on half power, heating it first for 30 seconds, and then in 15 second intervals after that, always stirring after each burst of heat. Let the chocolate cool a wee bit – you don’t want it hot so that it melts the butter, and then add it to half your frosting.
  7. Set this frosting aside. Add the vanilla bean paste to the reserved half of the frosting.
  8. When the cookies are completely cool, pipe frosting onto half of the cookies, topping with a similarly shaped partner cookie.
2.2.8


gluten free chocolate chip cookies

Gluten-free chocolate chip cookies, a classic treat

gluten free chocolate chip cookiesLittle black dresses. Peep-toe pumps. Red lipstick. Cucumber sandwiches. Sunday Roasts. French vanilla anything. Chocolate chip cookies.

I am a fan of classic things.

I have a go-to red lipstick. A perfect pair of pumps. Almost all of my dresses are little black dresses. I know how to swing dance and salsa. I can waltz and cha cha. (I cannot for the life of me do the Cha Cha slide.) I still wear Chanel No. 5 whenever I put on a suit.

When I need cheering up? Breakfast at Tiffany’s. Some Celine Dion. (Ok, fine, and maybe some 90’s pop)

Classics endure.

Like brownies, Sunday roasts and chocolate chip cookies. All things that are always a good choice.

Yes, there happen to be 2 other recipes for gluten-free chocolate chip cookies on frannycakes (one a birthday cake cookie with chocolate chips, the other a toffee chocolate-chip cookie), but neither of them is just a classic chocolate chip cookie.

Gluten-free chocolate chip cookies, a classic treat
#ratingval# from #reviews# reviews
Print
Recipe Type: Cookie
Author: Mary Fran Wiley
Prep time: 20 mins
Cook time: 15 mins
Total time: 35 mins
Serves: 36
Ingredients
  • 350 (2 1/2 cups) grams gluten-free all purpose flour*
  • 1 teaspoon xantham gum**
  • 1 teaspoon baking soda
  • 1/4 teaspoon salt
  • 215 grams (1 cup, firmly packed) dark brown sugar
  • 50 grams (1/4 cup) granulated sugar
  • 225 grams (2 sticks or 1 cup) cold butter, cut into cubes
  • 2 large eggs
  • 1 tablespoon vanilla extract
  • 350 grams (2 cups) semi-sweet chocolate chips
Instructions
  1. Prepare cookie sheets with parchment paper, but do not grease them.
  2. In a medium bowl whisk together the gluten-free flour, xantham gum if using, baking soda, and salt.
  3. In the bowl of a stand mixer, blend the sugars at medium speed.
  4. Add the cold butter and mix to form a grainy paste, scraping down the sides of the bowl. You are not looking for light and fluffy, you just want to mix until they are evenly combined.
  5. Add eggs and vanilla extract and mix at medium speed just until blended. Scrape down the sides of the bowl and do not over mix.
  6. Add the flour mix in 2 parts with the mixer at a low speed just until mixed. Then stir in the chocolate chips until just combined
  7. Drop by rounded tablespoons onto prepared cookie sheet, two inches apart.
  8. Place the cookie sheet in the freezer while the oven preheats.
  9. Preheat oven to 375° F. (Or 300° F. for a flatter, more spread out cookie).
  10. Bake 12-15 (20-22 for the cooler temperature) minutes until golden. Transfer cookies immediately to a wire rack to cool.
Notes

*This recipe works best with Cup4Cup flour from Williams-Sonoma. It will work with other blends that are not bean-based and do not have leaveners already added. Better Batter or Jules Nearly Normal Flour will work well here. You could also use your favorite home made blend.
**Xantham gum is only necessary if your blend does not include a binding agent such as xantham gum, guar gum or expandex.

2.2.8


peanut butter gluten free blondies

“This is the marry me juice” (and a recipe for gluten-free pb&j blondies)

peanut butter gluten free blondiesI burst into a fit of giggles every time I hear this phrase.

Uncontrollable, side-splitting giggles.

That is a quote from a recipe called Engagement Chicken. Apparently it is a thing that girls make when they want to catch themselves a fine young gentleman. I happen to think it is funny. Like a chicken has magic properties. (On the other hand, these cupcakes do have amazing man-catching powers). That phrase has become something of an inside joke with a couple of my friends.

And it is kind of related to today’s post.

Kind of.

Today’s post isn’t about man bait. It is about great pairs.

Sonny & Cher. Sherlock Holmes & Dr. Watson. Lucy & Desi. Root beer & Vanilla Ice Cream. Nutella & bananas. Tom & Jerry. Bert & Ernie. Kermit & Miss Piggy. Peanut Butter & Jelly. Andy & Emily.

You haven’t heard of Andy & Emily? That’s ok. They aren’t exactly famous.

Andy is my cousin and one of my best friends (also, he is the one who gave me the nickname of FrannyCakes). Emily is my brand-new cousin-in-law. (And if it isn’t really a thing, I don’t care).

They got hitched Labor Day Weekend, and it was quite the celebration.

There were silly photos in a photo booth. Dancing. Silliness. Oh, and some mushy true love stuff transpired.

An excellent start for their life together.

A perfect pair for that list.

Welcome to the family, Emily! You and Andy make a great pair.

Just like peanut butter & grape jelly (does any one else have fond memories of Goober peanut butter? I might have mentioned before that I have the palate of a four year old…). These are slightly addictive.

Gluten-Free Peanut Butter & Jelly Blondies
#ratingval# from #reviews# reviews
Print
Recipe Type: Dessert
Author: Mary Fran Wiley
Prep time: 10 mins
Cook time: 30 mins
Total time: 40 mins
Serves: 24
A classic bar cookie paired with one of food’s greatest pairs: peanut butter & grape jelly.
Ingredients
  • 280 grams (2 cups) gluten-free all-purpose flour*
  • 1/2 teaspoon xantham gum(omit if using a flour blend that includes this)
  • 1 teaspoon baking powder
  • 1/2 teaspoon salt
  • 175 grams (1 1/2 sticks) butter, melted
  • 215 grams (1 cup, packed) dark brown sugar
  • 100 grams (1/2 cup) granulated sugar
  • 3 eggs
  • 1 tablespoon vanilla extract
  • 150 grams (generous 1/2 cup) smooth peanut butter**
  • 100 grams (1/2 cup) grape jelly***
Instructions
  1. Position a rack in the center of the oven and preheat the oven to 325 degrees F.
  2. Grease a 9×13-inch pan or heatproof glass dish and then line the pan with parchment paper, leaving about an inch of overhang on the long sides.
  3. In a medium mixing bowl, whisk together the flour, xantham gum (if using), salt and baking powder. Set aside.
  4. In a seperate, large mixing bowl, stir together the melted butter, brown sugar, granulated sugar, eggs and vanilla. For a denser blondie stir until just combined. For a lighter, cake-ier blondie, lightly beat the eggs before adding them to the sugars and butter.
  5. Stir in the flour mixture into the buter mixture. Spread the batter evenly in the prepared pan with the back of a spoon or a rubber spatula. (You might want to grease the spatula if you are having problems spreading the batter)
  6. Slightly melt the peanut butter and jelly in separate dishes in the microwave, and spoon them out all over the top of the batter.
  7. Swirl the batter with a spatula or butter knife, but be careful not to go all the way to the bottom of the pan, or the blondies might fall apart.
  8. Bake for 30 minutes, or until a wooden skewer inserted near the center comes out clean.
  9. Set the pan on a wire rack to cool for 15 minutes.
  10. Grasp the edges of the parchment and carefully lift the blondies out of the pan. Cut into bars.
Notes

*I usually use Cup4Cup brand all-purpose flour, but you could use most commercially available flour blends or a home-made AP blend.
**You could use SunButter to make these nut-free.
***Grape jelly is my favorite, but strawberry jelly would work just fine too.

2.2.8

This post is linked to Slightly Indulgent Tuesdays.


Ratio Rally: Angel Food Cake

This post is part of the Gluten-Free Ratio Rally, a group of gluten-free bloggers inspired and empowered by Ruhlman‘s Ratio and started by Shauna at Gluten-Free Girl. We get together each month and post many different takes on the same theme. This month that theme is Gluten-Free Angel Food Cake and the rally is being hosted by Caleigh from Gluten Free[k].

Today is about finding and celebrating joy.

Because it is here. In every day. Even when it hurts to put on real pants. And some days, I need to remind myself of it.

Joy is seeing art exhibits and taking tours in French of the Art Institute with my aunt.

finding joy in the little things

Joy is my cat telling me it is time to go to bed by sitting on my chest so I can no longer see the computer screen. And then refusing to move until i go to sleep.

Joy is how I feel when I step of the train in the Loop and the promise of a good day is hanging in the air.

Joy is a hug sent via email from a friend on the opposite side of the world. And a phone call from that same friend at exactly the wrong time because someone can’t do math.

This is what I am focusing on today.

And sometimes, all you need is a little cake to bring it to you.

The ratio

3 parts egg whites: 3 parts sugar: 1 part flour (the lighter the better).

Not going to lie, I love angel food cake. And there is a recipe that we have used often in our house – one that is gluten free just because it is. The one from the back of the Swan’s Down Potato Starch. It is quite lovely, and it means, dear readers, that this is a fairly flexible cake. Add cocoa or ground chocolate in place of some of the flour for a chocolate cake. Use potato starch or arrowroot because that is what you happen to have. You will still end up with a magical, light cake.

Well, as long as you resist the urge to brush the warm cake with the earl grey syrup. Because I did not. And I melted my cake. And I know better. At least it still tastes good.

The flavors

Rainier cherries pan roasted with cointreau. Earl grey syrup. Orange extract in the cake. I would say, dear friends, that this is one sophisticated cake. The cointreau and the orange extract in the cake help pull the bergamot flavors to the forefront in the tea syrup. The tea itself gives a complex background for the oh-so-sweet cherries.

I whole heartedly suggest that you try the cake with all of these components. Sure, the cake on its own with fresh berries and home made whipped cream would be a perfectly simple dessert. But this my friends, is a rockstar dessert.

This is not your mom’s tired angel food cake.

This is not the Styrofoam textured cake that you can buy at the grocery store (yes, the filled with gluten kind).

This is a melt-in-your-mouth cake. A curl your toes with delight cake. This is the cake you want to make when you are trying to impress someone with your mad skills but can’t pipe frosting for the life of you. Or if you think you aren’t an accomplished baker.

[toggle title_open=”The others!” title_closed=”See the other posts from this month’s rally” hide=”yes” border=”yes” style=”default” excerpt_length=”0″ read_more_text=”Read More” read_less_text=”Read Less” include_excerpt_html=”no”]The others

Adina | Gluten Free Travelette made Cacao Spice Angel Food Cake
Angela | Angela’s Kitchen made Grilled Lemon Angel Food Cake with Lemon Curd and Berries
Aunt Mae | Honey From Flinty Rocks made  Angel Food Cake with Lemon Glaze
Caleigh | Gluten Free[k] made Almond Angel Food Stars
Caneel | Mama Me Gluten Free made Angel Food Cake “Pudding” with Fresh Cherry Sauce
Charissa | Zest Bakery Saffron Angel Food Cake (and didn’t post a link!)
gretchen | kumquat made caramel macchiato angel food cake
Heather | Discovering the Extraordinary Coconut Lime Angel Food Cake Roll
Jonathan | The Canary Files made Lavender Angel Food Cupcakes
Pete & Kelli | No Gluten, No Problem made Caramel Peach Angel Food Cake
TR | No One Likes Crumbley Cookies made Peach Angel Food Cake

[/toggle]
Gluten Free Angel Food Cake with Early Grey & Cherries
#ratingval# from #reviews# reviews
Print
Recipe Type: Dessert
Author: Mary Fran Wiley
Prep time: 20 mins
Cook time: 50 mins
Total time: 1 hour 10 mins
Serves: 12
Make just the cake, or make it with all the components. Either way you will have an excellent cake.
Ingredients
  • Syrup
  • 1 cup boiling water
  • 3 earl grey tea bags
  • 200 grams (1 cup) sugar
  • Cake
  • 350 grams (1 3/4 cup) granulated sugar, divided
  • 175 grams (1 1/4 cup) gluten-free all purpose flour*
  • 350 grams (12) egg whites
  • 1 teaspoon cream of tartar
  • 1 tablespoon lemon juice
  • 1/4 teaspoon salt
  • 1 teaspoon vanilla
  • 1 teaspoon orange extract
  • Cherry topping
  • 450 grams (1 pound) Rainier or other sweet red cherry, pitted and halved
  • 1/4 cup cointreau
  • 1 tablespoon turbinado sugar (or regular sugar if that is all you have)
  • 1/4 teaspoon salt
Instructions
Make the tea
  1. Steep the tea in the boiling water and let sit while you make the batter.
Make the batter
  1. Preheat oven to 350 degrees fahrenheit. Whisk together the flour and half the sugar, set aside.
  2. In the bowl of a stand mixer, whip the egg whites until foamy, about a minute.
  3. Add the the remaining sugar, cream of tartar, lemon juice, salt, vanilla and orange extract to the egg whites.
  4. Increase the speed to medium-high, and beat until soft peaks form.
  5. Now is the time that requires a little patience, fold in the flour/sugar combo 1/3 at a time. You want to make sure that you do not deflate the mixture too much.
  6. Pour batter into a 9 or 10″ tube pan and bake for 30-50 mins. You want a tester inserted into the middle of the cake to come out clean.
Make the syrup
  1. Remove the teabags from the tea. In a small saucepan over medium heat, bring the strong tea and sugar to a boil. Let boil for 5 minutes (you want to end up with about a cup of syrup.
Make the cherries
  1. While the cake is baking, and the syrup is cooking (you do not need to stir it), combine cherries, half the cointreau, the sugar and the salt in a large skillet.
  2. Cook over medium heat until the cherries start to soften. Pour in the remaining cointreau to deglaze the pan and keep cooking until the sauce thickens back up. Stop cooking before the cherries turn to mush.
Assemble
  1. Let the cake cool in the pan on a wire rack for an hour and a half. Resist the urge to brush it with the syrup until it is cool.
  2. When cool, poke some holes in the bottom of the cake and brush with the syrup.
  3. Remove cake from pan, poke the top with holes and brush with syrup again.
  4. Top with cherries and serve. Amaze your friends.
Notes

*If you want to use potato starch or arrowroot, please go by weight and not by volume. You will end up with a little more volume wise.
**If you just want a plain cake, skip the orange extract and replace it with vanilla.

2.2.8


gluten free crackers

Ratio Rally: Gluten-Free Crackers

This post is part of the Gluten-Free Ratio Rally, a group of gluten-free bloggers inspired and empowered by Ruhlman‘s Ratio. We get together each month and post many different takes on the same theme. This month that theme is Gluten-Free Crackers and the rally is being hosted by Rachel from The Crispy Cook.

This is a post about crackers. Which happen to be another something I don’t care too much for the commercially available options, and I always thought that baking them was incredibly labor intensive.

Read more